SharePoint Discovery Service
SharePoint crawler ingests and downloads all the files from SharePoint and uploads it to the system.
SharePoint crawl types:
- Full Crawl: During a full crawl, the search engine crawls, processes, and indexes every item in the content source, regardless of the previous crawl status.
- Incremental Crawl: It enables the Crawler to crawl only the items which have been newly created or modified since the last crawl. Modification includes:
- Content updates
- Metadata updates
- Permission updates
- Deletes etc.
- Incremental crawl takes much less time as the unchanged items are not processed.
- Continuous Crawl: Continuous crawl is a dynamic way of crawling SharePoint and Office 365 content. When it is enabled on a content source, the Crawler checks the SharePoint change logs regularly (every 15 min, by default) and looks for recent changes. If there’s any item on the changelog, the crawler takes immediate action on it and sends to the Content Processor, though continuous crawl is not real-time however, it checks the SharePoint change logs in a regular manner. Also, continuous crawl doesn’t fix any errors therefore, we still need incremental crawl run on the content source (every 4 hours, by default) even if we use continuous crawl.
Best Practices for crawling in SharePoint server:
- Use the default content access account to crawl most content: Content access account is the account that the SharePoint Server Search Service uses by default for crawling. It must be a domain account with a password that is current in Active Directory Domain Services (AD DS). If the password of this domain account expires, the Search service is not able to use the account to crawl content.
- Use content sources effectively: A content source is a set of options in a Search service application that you use to specify each of the following components:
- One or more start addresses to crawl.
- The type of content in the start addresses (such as SharePoint Server sites, file shares, or line-of-business data). You can specify only one type of content to crawl in a content source. For example, you would use one content source to crawl SharePoint Server sites, and a different content source to crawl file shares.
- A crawl schedule and a crawl priority for full or incremental crawls that will apply to all of the content repositories that the content source specifies.
- When you create a Search service application, the search system
automatically creates and configures one content source, which is
called Local SharePoint sites. This preconfigured content
source is for crawling user profiles, and for crawling all
SharePoint Server sites in the web applications with which the
Search service application is associated. One can edit the
preconfigured content source Local SharePoint sites to specify a
crawl schedule as it does not specify a crawl schedule by default.
One can schedule incremental crawl or enable continuous crawls to
make sure that the content is crawled regularly.
- Crawl user profiles before you crawl SharePoint server sites: By default, in the first search service application, the preconfigured content source Local SharePoint sites contains at least the following two start addresses:
- https://webAppUrl, which is for crawling the default zone URL specified for the existing Web Application(s)
- sps3s://myWebAppUrl, which is for crawling user profiles.
- In order to crawl user profiles and then crawl SharePoint
Server sites:
- Verify that the user account that performs this procedure is an administrator for the Search service application that you want to configure.
- Create a content source that is only for crawling user profiles (the profile store). You might give that content source a name such as People. In the new content source, in the Start Addresses section, type sps3s:// myWebAppUrl, where myWebAppUrl is the URL of the My Site host.
- Start a crawl for the People content source that you created.
- Delete the start address sps3s://myWebAppUrl from the preconfigured content source Local SharePoint sites.
- Wait about two hours after the crawl for the People content source finishes.
- Start the first full crawl for the content source Local SharePoint sites.
- Use continuous crawls to ensure that search results are fresh: Enable continuous crawls is a crawl schedule option that you can select when you add or edit a content source of type SharePoint Sites. A continuous crawl crawls content that was added, changed, or deleted since the last crawl. A continuous crawl starts at predefined time intervals. The default interval is every 15 minutes, but you can set continuous crawls to occur at shorter intervals by using Microsoft PowerShell. Because continuous crawls occur so often, they help ensure search-index freshness, even for SharePoint Server content that is frequently updated. Also, while an incremental or full crawl is delayed by multiple crawl attempts that are returning an error for a particular item, a continuous crawl can be crawling other content and contributing to index freshness, because a continuous crawl doesn't process or retry items that repeatedly return errors.
- Limitation of Continuous Crawl: Continuous crawls increase the load on the crawler and on crawl targets. Make sure that you plan and scale out accordingly for this increased consumption of resources. For each large content source for which you enable continuous crawls, it is recommended that you configure one or more front-end web servers as dedicated targets for crawling.
- Use crawl rules to exclude irrelevant content from being crawled: One can create crawl rules to limit the content that you want to crawl.
- These measures can help reduce the use of server resources and network traffic and can increase the relevance of search results. One can review the query and crawl logs and adjust content sources and crawl rules to include more content if it is necessary and exclude the unnecessary ones.
- Crawl the default zone of SharePoint Server web applications: When you crawl the default zone of a SharePoint Server web application, the query processor automatically maps and returns search-result URLs so that they are relative to the alternate access mapping (AAM) zone from which queries are performed. This setting makes it possible for users to readily view and open search results.
- Reduce the effect of crawling on SharePoint server crawl targets: We can reduce by following below points:
- For a small SharePoint Server environment, redirect all crawl traffic to a single SharePoint Server front-end web server. For a large environment, redirect all crawl traffic to a specific group of front-end web servers. This pattern of crawl redirection prevents the crawler from using the same resources that are being used to render and serve web pages and content to active users.
- Limit search database usage in Microsoft SQL Server to prevent the crawler from using shared SQL Server disk and processor resources during a crawl.
- Use Active Directory groups instead of individual users for permissions: Various activities of users on a site are determined by the permission level that user or group has. If one adds or remove users individually for site permissions, or if one uses a SharePoint Server group to specify site permissions and if anyone changes the membership of the group, the crawler must perform a "security-only crawl", which updates all affected items in the search index to reflect the change.
- Similarly, adding or updating web application policy with different users or SharePoint Server groups will trigger a crawl of all content covered by that policy. This increases crawl load and can reduce search-results freshness. Therefore, to specify site permissions, it is best to use Active Directory Domain Services (AD DS) groups, because these groups does not require the crawler to update the affected items in the search index.
- Add a second crawl component to provide fault tolerance: When you create a Search service application, the default search topology includes one crawl component. A crawl component retrieves items from content repositories, downloads the items to the server that hosts the crawl component, passes the items and associated metadata to a content processing component, and adds crawl-related information to associated crawl databases. One can add a second crawl component to provide fault tolerance. If one crawl component becomes unavailable, the remaining crawl component will take over all of the crawling.
- Manage environment resources to improve crawl performance: Crawl Performance can be improved by following factors:
- Provide more CPU and RAM and faster disk I/O if there is slow response time from crawled servers.
- Install 1 or 2 one-gigabit-per-second network adapters on each crawl server in case of low network bandwidth.
- Provide more content processing components, and more CPU resources for each content processing component.
- Add I/O resources for servers that host index components.
- Make sure no crawls are active before you change the search topology: To confirm that no crawls are in progress, make sure value of status field for each content source is either idle or paused. If necessary, one can manually pause or stop full or incremental crawls and can disable continuous crawls for the time being.
To connect and ingest SharePoint documents, take the following steps:
- Select the SharePoint from KMS Data Source as shown in the following figure:
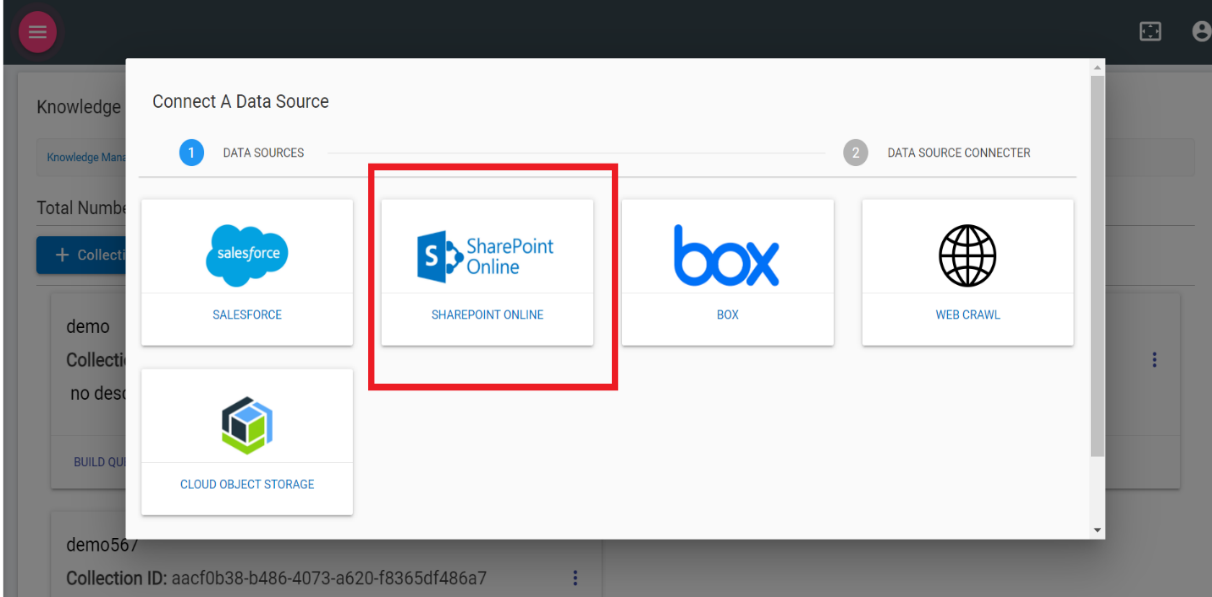
- The following screen appears:
Figure 2. Figure 201 – Share Point Data Source 
- To use the service, the user must have SharePoint Username, Password, and URL.
- Once the credentials are validated, click Connect. Click Back to go back to the previous screen.
- This forms the connection of crawler with SharePoint. It reads all the documents from the data source and uploads it to the system.
- Once the process is complete, it allows users to perform queries as per the need on KMS using Natural Language or Standard Query Language.