Create a new SOP
To create a new SOP, follow the steps below:
- Click Add SOP button on the SOP Management Console landing page.
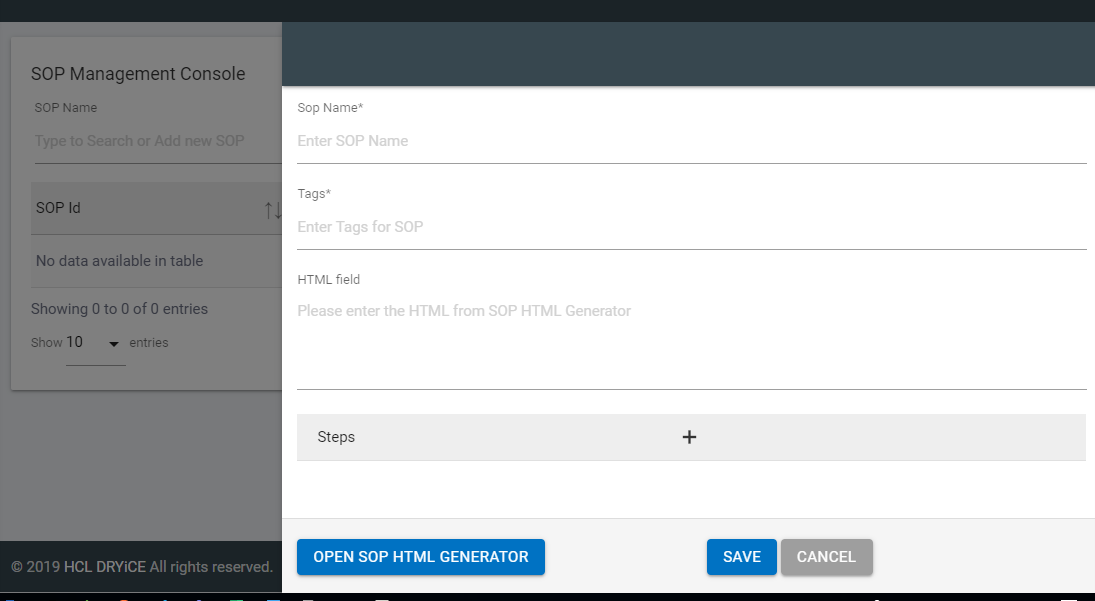
- It opens the SOP Management dialog box with the following items:
- SOP Name - User is advised to give unique and functional SOP Names for better management. Ensure that they are meaningful and consistent.
- Brevity
- Use Keywords
- Avoid Spaces and use underscore (_) to delineate words
- Tags - Add meaningful tags for the SOP, based on the content or the question that the user will ask to retrieve the SOP. Such as, if your SOP is related to an Outlook configurability issue you will use tags such as Outlook <version>, English (referring to the Language of the SOP document) etc.
- HTML Field - Use this field to store the HTML content from the SOP HTML Generator. It helps you design the SOP HTML content in an intuitive and user-friendly manner.
All mentioned fields are mandatory while creating a new SOP.
- Click on Open SOP HTML Generator. This is used to generate HTML snippets to be filled in the HTML Field. Generating HTML snippets becomes easy with SOP HTML Generator as it requires no prior knowledge of HTML syntax.
-
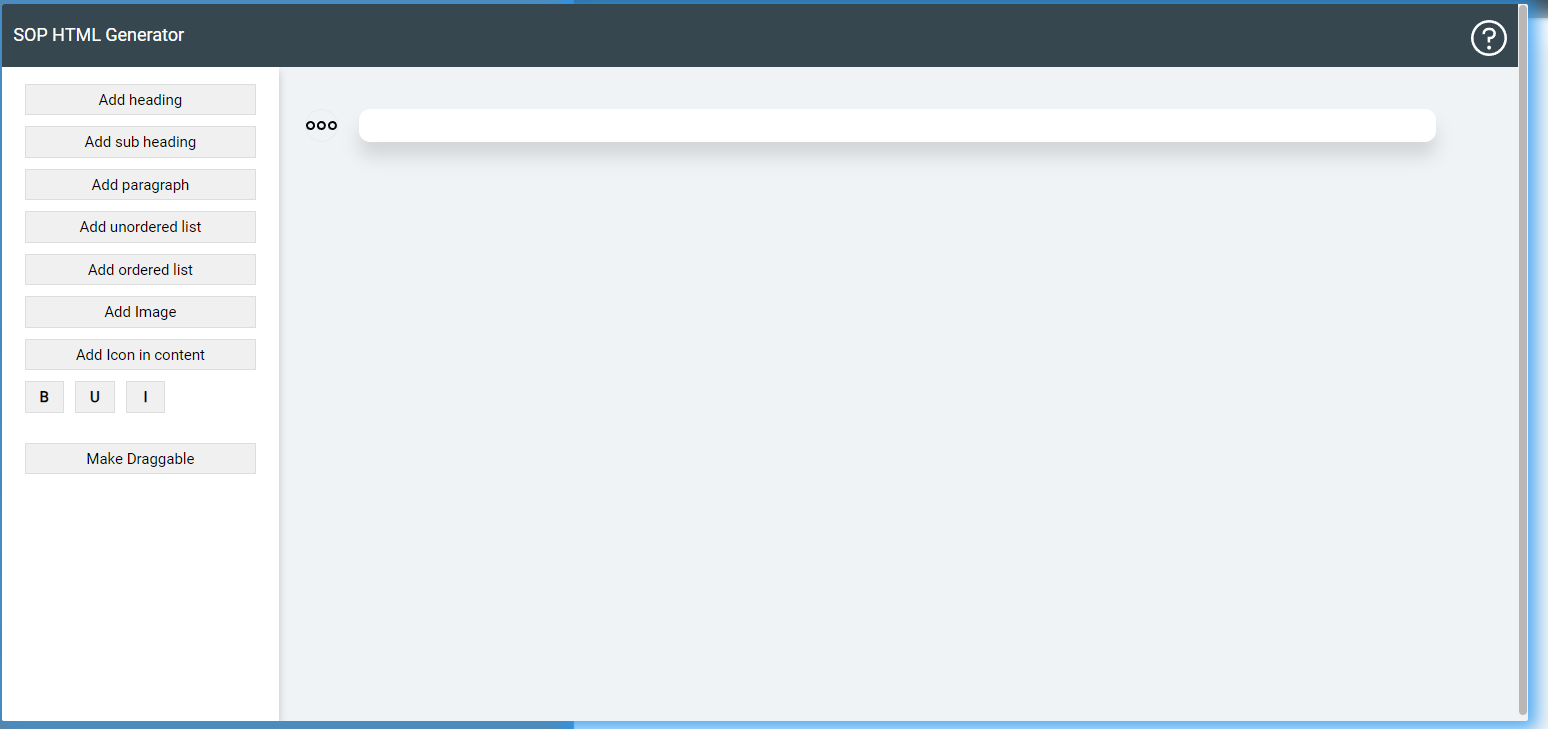
Figure 66 - SOP HTML Generator Window
- A SOP HTML Generator window has the following views:
- Left Navigation Bar - It has all the attributes required to generate HTML for a SOP document.
- Preview Window - This is a graphical user interface to add & edit content for the HTML Attributes.
- Top Navigation - Click the Info Icon (?) on top right of the BigFix AEX SOP Editor window for viewing more information on the attributes listed in the Left Navigation Bar.
.png)
Figure 67 - BigFix AEX SOP HTML Generator
- Attributes of BigFix AEX SOP HTML Generator (On the Left Navigation bar):
- Add Heading - Use this attribute to add Headline of your SOP. The content displayed using this attribute has the biggest font size as shown in Figure 67 - BigFix AEX SOP HTML Generator.
- Add sub-heading - Use this attribute as sub-headlines or as a header of your paragraph.
- Add Paragraph - Add the details of the procedure.
- Add unordered list - To create a collection of related items that have no special order or sequence.
- Add ordered list - Use this attribute to create steps in a procedure where order needs to be emphasized.
- Add image - Use this attribute to add images to your SOP .
- To add an image after a sentence, click the Add Image button.
- Enter the URL of the image (Please ensure that UI Management console is used to upload the images before we enter the URL of the image here). While entering the URL of the image, user is advised to follow the below nomenclature:
- The URL path structure should be: /assets/images/sop/xyz. Here, “xyz” refers to the name of the image along with the file extension. The image format supported are JPEG and PNG.
- Add Alternate Text for an image: This is the text which is shown in the SOP ,in case the URL of the image mentioned earlier breaks or is unable to load.
.png)
Figure 68 - BigFix AEX SOP HTML Generator: Add Image
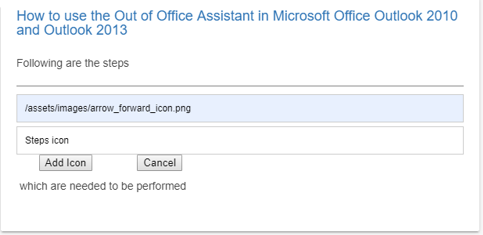
- Add Icon in content- Use this attribute to add icons in your SOP. Enter the URL of the icon (Please ensure that UI Management console is used to upload the icon before we enter the URL of the icon here).
- While entering the URL of the icon, user is advised to follow the below nomenclature:
- The URL path structure should be: /assets/images/sop/xyz. Here “xyz” refers to the name of the icon. The icon formats supported are JPEG and PNG.
- Add Alternate Text : This is the text which will be shown in your document in case the URL of the image mentioned earlier breaks or is unable to load.
.png)
Figure 69 - BigFix AEX SOP HTML Generator – Add Icon in content
- Format – Use following attributes to format and highlight the text.
-
 - Bold
 -
 - Underline
 -
 - Italicise
- Make Draggable - Use this attribute to enable content to be reordered in the preview pane.
- Copy HTML – Click on “Copy HTML” to copy the SOP HTML created. Click anywhere outside the SOP editor window to exit the editor.
- Paste the HTML copied (Command + V) from the SOP HTML Generator in the HTML field.
- After the content is copied in HTML field. We need to create Steps for the same. This is mandatory if the interaction channel with BigFix AEX is other than Web for example Teams, Facebook, IVR, etc. These platforms require the HTML to be in a format and steps are then mapped to the placeholders in these messaging platforms.
- In case you fail to Create Steps, BigFix AEX will perform a best effort stripping of HTML tags (Example of HTML tags include <br>, <b>).
SOP can be represented as HTML on the previous step. But it is recommended to add steps for future support and to provide better viewing capability on non-HTML based channels like Teams, Skype, Slack, IVR, etc.
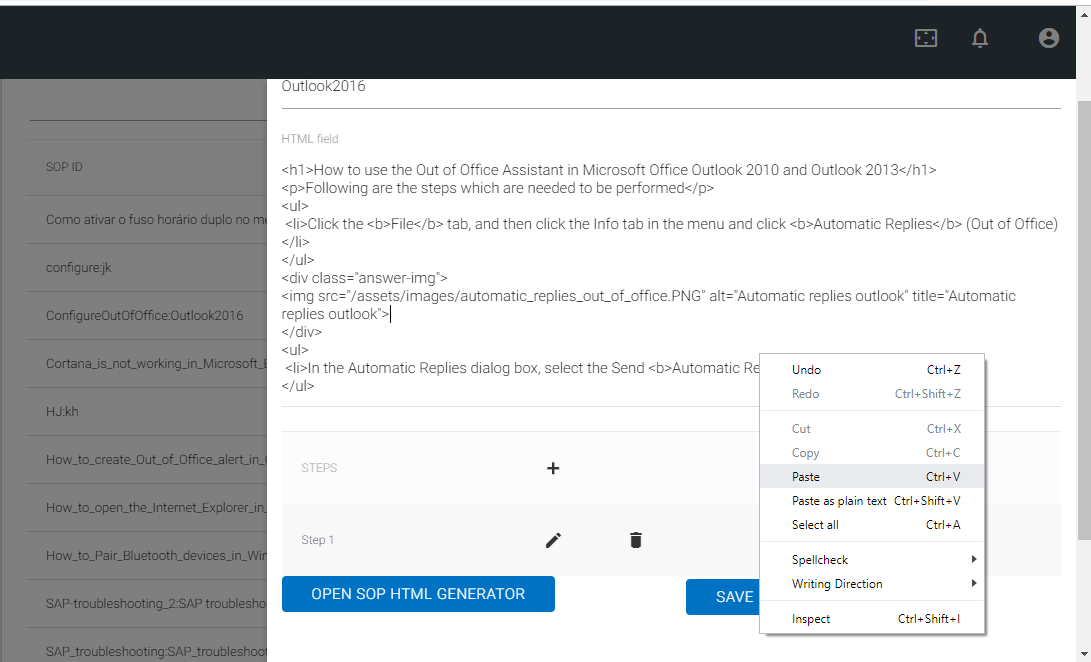
- Follow the steps below to Create Steps:
- Click
 icon next to the Step. It
opens the Adding Steps dialog box.
icon next to the Step. It
opens the Adding Steps dialog box.
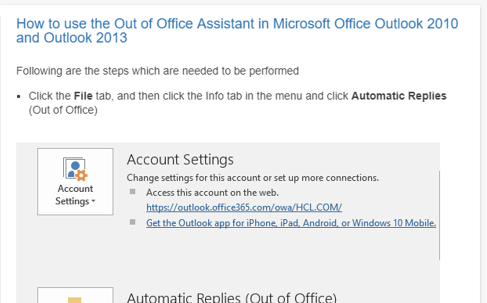
- Let us understand this through a scenario.
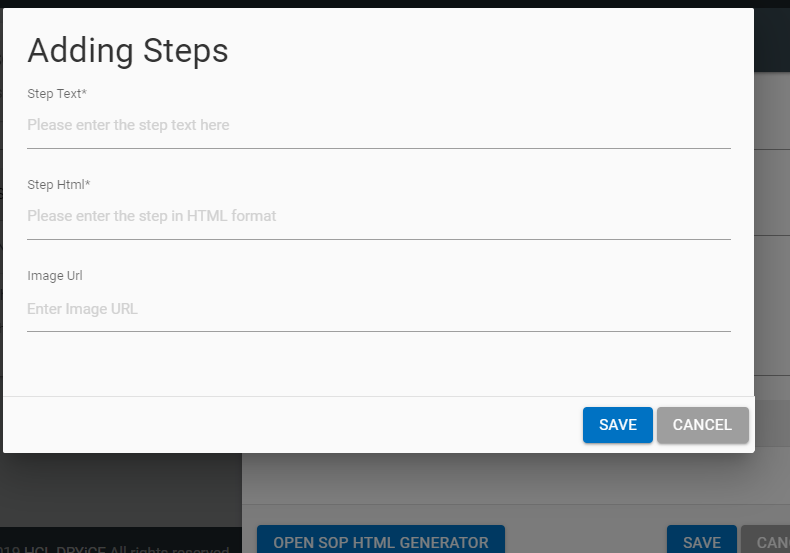
- Scenario – If the HTML Step to be added in the SOP is “ <li> Click the <b>File</b> tab, and then click the Info tab in the menu and click <b>Automatic Replies</b> (Out of Office)</li>”. Refer to Figure 71 - Step Dialog Box: Adding Steps .
- As per this scenario, user will fill the below details in the dialog box to create a step for SOP in HTML.
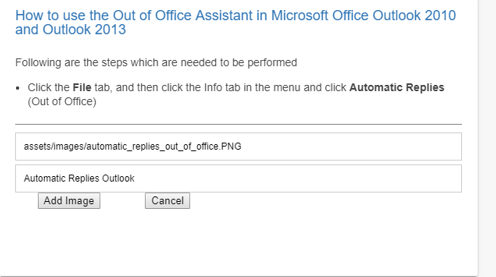
- Step Text – Click the File tab, then click the Info tab in the menu, and then click the Automatic Replies (Out of Office) (Notice that the HTML tags are removed).
- Step HTML - <li>Click the <b>File</b> tab, then click the Info tab in the menu, and then click <b>Automatic Replies</b> (Out of Office)</li> ( Notice that here user enters the HTML Snippet for the Step).
- Image URL - Enter the URL of the images as generated in the UI Management Console (In case an image exists in the respective Step of the SOP otherwise leave blank).
While an SOP can have multiple images, a step within an SOP can only have one image.
- Click the Save button and it adds a step in the SOP. Repeat the steps to create the additional steps in the SOP.
- Steps created can be viewed in a list as shown in Figure 72 - List View: Steps Added.
Figure 4. Figure 72 - List View: Steps Added 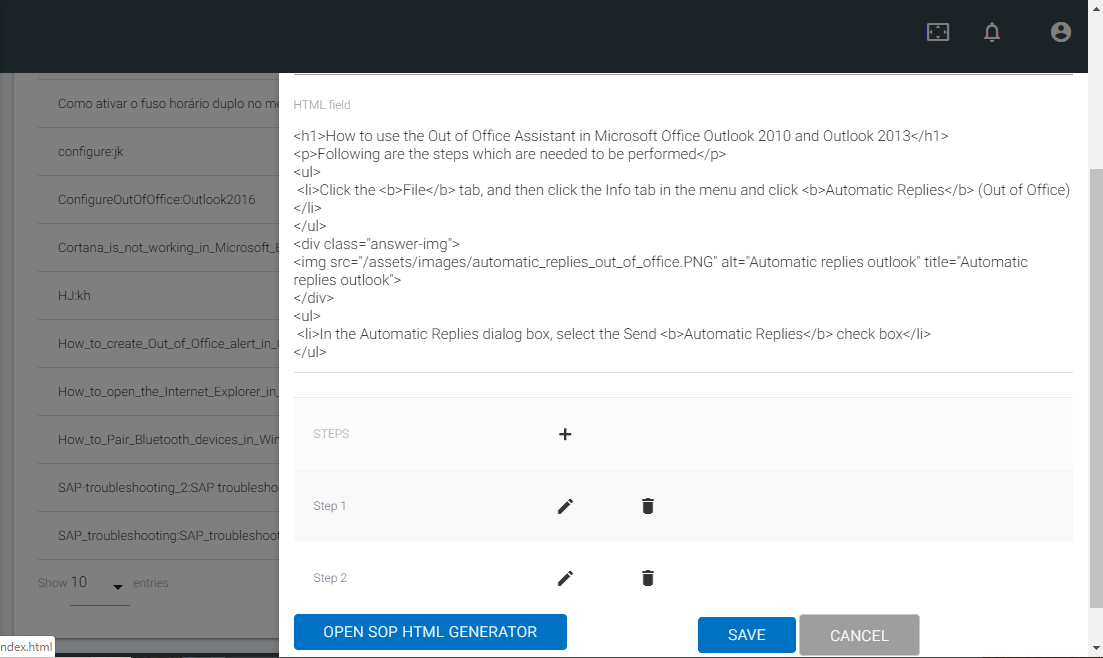
- Once all the steps are added, the new SOP is added with a unique SOP ID.
The SOP ID is a unique combination of the name and tag assigned to a SOP.
This brings us to the end of BigFix AEX’s SOP Management Console. User will now be able to create/ view/ edit the SOP documents in BigFix AEX. Once an SOP is configured using this console, the SOP will be fetched/rendered for a use case based on the tag defined in the SOP document. It is this tag which is mentioned inside a rule in the Rule Engine. (More details on how to configure a Rule to render a SOP is covered in BigFix AEX Developer Guide).