MongoDB
MongoDB is a NoSQL database used for storing documents' meta-data information in BigFix Runbook AI. It is available in both Community and Enterprise versions, and can be installed and configured in High Availability (HA) or non-High Availability (non-HA) mode. The installation steps include downloading the appropriate installer package, configuring authentication and authorization, enabling SSL authentication, and testing the connection.
| Version | 4.0 |
| Purpose | It is a NoSQL database and used for storing documents’ content. |
| Source |
This is available as part of BigFix Runbook AI installer package. For Community Version: Follow the below path: Pre-Requisite Software mongodb-win32-x86_64-2008plus-ssl-4.0.25-signed.msi. For Enterprise Version: Follow the below path: Pre-Requisite Software mongodb-win32-x86_64-enterprise-windows-64-4.0.25-signed.msi. |
MongoDB is an open-source NoSQL document database. MongoDB stores information in the form of documents. It is used in BigFix Runbook AI to store meta-data information of Knowledge articles, SOPs etc. and various NLP models used in iKnowledge module.
This document describes steps for installation and configuration of MongoDB version 4.0 for Community and Enterprise edition in High Availability (HA) and non-High Availability (non-HA) mode.
Before proceeding with the installation, a user should already have identified various configurational parameters mentioned below:
- Encryption Required: At Rest or In-Transit
- High Availability: Required / Not Required
- Version: Enterprise or Community
If encryption is required, proceed with MongoDB Enterprise version.
MongoDB Installation Procedure without HA mode
Community Version:
This section describes the procedure for installation of MongoDB with authentication and authorization configured for Community Edition.
Important note:
- Please ensure the ports that are to be used for MongoDB service is open for communication with the help of a windows administrator.
- During the installation procedure, whenever the MongoDB service is restarted, open the new command prompt to run further commands.
Installation steps
- Download the file mongodb-win32-x86_64-2008plus-ssl-4.0.25-signed.mse from the Path mentioned in the source field of Table 15 – MongoDB Requirements for Community Version.
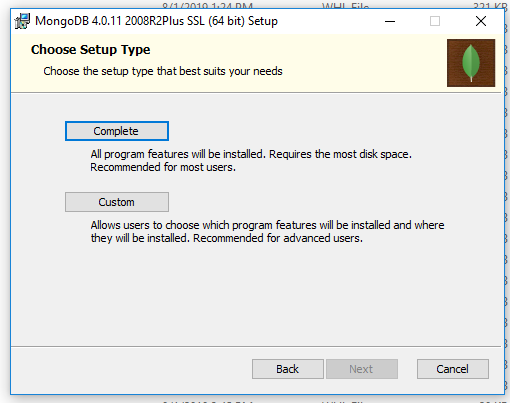
- Double-click on mongodb-win32-x86_64-2008plus-ssl-4.0.25-signed.mse file and select installation option as Complete and click Next.
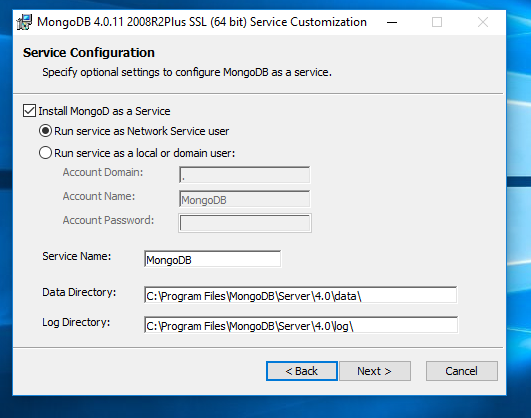
- The option Install MongoDB as service would be checked by default.
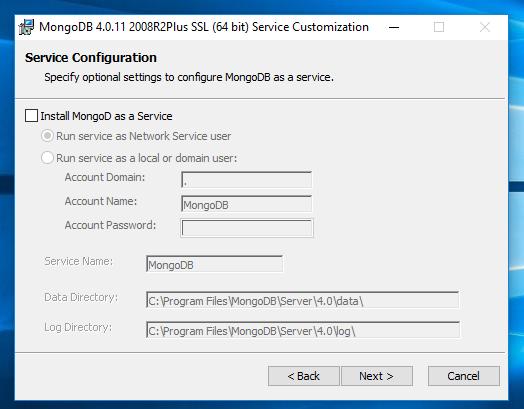
- Uncheck Install MongoDB as Service and click Next.
- Wait till the MongoDB installation is complete.
Add MongoDB to the Path:
To add MongoDB to the PATH, please perform the below steps:
- Go to the location where MongoDB was installed. For e.g., C:\Program Files\MongoDB .
- Inside MongoDB, go to folder\Server\4.0\bin .
- Go to Control Panel System and SecuritySystem.
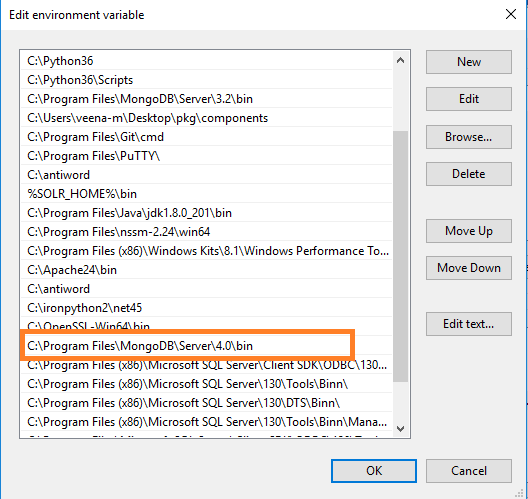
- Select Advanced System Settings and click Environment Variables.
- This will open a new dialog box.
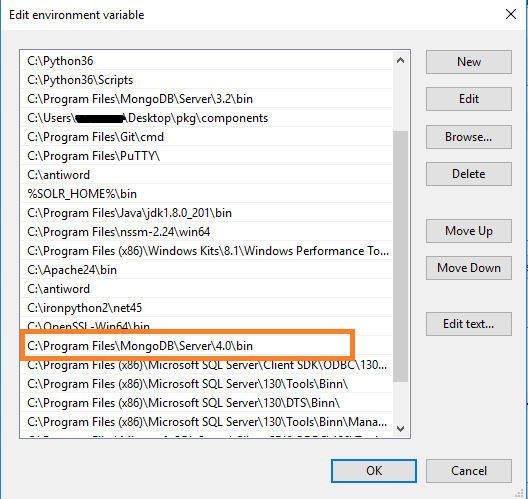
- Select the variable path in System Variables and add path of MongoDB. For e.g. - C:\Program Files\MongoDB\Server\4.0\bin .
Creation of Directory Structure:
- Create a folder named mongo. It should not be in the same location where MongoDB is installed.
- Inside the folder mongo, create a folder named data and then create three folders named as config, database and log as shown in Figure 32.
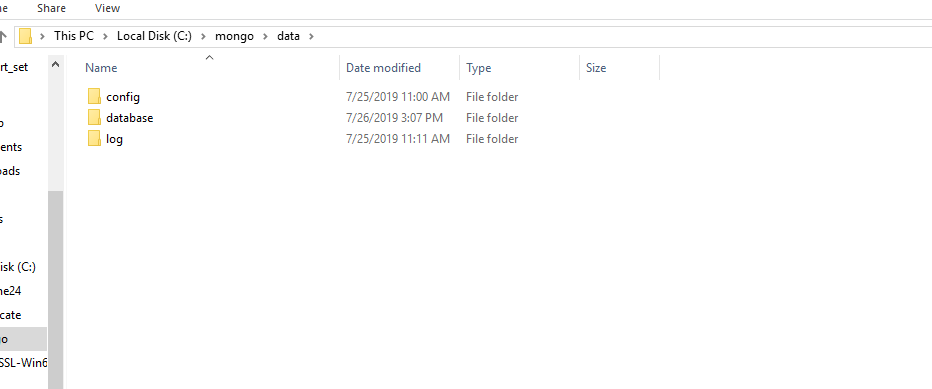
Creation of MongoDB Service
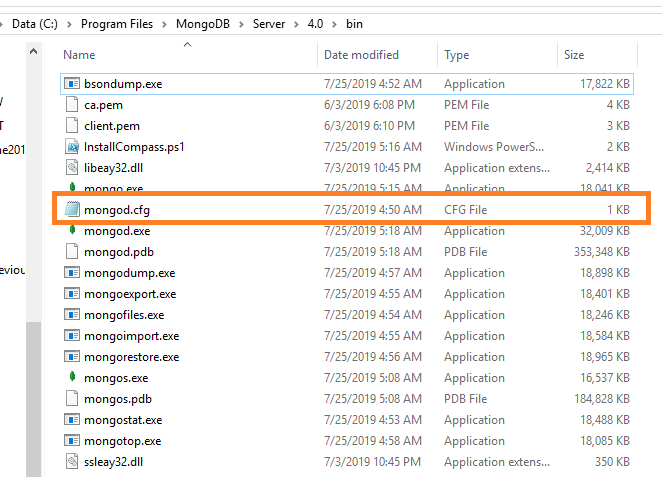
- Go to the location where MongoDB is installed. Refer to the Path set in the PATH environment variable. For e.g., C:\Program Files\MongoDB .
- Go to bin folder. for e.g., C:\Program Files\MongoDB\Server\4.0\bin.
- Locate the file named mongod.cfg and copy the file.
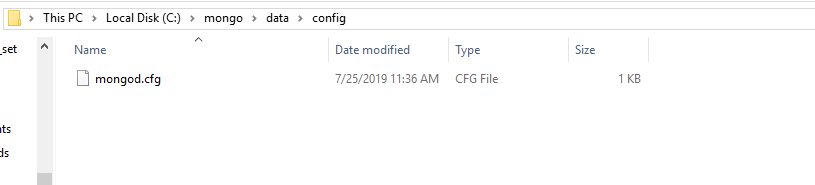
- Go to the mongo folder that was custom created earlier. Inside the directory data, go to the config folder. Paste the mongod.cfg file here.
- Open the file mongod.cfg (preferably in Notepad++ or Sublime) and follow the below steps:
While editing the file, maintaining indentation in the file is very important.
- In the storage header, change the following
field:
- dbPath: Add path till mongo\data\database.
- In the systemLog, change the following field:
- Path: Add path of mongo\data\log\mongod.log.
Folder mongo\data\log doesn’t have Mongod.log. This will be created automatically when mongoDB service is created.
- In the net, change the following fields:
- Port: Enter the port for the installation of MongoDB.
- bindIpAll: true.
Figure 8. Figure 34 - Creation of MongoDB service (Cont.) 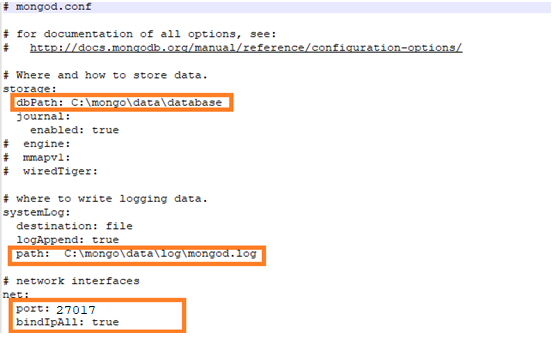
- Save the changes made in the file mongod.cfg.
- Open the Command Prompt
as Administrator and run the following command:
Please make sure to provide correct path for config.
mongod –config “<path of the mongoDB folder you created\mongo\data\config\mongod.cfg>" --install --serviceName "MongoDB"
For e.g. mongod --config "C:\mongo\data\config\mongod.cfg" --install --serviceName "MongoDB"
- MongoDB service with the name MongoDB will be created.
Start MongoDB Service
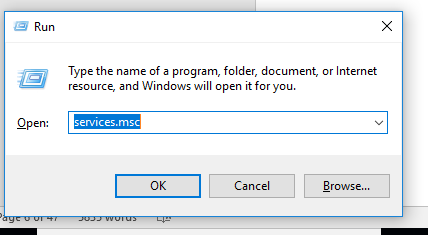
- Press Windows+R, and type services.msc and press Enter.
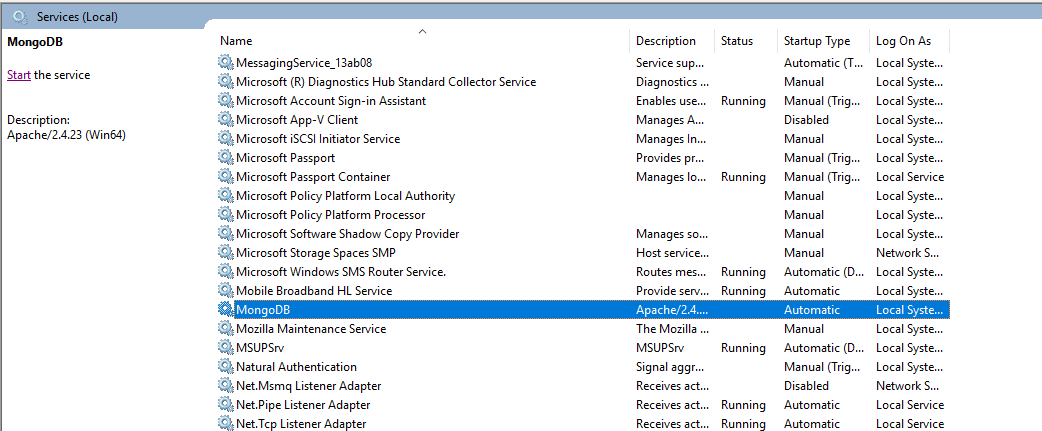
- Search for MongoDB service, then click on MongoDB service and click Start the service on the Left pane.
- Go to the server that has MongoDB service installed. Open the Command Prompt as Administrator and execute the below commands by changing the respective IP and port of server.
mongo --host <IP> --port <port on which mongoDB service is running(mentioned in config file)>
for e.g. - mongo --host 10.1.1xx.x1 --port 27017
- If the service is running successfully, the connection will be established without any error message.
Enable Authentication
To enable the authentication, perform the following steps:
- Go to the server where MongoDB service has been installed. Open the Command Prompt as Administrator and execute the below command.
mongo --host x.x.xx.x1 --port 27017
- Execute the below command.
MongoDB> use admin
- Make the following changes in the values before execution:
user:<user-name >
pwd :<password>
(choose any password for the corresponding user for MongoDB authentication.)
MongoDB>> db.createUser(
{
user: "admin",
pwd: "comnet123",
roles: [ { role: "userAdminAnyDatabase", db: "admin" }, { role: "root", db: "admin" }, "readWriteAnyDatabase" ]
}
)
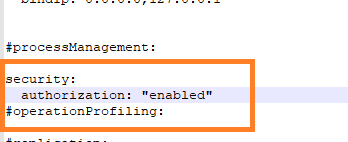
- Make the following changes in mongod.cfg. Refer the screenshot below:
- Restart the MongoDB service in the server.
- Re-open the Command Prompt as Administrator and open the MongoDB terminal using the following command:
mongo --host <IP> --port <Port> -u <username> -p <password> --authenticationDatabase "admin"
For e.g. - mongo --host x.x.xx.x --port 27017 -u admin -p comnet123 --authenticationDatabase "admin"
- Connection with MongoDB should be successfully established.
Test the Connection
To test the connection, perform the following steps:
Python 3.6 should be present. You should also have the BigFix Runbook AI installer package as it contains some resources to be used in subsequent steps.
- Open the Command Prompt as Administrator and execute the following command to install pymongo:
pip install pymongo
- Copy the file named “mongo_connection_community_Non-HA.py” present in the installer package under iAutomateInstaller Resources Resources.zip folder to any folder.
- Open the file in Notepad and change the value of Server IP and Port
where MongoDB service is running.
import ssl
from pymongo import MongoClient
client = MongoClient('<IP of the server>:<Port>',
username='<Username>',
password='<Password>',
ssl=False)
db = client['DRYiCE_db']
db_collection = db['DRYiCE_Collection']
db_collection.insert({"name":"xyz"})
print("Connection to Mongo Database successful")
- Open the Command Prompt as Administrator mode. Change the current working
directory to the folder that has code using the following command:
cd <folder path>
- Execute the code by using the following command.
python <file_name.py>
- If file executes without any error, then connection is successful.
Enterprise Version
This section describes the procedure for installation of MongoDB with authentication and authorization configured for Enterprise Edition.
- Please ensure the ports that are to be used for MongoDB service is open for communication with the help of windows administrator.
- During the installation procedure whenever the MongoDB service is restarted, open the new command prompt window to run the further commands.
Installation steps:
- Download the file mongodb-win32-x86_64-enterprise-windows-64-4.0.25-signed.mse from the Path mentioned in the source field of Table 15 – MongoDB Requirements for Enterprise Version.
- Double-click on mongodb-win32-x86_64-enterprise-windows-64-4.0.25-signed.mse file and select installation option as Complete and click Next.
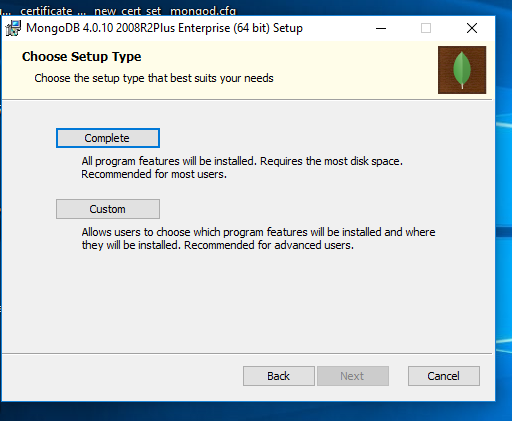
Please ensure to note the location of the installation directory of MongoDB.
- The option Install MongoDB as service would be checked by default.
- Uncheck Install MongoDB as service and click Next.
- Wait till the MongoDB installation is complete.
Add MongoDB to the Path
To add MongoDB to the PATH, please perform the below steps:
- Go to the location where MongoDB was installed. For e.g., C:\Program Files\MongoDB .
- Inside MongoDB, go to folder\Server\4.0\bin .
- Go to Control PanelSystem and SecuritySecurity.
- Select Advanced System Settings, click Environment Variables. This will open up a new dialog box.
- Select the Variable Path in System Variables and add path of MongoDB. For e.g. - C:\Program Files\MongoDB\Server\4.0\bin .
.png)
Creation of Directory Structure
- Create a folder named mongo. It should not be in the same location where MongoDB is installed.
- Inside the folder mongo, create a folder named data.
- Inside the folder data, create three folders named as config, database, and log.
.png)
Creation of MongoDB Service
- Go to the location where MongoDB is installed. Refer to the Path set in the PATH environment variable. For e.g., C:\Program Files\MongoDB .
- Go to bin folder. for e.g., C:\Program Files\MongoDB\Server\4.0\bin .
- Locate the file named mongod.cfg and copy the file.
.png)
- Go to the mongo folder that was created earlier. Inside the directory data, go to the config folder and paste the mongod.cfg file here.
.png)
- Open the file mongod.cfg (preferably in Notepad++ or Sublime) and follow the below steps:
While editing the file, maintaining indentation in the file is very important.
- In the storage header, change the following
fields:
- DBPATH: Add path till mongo\data\database
- In the systemLog, change the following fields:
- PATH: Add path of mongo\data\log\mongod.log
Folder mongo\data\log doesn’t have Mongod.log. This will be created automatically when mongo service is created.
- In the net, change the following fields:
- port: Enter the port you want to install MongoDB
- bindIpAll: true
.png)
- Save the changes made in the file mongod.cfg.
- Open the Command Prompt as Administrator and run the following command.
Please ensure to enter correct path of config).
mongod –config “<path of the mongoDB folder you created\mongo\data\config\mongod.cfg>" --install --serviceName "MongoDB"
For e.g. mongod --config "C:\mongo\data\config\mongod.cfg" --install --serviceName "MongoDB"
- MongoDB service with the name MongoDB will be created.
Start MongoDB Service
- Press Windows+R, type services.msc and press Enter.
.png)
- Search for MongoDB service.
- Click MongoDB service and click Start the service on the Left pane.
.png)
- Go to the server that has MongoDB service installed.
- Open the Command Prompt as Administrator and execute the below command by changing respective IP and port of server.
mongo --host <IP> --port <port on which mongoDB service is running(mentioned in config file)>
for e.g. - mongo --host 10.1.1xx.x1 --port 27017
- If the service is running successfully, then connection will be established. If not, then follow the above steps again.
Enable Authentication
To enable the authentication, perform the following steps:
- Go to the server where MongoDB service has been installed.
- Open the Command Prompt as Administrator and execute the below command:
mongo --host x.x.xx.x1 --port 27017
- Execute the below command:
MongoDB Enterprise> use admin
- Make the following changes in the values before execution:
user:<user-name >
pwd :<password>
(choose any password for the corresponding user for MongoDB authentication.)
MongoDB Enterprise> db.createUser(
{
user: "admin",
pwd: "comnet123",
roles: [ { role: "userAdminAnyDatabase", db: "admin" }, { role: "root", db: "admin" }, "readWriteAnyDatabase" ]
}
)
- Make the following changes in mongod.cfg and refer to the screenshot below.
.png)
- Restart the MongoDB service in the server.
- Re-open the Command Prompt as Administrator and open the MongoDB terminal using the following command:
mongo --host <IP> --port <Port> -u <username> -p <password> --authenticationDatabase "admin"
For e.g. - mongo --host x.x.xx.x --port 27017 -u admin -p comnet123 --authenticationDatabase "admin"
- Connection with MongoDB should be successfully established.
Enable SSL Authentication
To enable SSL authentication, perform the following steps:
Please ensure that only one ca.pem should be generated. From the same ca.pem, server.pem for each server should be generated. From the same ca.pem, client.pem should be generated.
- Generate the ca.pem, server.pem and client.pem by referring to the Generate ca.pem and server.pem and Generate client.pem.
- After the ca.pem, client.pem and server.pem are generated, copy these files and paste them in the following path:
<MongoDB_installed_path>/MongoDB/Server/4.0/bin
For e.g. - C:\Program Files\MongoDB\Server\4.0\bin
- Go to folder mongo/data/config, open the file mongod.cfg and make the following changes:
Please preserve the space and indentations as shown below. Ensure that editing is done in notepad++.
- In the net header, enter the following values:
ssl:
mode: allowSSL
PEMKeyFile: C:\Program Files\MongoDB\Server\4.0\bin\server.pem
CAFile: C:\Program Files\MongoDB\Server\4.0\bin\ca.pem
Figure 23. Figure 49 - MongoDB Installation – Enable SSL Authentication (non-HA) 
- Save the file for changes to be reflected.
- Open the Command Prompt as Administrator on the server and execute the below command:
mongo --ssl --host <IP> --port <port> -u <username> -p <password> --authenticationDatabase "admin" --sslCAFile "<path of ca.pem>" --sslPEMKeyFile "<path of client.pem>"
for e.g. –
mongo --ssl --host x.x.x.x1 --port 27017 -u admin -p comnet123 --authenticationDatabase "admin" --sslCAFile "C:\Program Files\MongoDB\Server\4.0\bin\ca.pem" --sslPEMKeyFile "C:\Program Files\MongoDB\Server\4.0\bin\client.pem"
- This will establish the connection with MongoDB.
- Execute the below commands:
MongoDB Enterprise>db.adminCommand( { setParameter: 1, sslMode: "preferSSL" } )
MongoDB Enterprise> db.adminCommand( { setParameter: 1, sslMode: "requireSSL" } )
- Restart the MongoDB service on the server.
Test the Connection
To test the connection, perform the following steps:
Python 3.6 should be present. You should also have the BigFix Runbook AI installer package as it contains some resources to be used in subsequent steps.
- Open the Command Prompt as Administrator and execute the following command:
pip install pymongo
- Copy the file named “mongo_connection_enterprise_Non-HA.py”, present in the installer package under iAutomateInstaller Resources Resources.zip folder to any folder.
- Open the file in Notepad and change the value of IP, port, username, password, path of pem files where MongoDB service is running.
import ssl
from pymongo import MongoClient
client = MongoClient('<IP of the server>:<Port>',
username='<Username>',
password='<Password>',
ssl=True,
ssl_certfile="<path of client.pem file>",
ssl_ca_certs="<path of ca.pem file>",
ssl_cert_reqs=ssl.CERT_REQUIRED)
db = client['DRYiCE_db']
db_collection = db['DRYiCE_Collection']
db_collection.insert({"name":"xyz"})
print("Connection to Mongo Database successful")
- Open the Command Prompt as Administrator. Change the current working directory to the folder that has code using the following command:
cd <folder path>
- Execute the code by using the following command:
python <file_name.py>
- If the file executes without any error, the connection is successful.
MongoDB Installation Procedure – with HA mode
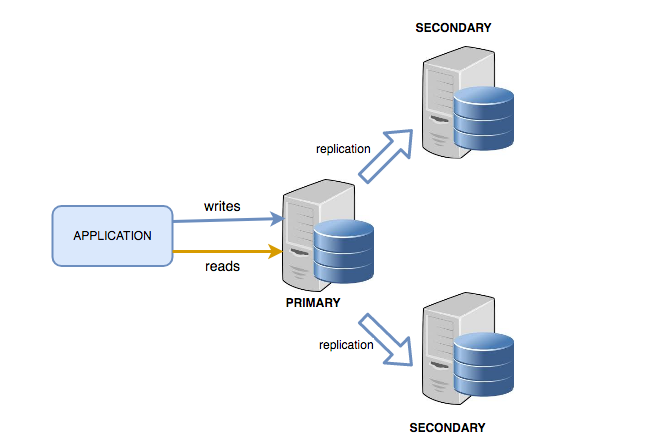
High Availability in MongoDB is enabled using concept of replica set where at least three MongoDB instances are used to configure clusters. For BigFix Runbook AI, we will have three MongoDB instances where one instance will be Primary and rest of them will be Secondary. HA in MongoDB works as per below guidelines.
- If primary node is down, then one of secondary node will be promoted to become primary node.
- If secondary is down, then system will work as it is.
Replication amongst nodes is handled by MongoDB itself.
Replication provides redundancy and increases . With multiple copies of data on different database servers, replication provides a level of fault tolerance against the loss of a single database server.
For MongoDB in HA, at least three servers are required. If more than three servers are to be configured, ensure that they are odd in number. Please make sure the ports that are going to be used for MongoDB are open for communication.
Community Version:
This section describes the procedure for installation of MongoDB with authentication and authorization configured for Community Edition in HA mode.
Important note:
- Please ensure the ports that are to be used for MongoDB service is open for communication with the help of Windows administrator.
- During the installation procedure whenever the MongoDB service is restarted, open the new command prompt to run the further commands.
Installation steps:
- Download the file mongodb-win32-x86_64-2008plus-ssl-4.0.25-signed.mse from the Path mentioned in the source field of for Community Version.
- Double-click on mongodb-win32-x86_64-2008plus-ssl-4.0.25-signed.mse file, then select installation option as Complete and click Next.
.png)
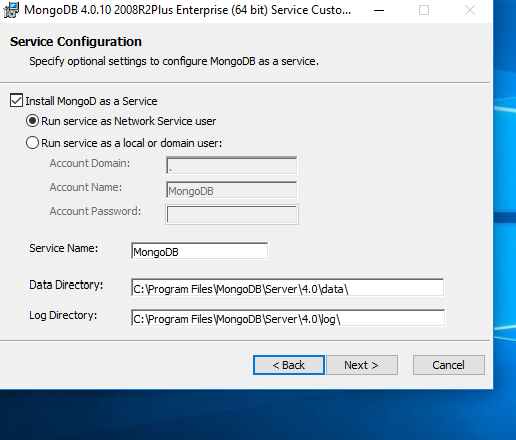
- The option Install MongoDB as service would be checked by default.
.png)
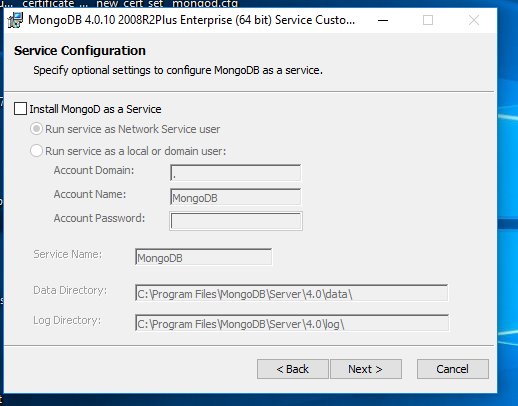
- Uncheck Install MongoDB as service and click Next.
.png)
- Wait till the MongoDB installation is complete.
Add MongoDB to the Path:
To add MongoDB to the PATH, please perform the below steps:
- Go to location where MongoDB was installed. For e.g., C:\Program Files\MongoDB .
- Inside MongoDB, go to folder\Server\4.0\bin .
- Go to Control Panel System and Security Security.
- Select Advanced System Settings and click Environment Variables. This will open up a new dialog box.
- Select the variable Path in System Variables and add path of MongoDB. For e.g. - C:\Program Files\MongoDB\Server\4.0\bin .
.png)
Creation of Directory Structure:
- Create a folder named mongo. It should not be in the same location where MongoDB is installed.
- Inside the folder mongo, create a folder named data.
- Inside the folder data, create three folders named as config, database, and log.
.png)
Creation of MongoDB Service
- Go to the location where MongoDB is installed. Refer to the Path set in the PATH environment variable. For e.g., C:\Program Files\MongoDB .
- Go to bin folder. for e.g., C:\Program Files\MongoDB\Server\4.0\bin .
- Locate the file named mongod.cfg and copy the file.
.png)
- Go to the mongo folder that was created earlier. Inside the directory data, go to the config folder and paste the mongod.cfg file here.
.png)
- Open the file mongod.cfg (preferably in Notepad++ or Sublime) and follow the below steps:
While editing the file, maintaining indentation is very important.
- In the storage header, change the following fields:
- dbPath: Add path till mongo\data\database
- In the systemLog, change the following fields:
- path: Add path of mongo\data\log\mongod.log
Folder mongo\data\log doesn’t have Mongod.log. This will be created automatically when mongo service is created.
- In the net, change the following fields:
- port: Enter the port you want to install MongoDB
- bindIpAll: true
Please do not user Port Number 27017 as it’s the default port.
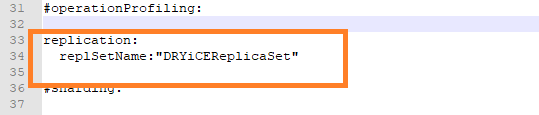
- In the replication, change the following fields:
- replSetName: Enter the name of replica set
.png)
- Save the changes made in the file mongod.cfg.
- Open Command Prompt as Administrator and run the following command.
Please ensure to enter the correct path of config file.
mongod –config “<path of the mongoDB folder you created\mongo\data\config\mongod.cfg>" --install --serviceName "MongoDB"
For e.g. mongod --config "C:\mongo\data\config\mongod.cfg" --install --serviceName "MongoDB"
- MongoDB service with the name MongoDB will be created.
Start MongoDB Service
- Press Windows+R, then type services.msc and press Enter.
.png)
- Search for the MongoDB service and click MongoDB service.
- Click Start the service on the Left pane.
.png)
These steps must be performed on all the servers which are part of the replica set.
- Go to all the servers that have MongoDB service installed.
- Open Command Prompt as Administrator and execute the below command by changing respective IP and port of server.
mongo --host <IP> --port <port on which mongoDB service is running (mentioned in config file)>
for e.g.
server 1: mongo --host x.x.xx.x1 --port 27017
server 2: mongo --host x.x.x.x2 --port 27017
server 3: mongo --host x.x.x.x3 --port 27017
- If the service is running successfully, then connection will be established without any error message.
Configure Replica Set
Once the MongoDB service is up and running, perform the below steps to configure the replica set for MongoDB.
- Go to one of the servers that is a part of the replica set.
- Open the Command Prompt as Administrator and execute the below command to open the terminal.
mongo --host <IP> --port <in which MongoDB service is running. The one written in config >
for e.g. - mongo --host x.x.xx.x1 --port 27017
- In the same terminal, execute the below commands:
MongoDB > rs.initiate( {
_id : "DRYiCEReplicaSet",
members: [
{ _id: 0, host: "<IP>:<PORT>" },
{ _id: 1, host: "<IP>:<PORT>" },
{ _id: 2, host: "<IP>:<PORT>" }
]
})
- Here, add the hosts that are part of the replica set and mention the respective host IP and port on which MongoDB service is running. Ensure that the ports are open for communication.
MongoDB > rs.initiate( {
_id : "DRYiCEReplicaSet",
members: [
{ _id: 0, host: "10.1.1xx.x1:27017" },
{ _id: 1, host: "10.1.1xx.x21:27017" },
{ _id: 2, host: "10.1.1xx.x3:27017" }
]
})
- Enter the below command to identify the Primary and Secondary server:
MongoDB >rs.status()
- Execute the below command on the Secondary servers:
MongoDB >rs.slaveOk()
Enable Authentication
Authentication needs to be enabled only on the Primary server. All the secondary replica server will automatically be updated with the same.
To enable the authentication, perform the following steps:
- Go to the Primary server in the replica set.
- Open the Command Prompt as Administrator and execute the below command:
mongo --host x.x.xx.x1 --port 27017
- Execute the below command:
MongoDB replicaTest:PRIMARY>use admin
- Execute the below command. Make the following changes in the values before execution:
user:<user-name >
pwd :<password>
(choose any password for the corresponding user for MongoDB authentication.)
MongoDB replicaTest:PRIMARY> db.createUser(
{
user: "admin",
pwd: "comnet123",
roles: [ { role: "userAdminAnyDatabase", db: "admin" }, { role: "root", db: "admin" }, "readWriteAnyDatabase" ]
}
)
- After this is successfully executed in the primary server of replica set, make the following changes in mongod.cfg of all the servers that are part of replica set. Refer the screenshot below:
.png)
- Close the terminal and restart the MongoDB service of all servers in the replica set.
- Re-open the Command Prompt as Administrator on all the servers in the replica set and connect to MongoDB using the below command:
mongo --host <IP> --port <Port>-u <username> -p <password> --authenticationDatabase "admin"
For e.g. –
mongo --host x.x.xx.x1 --port 27017 -u admin -p comnet123 --authenticationDatabase "admin"
mongo --host x.x.xx.x2 --port 27017 -u admin -p comnet123 --authenticationDatabase "admin"
mongo --host x.x.xx.x3 --port 27017 -u admin -p comnet123 --authenticationDatabase "admin"
- Connection with MongoDB should be successfully established on both Primary and Secondary servers.
Test the Connection
To test the connection, perform the following steps:
Python 3.6 should be present. You should also have the BigFix Runbook AI installer package as it contains some resources to be used in subsequent steps.
- Open the Command Prompt as Administrator and execute the following command to install pymongo.
pip install pymongo
- Copy the file named “mongo_connection_community_HA.py”, present in the installer package under iAutomateInstaller Resources Resources.zip folder, to any folder.
- Open the file in Notepad and change the respective IP, port, username, password where MongoDB service is running.
Please preserve spaces and indentation.
import ssl
from pymongo import MongoClient
client = MongoClient(['10.1X.1XX.XX:27017','10.1X.1XX.6X:27017','10.1X.1XX.XX:27017'],
username='admin',
password='comnet123',
ssl=False)
db = client['DRYiCE_db']
db_collection = db['DRYiCE_Collection']
db_collection.insert({"name":"xyz"})
print("Connection to Mongo Database successful")
- Open the Command Prompt as Administrator mode and change the current working directory to the folder that has code using the following command:
cd <folder path>
- Execute the code by executing the following command:
python <file_name.py>
- If file executes without any error, then connection is successful.
Enterprise Version
This section describes the procedure for installation of MongoDB with authentication and authorization configured for Enterprise Edition in HA mode.
Important note:
- Please ensure the ports that are to be used for MongoDB service is open for communication with the help of Windows administrator.
- During the installation procedure whenever the MongoDB service is restarted, open the new command prompt to run the further commands.
Installation steps:
- Download the file mongodb-win32-x86_64-enterprise-windows-64-4.0.25-signed.mse from the Path mentioned in the source field of Table 15 – MongoDB Requirements for Enterprise Version.
- Double-click on mongodb-win32-x86_64-enterprise-windows-64-4.0.25-signed.mse file, select installation option as Complete and click Next.
.png)
- Please ensure to note the location of the installation directory of MongoDB.
- The option Install MongoDB as service would be checked by default.
.png)
- Uncheck Install MongoDB as service and click Next.
.png)
- Wait till the MongoDB installation is complete.
Add MongoDB to the Path:
To add MongoDB to the PATH, please perform the below steps:
- Go to location where MongoDB was installed. For e.g., C:\Program Files\MongoDB .
- Inside MongoDB, go to folder \Server\4.0\bin .
- Go to Control Panel System and Security Security.
- Select Advanced System Settings, click Environment Variables. This will open a new dialog box.
- Select the variable path in System Variables and add path of MongoDB. For e.g. - C:\Program Files\MongoDB\Server\4.0\bin .
Creation of Directory Structure:
- Create a folder named mongo. It should not be in the same location where MongoDB is installed.
- Inside the folder mongo, create a folder named data.
- Inside the folder data, create three folders named as config, database, and log.
.png)
Creation of MongoDB Service
- Go to the location where MongoDB is installed. Refer to the Path set in the PATH environment variable. For e.g., C:\Program Files\MongoDB .
- Go to bin folder. For e.g., C:\Program Files\MongoDB\Server\4.0\bin .
- Locate the file named mongod.cfg and copy the file.
.png)
- Go to the mongo folder that was custom created earlier. Inside the directory data, go to the config folder. Paste the mongod.cfg file here.
.png)
- Open the file mongod.cfg (preferably in Notepad++ or Sublime) and follow the below steps:
While editing the file, maintaining indentation in the file is very important.
- In the storage header, change the following fields:
- dbPath: Add path till mongo\data\database.
- In the systemLog, change the following fields:
- path: Add path of mongo\data\log\mongod.log.
Folder mongo\data\log doesn’t have Mongod.log. This will be created automatically when mongo service is created.
- In the net, change the following fields:
- port: Enter the port you want to install MongoDB.
- bindIpAll: True.
- In the replication, change the following fields:
- replSetName: Enter the name of the replica set.
.png)
.png)
- Save the changes made in the file mongod.cfg.
- Open the Command Prompt as Administrator and run the following command.
mongod –config “<path of the mongoDB folder you created\mongo\data\config\mongod.cfg>" --install --serviceName "MongoDB"
For e.g. mongod --config "C:\mongo\data\config\mongod.cfg" --install --serviceName "MongoDB"
Ensure to enter the correct path of config file.
- MongoDB service with the name MongoDB will be created.
Start MongoDB Service
- Press Windows+R, type services.msc and press Enter.
.png)
- Search for MongoDB service, then click on it and click Start the service on the Left pane.
.png)
These steps must be performed on all the servers that are part of the replica set.
- Go to all the servers that have MongoDB service installed.
- Open the Command Prompt as Administrator and execute the below command by changing respective IP and port of server.
Ensure that the port on which MongoDB service is running is open for communication.
mongo --host <IP> --port <port on which mongoDB service is running(mentioned in config file)>
for e.g.
server1: mongo --host x.x.x.x1 --port 27017
server2: mongo --host x.x.x.x2 --port 27017
server3: mongo --host x.x.x.x3 --port 27017
- If the service is running successfully, then connection will be established without any error message.
Configure Replica Set
Once the MongoDB service is up and running, perform the below steps to configure the replica set for MongoDB.
- Go to one of the servers that is a part of the replica set.
- Open the Command Prompt as Administrator and execute the below command to open the terminal.
mongo --host <IP> --port <in which MongoDB service is running. The one written in config >
for e.g. - mongo --host x.x.xx.x1 --port 27017
- In the same terminal, execute the below commands:
MongoDB > rs.initiate( {
_id : "DRYiCEReplicaSet",
members: [
{ _id: 0, host: "<IP>:<PORT>" },
{ _id: 1, host: "<IP>:<PORT>" },
{ _id: 2, host: "<IP>:<PORT>" }
]
})
For eg.,
MongoDB > rs.initiate( {
_id : "DRYiCEReplicaSet",
members: [
{ _id: 0, host: "10.1.1xx.x1:27017" },
{ _id: 1, host: "10.1.1xx.x21:27017" },
{ _id: 2, host: "10.1.1xx.x3:27017" }
]
})
- Here, add the hosts that are part of the replica set. Also mention the respective host IP and port on which MongoDB service is running. Ensure that the ports are open for communication.
- Enter the below command to identify the Primary and Secondary server.
MongoDB >rs.status()
- Execute the below command on the Secondary servers.
MongoDB >rs.slaveOk()
Enable Authentication
Authentication needs to be enabled only on the Primary server. The Secondary servers are automatically updated as they are part of the replica set.
To enable the authentication, perform the following steps:
- Go to the primary server in the replica set.
- Open the Command Prompt as Administrator and execute the below command:
mongo --host x.x.xx.x1 --port 27017
- Execute the below command:
MongoDB Enterprise replicaTest:PRIMARY>use admin
- Execute the below command. Make the following changes in the values before execution:
user:<user-name >
pwd :<password>
(choose any password for the corresponding user for MongoDB authentication.)
MongoDB Enterprise replicaTest:PRIMARY>db.createUser(
{
user: "admin",
pwd: "comnet123",
roles: [ { role: "userAdminAnyDatabase", db: "admin" }, { role: "root", db: "admin" }, "readWriteAnyDatabase" ]
}
)
- After this is successfully executed in the primary server of replica set, make the following changes in mongod.cfg of all the servers that are part of replica set. Refer the screenshot below:
.png)
- Close the terminal and restart the MongoDB service of all the servers in the replica set.
- On all the server’s part of the replica set, open the Command Prompt as Administrator and open the MongoDB terminal using the following command:
mongo --host <IP> --port <Port> -u <username> -p <password> --authenticationDatabase "admin"
For e.g.
mongo --host x.x.xx.x1 --port 27017 -u admin -p comnet123 --authenticationDatabase "admin"
mongo --host x.x.xx.x2 --port 27017 -u admin -p comnet123 --authenticationDatabase "admin"
mongo --host x.x.xx.x3 --port 27017 -u admin -p comnet123 --authenticationDatabase "admin"
- Connection with MongoDB should be successfully established on both primary and secondary servers.
Enable SSL Authentication
To enable SSL authentication, perform the following steps:
Please ensure that only one ca.pem should be generated. From the same ca.pem, server.pem for each server should be generated. From the same ca.pem, client.pem should be generated.
If this is not done properly, it may result in failure of SSL Authentication and replica set server may become unreachable.
- Generate the ca.pem, server.pem and client.pem by referring to the Generate ca.pem and server.pem and Generate client.pem.
- After the ca.pem, client.pem and server.pem are generated, copy these files, and paste them in the path below:
<MongoDB_installed_path>/MongoDB/Server/4.0/bin
For e.g. - C:\Program Files\MongoDB\Server\4.0\bin
server.pem generated for the respective servers should be placed in the same server.
- Go to folder mongo/data/config, then open the file mongod.cfg and make the following changes.
Please preserve the space and indentations as shown in the screen shot below. Ensure that editing is done in notepad++.
- In the net header, edit the following:
ssl:
mode: allowSSL
PEMKeyFile: C:\Program Files\MongoDB\Server\4.0\bin\server.pem
CAFile: C:\Program Files\MongoDB\Server\4.0\bin\ca.pem
.png)
- Save the file for changes to be reflected.
- After making the changes in all the servers of the replica set, Restart the MongoDB services on all the servers.
- Open Command Prompt as Administrator on all the servers and execute the below command:
mongo --ssl --host <IP> --port <port> -u <username> -p <password> --authenticationDatabase "admin" --sslCAFile "<path of ca.pem>" --sslPEMKeyFile "<path of client.pem>"
- Add the respective IP, port, path of the pem file in all the servers.
for e.g. –
mongo --ssl --host 10.x.x.x1 --port 27017 -u admin -p comnet123 --authenticationDatabase "admin" --sslCAFile "C:\Program Files\MongoDB\Server\4.0\bin\ca.pem" --sslPEMKeyFile "C:\Program Files\MongoDB\Server\4.0\bin\client.pem"
- This will help in establishing the connection with MongoDB.
- Execute the below commands in all the servers of the replica sets.
MongoDB Enterprise replicaTest:PRIMARY>db.adminCommand( { setParameter: 1, sslMode: "preferSSL" } )
MongoDB Enterprise replicaTest:PRIMARY>db.adminCommand( { setParameter: 1, sslMode: "requireSSL" } )
- Restart the MongoDB service on all the servers in the replica set.
Test the Connection
To test the connection, perform the following steps:
Python 3.6 should be present. You should also have the BigFix Runbook AI installer package as it contains some resources to be used in subsequent steps.
- Open Command Prompt as Administrator and execute the following command:
pip install pymongo
- Copy the file named “mongo_connection_enterprise_HA.py”, present in the installer package under iAutomateInstaller Resources Resources.zip folder, to any folder.
- Open the file in Notepad and change the value of IP, port, username, password, certificate path where MongoDB service is running.
import ssl
from pymongo import MongoClient
client = MongoClient([<IP of the server>:<Port>,<IP of the server>:<Port>,<IP of the server>:<Port>],username='<Username>',password='<Password>',ssl=True,
ssl_certfile="<path of client.pem file>",
ssl_ca_certs="<path of ca.pem file>",
ssl_cert_reqs=ssl.CERT_REQUIRED)
db = client['DRYiCE_db']
db_collection = db['DRYiCE_Collection']
db_collection.insert({"name":"xyz"})
print("Connection to Mongo Database successful")
- Open Command Prompt as Administrator and change the current working directory to the folder that has code using the following command:
cd <folder path>
- Execute the code by using the following command:
python <file_name.py>
- If file executes without any error, then connection is successful.