Apache SOLR
BigFix Runbook AI uses Apache Solr for indexing and searching information from documents. It can be configured in High Availability (HA) or non-HA mode, and requires the installation of Java and ZooKeeper.
| Version | Solr 8.5.0 |
| Purpose | It is used an indexer for searching information from documents. It is also used for maintaining pre-downloaded repository document mappings. |
| Prerequisites | Installation of Java |
| Source |
This is available as part of BigFix Runbook AI installer package. For Solr: Follow the below path: Pre-Requisite Software solr-8.5.0.zip For NSSM: Follow the below path: Pre-Requisite Software nssm-2.24.zip |
| Config |
Available as part of BigFix Runbook AI installer package. Follow the below path: Pre-Requisite Software Solr_8.5_Prereq.zip |
Apache Solr is an open-source enterprise search platform. It is being used as indexer in BigFix Runbook AI to search for relevant document based on context. In BigFix Runbook AI, it is used to provide the relevant knowledge articles based on the ticket descriptions. Users can also search for the knowledge articles proactively.
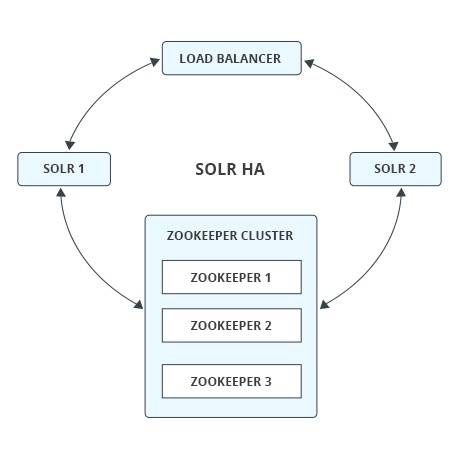
Apache Solr can be configured in two modes i.e., HA or non-HA mode. In non-HA mode, user will need to configure only one instance of Solr in Cloud mode where zookeeper will be in-built provided by Solr.
However, in HA mode user will need to configure separate zookeeper cluster. Zookeeper cluster should have at least 3 servers and if user wants to further increase the same then it should be odd in numbers. Please ensure that the user has at least two Solr instances which are connected via load balancer. In HA mode, all instances of Apache Solr have point in-time data replication i.e., all Solr instances are in read and write mode.
SOLR Installation – High Availability (HA) Mode
This section describes the procedure for installation of Solr in HA mode which is integrated with Zookeeper. This is applicable only for Windows Sever.
For Apache Solr in H.A, configure Zookeeper on at least three different servers because for ZooKeeper cluster to be active, there must be a majority of non-failing machines that can communicate with each other. For this reason, ZooKeeper cluster is usually made up of an odd number of machines. It runs as an ensemble of ZooKeeper servers i.e., Zookeeper cluster. User must integrate Zookeeper cluster with two Solr node running on different servers that are connected with Load Balancer.
Minimum configuration for each of the servers are explained below:
- Windows Server 2016 with 64-bit Processor
- 2 GB of RAM, and 80GB HDD hard drives
- 2 Cores
Installation of Zookeeper
| Source |
Available as part of BigFix Runbook AI installer package. Follow the below path: Pre-Requisite Software zookeeper-3.6.3.zip |
This section describes the procedure for installation of Zookeeper. Please perform the below steps:
- Download zookeeper-3.6.3.zip file from the path mentioned in the source field of Table 17 – Zookeeper Requirements on all three servers.
- Copy the zookeeper.zip folder in the desired location and extract it.
- e.g. - D:\zookeeper
- Ensure that Java version 1.8 or higher is configured in the system and JAVA_HOME variable is set. To check the same, open the Command Prompt and type the below command:
Java -version
Figure 2. Figure 77 - Installation of ZooKeeper 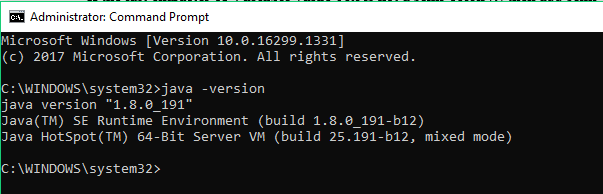
- Proceed with the installation if the Java version is displayed. If not, please install Java as mentioned in section Java.
- Go to the zookeeper installation directory where zookeeper was extracted.
- Go to <zookeeper_install_dir>/conf folder, rename the zoo_sample.cfg file to zoo.cfg.
- Create a folder inside zookeeper directory with name dataDir. For doing this, go inside the zookeeper installation directory, open the Command Prompt as Administrator and type:
mkdir dataDir
- Go to <zookeeper_install_dir>/conf folder and open zoo.cfg file. Change the below parameters and add details of three zookeeper servers. Here you need to select three distinct zookeeper ids for three distinct servers. (Keep it numeric).
Figure 3. Figure 78 - Installation of ZooKeeper (cont.) 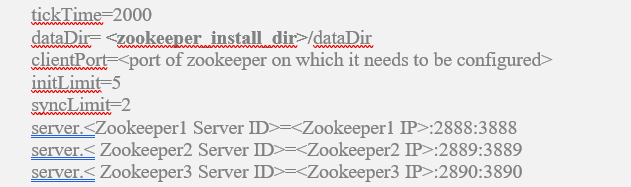
- Enter the same parameter details in zoo.cfg file.
Figure 4. Figure 79 - Installation of Zookeeper (cont.) 
- For Reference, zookeeper will use these ports (2888,
2889,….) to connect the individual follower nodes to the
leader nodes. The other ports (3888, 3889,….) are used for
leader election in the ensemble. Make sure all these ports must be
different from each other.
- Go to <zookeeper_install_dir> and open Command Prompt as Administrator and type the below command:
(echo<Zookeeper Server ID>)>dataDir/myid
- e.g. – (echo 1)>dataDir/myid
- This command will create a file inside dataDir folder with name myid and add the server ID. The server ID is a number between 1-255, and it must be unique. Also it must correspond with server.${id} in the zoo.cfg files.
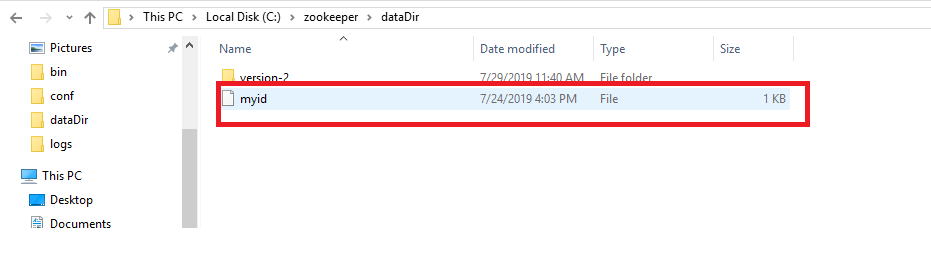
- In above example followed, there are 3 server IDs 1, 2 and 3. So, for the respective server, it’s zoo.cfg should contain its respective id.
- Go to the bin folder and open the Command Prompt as Administrator inside <zookeeper_install_dir>.
- Start Zookeeper by executing the following command:
zkServer.cmd
- Now Zookeper is running at <IP_address>:<port> (User can change the port in the zoo.cfg file with field name i.e., client Port).
- User may see some error in the terminal, if other two zookeepers were not started. Ignore this error for now, until all three Zookeeper starts.
- Configuration is ready for the first Zookeeper node.
Enabling Zookeeper as Windows Service
This section describes the procedure for enabling Zookeeper as a Windows service. Please perform the below steps:
- Download nssm-2.24.zip file from the path mentioned in the source field of Table 16 – Apache SOLR Requirements and unzip it.
- Copy nssm.exe from nssm-2.24\win64 to <zookeeper_install_dir >\bin.
- Go to the bin folder i.e., < zookeeper_install_dir >\bin and open the Command Prompt as Administrator.
- Execute the below command:
nssm install zookeeper
- The below window will be displayed.

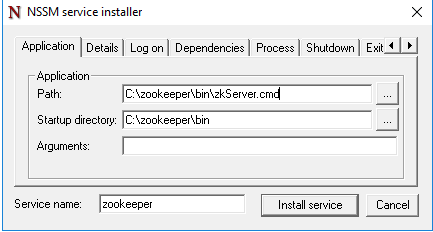
- Click Application tab and enter the information as mentioned below:
Path: <zookeeper_install_dir> \bin\zkServer.cmd
Startup Directory: <zookeeper_install_dir> \bin
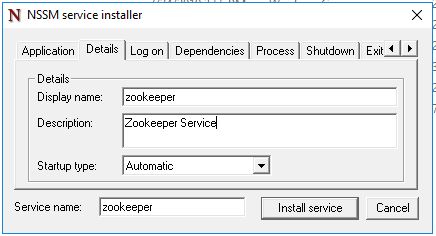
- Click Details tab and enter the information as displayed in the image below:
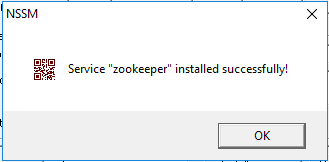
- Click Install Service.
- Upon successful installation, following message will appear.
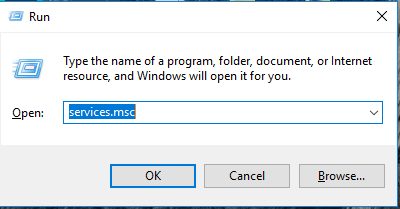
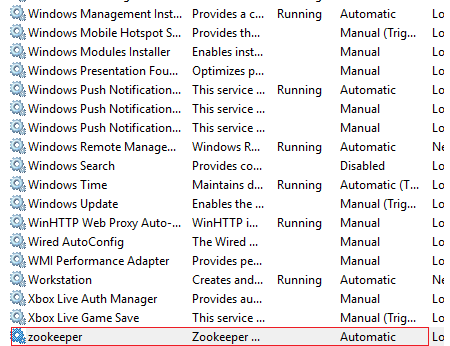
- Press Win+R, type services.msc and press OK.
- Search for zookeeper service and click on zookeeper service.
- Click Start the service on the left panel to start the service.
Installation of SOLR
This section describes the procedure for installation of Solr. As per the best practices, Solr instances (preferably two or more in number) should be configured on different servers, different from the servers where ZooKeeper cluster has been set up.
Please follow the below steps for each of the Solr instances:
- Download the folder solr-8.5.0 .zip file from the Path mentioned in source field of Table 14 – Apache SOLR Requirements .
- Extract zip file to desired location.
- e.g.: D:\solr
- Ensure that Java version 1.8 or higher is configured in the system. And JAVA_HOME variable is set. To check the same, open the Command Prompt and type the below command:
java -version
- Proceed with the installation if the Java version is displayed. If not, please install Java as mentioned in Java.
- Set SOLR_HOME environment variable and add to PATH environment variable. Follow the below steps to set the SOLR_HOME and PATH.
- Go to Control Panel System and Security Advanced System Settings.
- Click Environment Variables. A new dialog box appears.
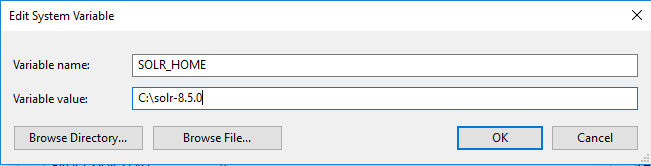
- Select Path in System Variables and add the respective path of Solr mentioned above.
- Set the environment variable as depicted in the image above.
- Add %SOLR_HOME%\bin to PATH environment variable.

- Navigate to SOLR_HOME\bin. Open the Command Prompt as Administrator and execute the below command:
solr start -cloud -s <SOLR_HOME\server\solr> -p <PORT> -z <ZOOKEEPER_IP_1>:<ZOOKEEPER_PORT_1>, <ZOOKEEPER_IP_2>:<ZOOKEEPER_PORT_2>,<ZOOKEEPER_IP_3>:<ZOOKEEPER_PORT_3>
- Enter the IP address and the Port as shown in below example in the respective fields:
e.g. –
solr start -cloud -s "C:\solr\solr-8.5.0\server\solr” -p 8983 -z "1x.xx.xx.x1:2181,1x.xx.1xx.x2:2181,1x.xx.xx.x3:2181"
Here,
-p for port, you can choose another port
-h for hostname/IP
-s for path where solr.xml and zoo.cfg is present
-SOLR_HOME is solr path till /solr-8.5.0
-z List of comma separated: Zookeeper IP with port
- Create a folder named iAutomateSolr in the directory path SOLR_HOME\server\solr\configsets.
- This step requires the two conf folders (that contains schema.xml and solrconfig.xml) from path mentioned in Table 14 – Apache SOLR Requirements . Please reach out to iAuto-Product-Supp@hcl.com to get access to the folder.
- Copy the two conf folder received to the ‘iAutomateSolr’ folder created in previous steps.
- Navigate to SOLR_HOME\server\scripts\cloud-scripts. Open the Command Prompt as Administrator and execute the below command for all three Zookeeper servers, for each of the two conf folders with different schema names, respectively.
zkcli.bat -zkhost <ZOOKEEPER_IP>:<ZOOKEEPER_PORT> -cmd upconfig -confname <SCHEMA_NAME> -confdir SOLR_HOME\server\solr\configsets\iAutomateSolr\<CONF_FOLDER_NAME>
For iScrape and iKnowledge: Enter the Solr IP and ZooKeeper Port that has been configured earlier. Set Schema Name as ‘ticketschema’ for Basic Knowledge and iScrape conf folder named as ‘conf_iscrape_knowledge’.
e.g. for iScrape and iKnowledge –
zkcli.bat -zkhost 1x.xx.xx.x1:2181 -cmd upconfig -confname ticketschema -confdir C:\solr\solr-8.5.0\server\solr\configsets\iAutomateSolr\conf_iscrape_knowledge
zkcli.bat -zkhost 1x.xx.xx.x2:2181 -cmd upconfig -confname ticketschema -confdir C:\solr\solr-8.5.0\server\solr\configsets\iAutomateSolr\ conf_iscrape_knowledge
zkcli.bat -zkhost 1x.xx.xx.x3:2181 -cmd upconfig -confname ticketschema -confdir C:\solr\solr-8.5.0\server\solr\configsets\iAutomateSolr\ conf_iscrape_knowledge
For Indexer: Enter the Solr IP and ZooKeeper Port that has been configured earlier. Set Schema Name as ‘documentschema’ for Advance iKnowledge conf folder named as ‘conf_indexer’.
e.g. for Indexer –
zkcli.bat -zkhost 1x.xx.xx.x1:2181 -cmd upconfig -confname documentschema -confdir C:\solr\solr-8.5.0\server\solr\configsets\iAutomateSolr\conf_indexer
zkcli.bat -zkhost 1x.xx.xx.x2:2181 -cmd upconfig -confname documentschema -confdir C:\solr\solr-8.5.0\server\solr\configsets\iAutomateSolr\conf_indexer
zkcli.bat -zkhost 1x.xx.xx.x3:2181 -cmd upconfig -confname documentschema -confdir C:\solr\solr-8.5.0\server\solr\configsets\iAutomateSolr\conf_indexer
Authentication
- Create security.json file with the content mentioned in the file named security.json, present in the installer package under iAutomateInstaller Resources Resources.zip folder and store in system.
- e.g., D:\solr\solr-8.5.0\security.json.
- Upload the security.json file to each of the ZooKeeper instances. Open the Command Prompt as Administrator and execute the below commands to upload configuration file to each of ZooKeeper instances:
solr zk cp <Security JSON PATH> zk:/security.json -z <IP>:<ZooKeeper Port>
e.g. –
solr zk cp file:C:\solr\solr-8.5.0\security.json zk:/security.json -z 1x.xx.xx.x1:2181
solr zk cp file:C:\solr\solr-8.5.0\security.json zk:/security.json -z 1x.xx.xx.x2:2181
solr zk cp file:C:\solr\solr-8.5.0\security.json zk:/security.json -z 1x.xx.xx.x3:2181
- This will create one user with name Solr and password as SolrRocks.
- Execute the below command in browser to ensure that Solr is running with authentication and authorization enabled.
http://<IP>:<SOLRPORT>/solr/admin/authentication
http://<IP>:<SOLRPORT>/solr/admin/authorization
- Enter the username ‘solr’ and password ‘SolrRocks’ when prompted for authentication.
- If the message “authorization.enabled”:true is displayed, it confirms that
authorization has been enabled successfully.
{
"responseHeader":{
"status":0,
"QTime":0},
"authorization.enabled":true,
"authorization":{
"class":"solr.RuleBasedAuthorizationPlugin",
"user-role":{"solr":"admin"},
"permissions":[{
"name":"security-edit",
"role":"admin"}]}}
- If the message “authentication.enabled”:true is displayed, it confirms that authorization has been enabled successfully.
{
"responseHeader":{
"status":0,
"QTime":3},
"authentication.enabled":true,
"authentication":{
"class":"solr.BasicAuthPlugin",
"credentials":{"solr":"IV0EHq1OnNrj6gvRCwvFwTrZ1+z1oBbnQdiVC3otuq0= Ndd7LKvVBAaZIF0QAVi1ekCfAJXr1GGfLtRUXhgrF8c="}}}
- Execute the below command as POST request on any of rest clients such as Postman or Curl. Select Basic Authentication and provide Username and Password as created in above steps under authorization tab. This creates a new user with UserName to be further used as <user_name> in credentials.
URL: .
- In Basic Authentication use the below credentials.
Username: solr
Password: SolrRocks
In the Body tab, select input as Raw JSON (application/json) and provide the below input.
{
"set-user": {"<user-name>" : "<password>" }
}
e.g. –
This will create user with username: solradmin and password: Admin098
{
"set-user": {"solradmin" : "Admin098" }
}
Now, a Solr user has been created with UserName as ‘solradmin’ and Password as ‘Admin098’.
Figure 14. Figure 89 - Installation of SOLR (cont.) 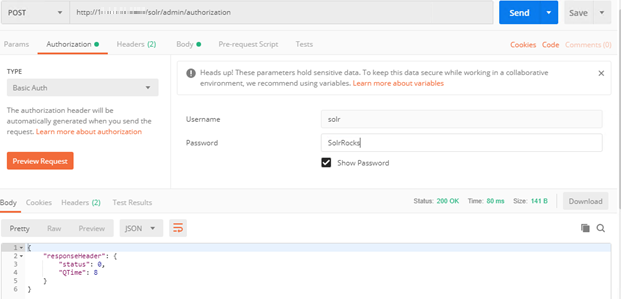
- This step provides admin rights to user which is mentioned in <username> tab and sets the user role using Post request with the URL specified below:
Execute the below command as POST request in any of rest client such as Postman or Curl
- In Basic Authentication use the below credentials.
URL: http://<IP>:<SOLRPORT>/solr/admin/authorization
Username: solr
Password: SolrRocks
In the Body tab, select input as Raw JSON (application/json) and provide the below input.
{ "set-user-role": {"<user-name>":["admin"]}}
e.g. –
This will provide admin rights to solradmin
{ "set-user-role": {"solradmin":["admin"]}}
- This step grants all permissions to the admin role as is mentioned below: Execute the below command as POST request in any of rest client such as Postman or Curl. Select Basic Authentication with Username as solr and Password as SolrRocks and this step will set the user permission.
- Enter the respective IP and Solr Port.
-
- In the Body tab, select input as Raw JSON (application/json) and provide the below input.
{
"set-permission": { "name":"all","role": "admin"}
}
- This grants all permissions to the users with
admin role.
- Open the Command Prompt as Administrator and run the below command:
solr stop -p <port of solr>
- Go to path where Solr is installed < SOLR_HOME >\bin.
- e.g. - C:\solr\solr-8.5.0\bin.
- Open solr.in in Edit mode. Uncomment the two lines mentioned below and edit <user-name> and <password> as mentioned in below example:
REM set SOLR_AUTH_TYPE=basic
REM set SOLR_AUTHENTICATION_OPTS="-Dbasicauth=<user-name>:<password>"
e.g. –
set SOLR_AUTH_TYPE=basic
set SOLR_AUTHENTICATION_OPTS="-Dbasicauth=solradmin:Admin098"
SOLR as a Service
This section describes the procedure for enabling Solr as a service.
Please follow the below steps:
- Download nssm-2.24.zip file from the path mentioned in the source field of Table 16 – Apache SOLR Requirements and unzip it.
- Copy nssm.exe from nssm-2.24\win64 to SOLR_HOME\bin.
- Open the Command Prompt as Administrator and Navigate to SOLR_HOME\bin.
- Execute the below command:
nssm install solrservice
- The following window appears:
Figure 15. Figure 90 - Enabling Solr as Windows Service 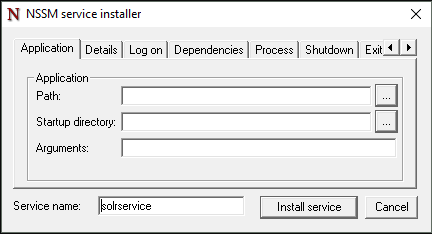
- Click Application tab and enter the information as mentioned below:
Path: C:\solr\solr-8.5.0\bin\solr.cmd
Startup directory: C:\solr-8.5.0\bin
Arguments: <As mentioned below>
start -cloud -s <SOLR_HOME\server\solr> -h <SOLR_IP> -f -p <SOLR_PORT> -z <ZOOKEEPER_IP>:<ZOOKEEPER_PORT>
E.g.
start -cloud -s "C:\solr\solr-8.5.0\server\solr" -h 1x.xx.xx.x1 -f -p 8983 -z "1x.xx.xx.x2:2181,1x.xx.xx.x3:2181,1x.xx.xx.x4:2181"
Figure 16. Figure 91 - Enabling Solr as Windows Service (cont.) 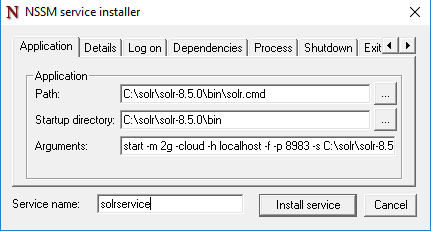
- Click Details tab and enter the below information:
Figure 17. Figure 92 - Enabling Solr as Windows Service (cont.) 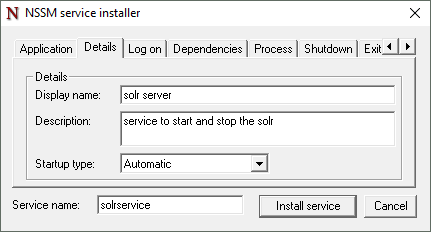
- Click Install Service.
- Upon successful installation, following message will appear.
Figure 18. Figure 93 - Enabling Solr as Windows Service (cont.) 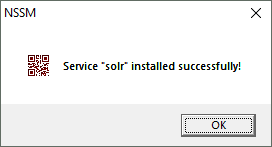
- Press Win+R, type services.msc and press Enter.
Figure 19. Figure 94 - Enabling Solr as Windows Service (cont.) .png)
- Search for Solr Server service.
- Click on Solr Server service and then click Start the service on the left panel to start the service.
Figure 20. Figure 95 - Enabling Solr as Windows Service (cont.) 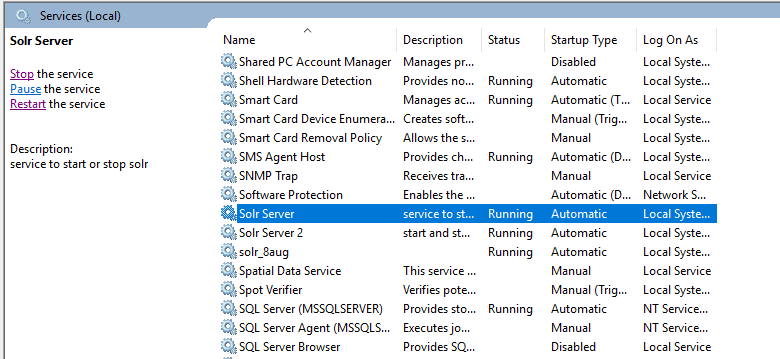
- Check the below mentioned URL in browser:
- http://<SOLR IP>:<SOLRPORT>/solr
- Enter username as “solradmin” and password as “Admin098” on Solr Portal Login Page.
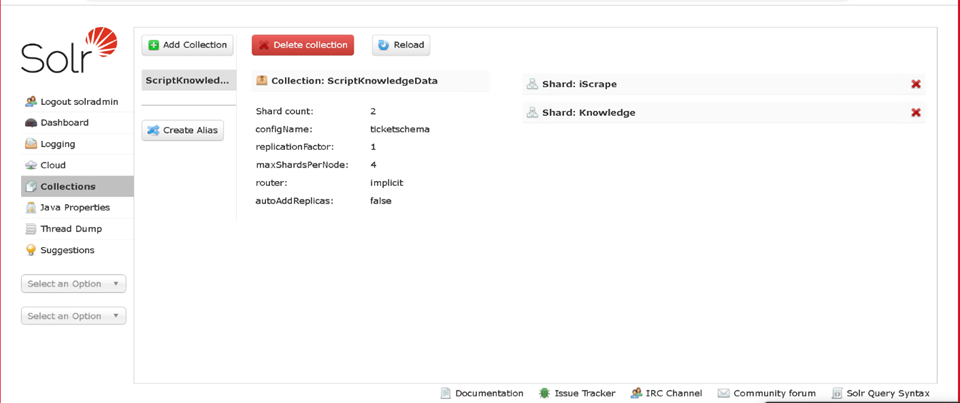
- Create collection named as ‘ScriptKnowledgeData’ in Solr for Basic Knowledge and iScrape using the URL below:
http://<SOLR_IP>:<SOLR_PORT>/solr/admin/collections?action=CREATE&name=ScriptKnowledgeData&router.name=implicit&shards=iScrape,Knowledge&replicationFactor=1&maxShardsPerNode=4&collection.configName=ticketschema&router.field=shardType.
- On successful creation of the collection following response is received.
{
"responseHeader":{
"status":0,
"QTime":3373},
"success":{
"<SOLR_IP>:<SOLR_PORT>_solr":{
"responseHeader":{
"status":0,
"QTime":2464},
"core":"ScriptKnowledgeData_iScrape_replica_n1"},
"<IP>:<PORT>_solr":{
"responseHeader":{
"status":0,
"QTime":2737},
"core":"ScriptKnowledgeData_Knowledge_replica_n2"}}}
- To check the Successful creation of collection in Solr. Navigate to Solr Home Page as mentioned in Figure 96. On Left Pane Select “Collections” tab and verify "ScriptKnowledgeData” collection is present.
Solr Installation – Non-High Availability (non-HA) mode
This section describes the procedure for installation of Solr without High Availability.
Please follow the below steps:
- Download the folder solr-8.5.0 .zip file from the Path mentioned in source field of Table 16 – Apache SOLR Requirements .
- Extract zip file to desired location.
- e.g.: D:\solr
- Ensure that Java version 1.8 or higher is configured in the system and JAVA_HOME variable is set. To check the same, open the Command Prompt as Administrator and type the below command:
java -version
- Proceed with the installation if the Java version is displayed. If not, please install Java as mentioned in Java.
- Set SOLR_HOME environment variable and add to PATH environment variable. Follow the below steps to set the SOLR_HOME and PATH.
- Go to Control Panel System and Security Advanced System Settings.
- Click Environment Variables. A new dialog box appears.
- Select Path in the System Variables and add the respective path of Solr mentioned above.
.png)
- Set the environment variable as depicted in the image above.
- Add %SOLR_HOME%\bin to PATH environment variable.
.PNG)
- Navigate to SOLR_HOME\bin. Open the Command Prompt in Administrator mode and execute the below command:
solr start -m 2g -cloud -h <SOLR_IP> -p <SOLR_PORT> -s SOLR_HOME\server\solr
- Enter the IP address and the Port as the example below states in the respective fields.
e.g. –
solr start -m 2g -cloud -h localhost -p 8983 -s D:\solr-8.5.0\server\solr
Here,
-p for port, you can choose another port
-h for hostname/IP
-m for memory
-s for path where solr.xml and zoo.cfg is present
SOLR_HOME is solr path till /solr-8.5.0
- Create a folder named iAutomateSolr in the directory path SOLR_HOME\server\solr\configsets.
- This step requires the two conf folders (that contains schema.xml and solrconfig.xml) from path mentioned in source field of Table 16 – Apache SOLR Requirements . Please reach out to iAuto-Product-Supp@hcl.com to get access to the folder.
- Copy the two conf folders received to the ‘iAutomateSolr’ folder created in previous steps.
- Navigate to SOLR_HOME\server\scripts\cloud-scripts. Open the Command Prompt as Administrator mode and execute the below command for the zookeeper server, for each of the two conf folders with different schema names, respectively; to upload the config for Solr as mentioned in the following two steps:
zkcli.bat -zkhost <SOLR_IP>:<ZOOKEEPERPORT> -cmd upconfig -confname <SCHEMA_NAME> -confdir SOLR_HOME\server\solr\configsets\iAutomateSolr\<CONF_FOLDER_NAME>
For Indexer: Enter the ZooKeeper IP and ZooKeeper Port where ZooKeeper IP is the IP address of the solr installation server and ZooKeeper Port is SolrPort+1000. Set the schema name as ‘documentschema’ for Advance iKnowledge conf folder named as ‘conf_indexer’.
e.g. For Indexer-
zkcli.bat -zkhost localhost:9983 -cmd upconfig -confname documentschema -confdir D:\solr-8.5.0\server\solr\configsets\iAutomateSolr\conf_indexer
Here,
- zookeeperPort is (solrport+1000)
- documentschema is name of config file maintain by zookeeper
- confdir is directory where your schema.xml(edited) for Advance iKnowledge is present
For iScrape: Enter the ZooKeeper IP and ZooKeeper Port where ZooKeeper IP is the IP address of the solr installation server and ZooKeeper Port is SolrPort+1000. Set the schema name as ‘ticketschema’ for BasicKnowledge and iScrape conf folder named as ‘conf_iscrape_knowledge’.
e.g. For iScrape: –
zkcli.bat -zkhost localhost:9983 -cmd upconfig -confname ticketschema -confdir D:\solr-8.5.0\server\solr\configsets\iAutomateSolr\conf_iscrape_knowledge
Here,
- zookeeperPort is (solrport+1000)
- ticketschema is name of config file maintain by zookeeper
- confdir is directory where your schema.xml(edited) is present
Authentication
- Create security.json file with the content mentioned in the file named security.json, present in the installer package under iAutomateInstallerResourcesResources.zip folder and store in system.
e.g. D:\solr\solr-8.5.0\security.json
- Upload the security.json file to the ZooKeeper instance. Open Command Prompt as Administrator and execute the below command to upload configuration file to ZooKeeper:
solr zk cp <Security JSON PATH> zk:/security.json -z <IP>:<ZooKeeper Port>
e.g. –
solr zk cp D:\solr-8.5.0\security.json zk:/security.json -z 1x.xx.xx.x1:9983
This will create one User with name solr and Password as SolrRocks
- Execute the below command in browser to ensure that Solr is running with authentication and authorization enabled.
http://<IP>:<SOLRPORT>/solr/admin/authentication
http://<IP>:<SOLRPORT>/solr/admin/authorization
- Enter the username “solr” and password “SolrRocks” when prompted on browser. If the message “authorization.enabled”:true is displayed, it confirms that authorization has been enabled successfully.
{
"responseHeader":{
"status":0,
"QTime":0},
"authorization.enabled":true,
"authorization":{
"class":"solr.RuleBasedAuthorizationPlugin",
"user-role":{"solr":"admin"},
"permissions":[{
"name":"security-edit",
"role":"admin"}]}}
- If the message
“authentication.enabled”:true is
displayed, it confirms that authorization has been enable
successfully.
{
"responseHeader":{
"status":0,
"QTime":3},
"authentication.enabled":true,
"authentication":{
"class":"solr.BasicAuthPlugin",
"credentials":{"solr":"IV0EHq1OnNrj6gvRCwvFwTrZ1+z1oBbnQdiVC3otuq0= Ndd7LKvVBAaZIF0QAVi1ekCfAJXr1GGfLtRUXhgrF8c="}}}
- Execute the below command as POST request on any of rest clients such as Postman or Curl. Select Basic Authentication and provide Username and Password as created in above steps under Authorization tab. This creates a new user with UserName to be further used as <user_name> in credentials.
http://<IP>:<SOLRPORT>/solr/admin/authentication
- In basic authentication, use below credentials:
Username: solr
Password: SolrRocks
In Body tab, select input as Raw JSON (application/json) and provide the below input
{
"set-user": {"<user-name>" : "<password>" }
}
e.g. –
This will create user with username: solradmin and password: Admin098.
{
"set-user": {"solradmin" : "Admin098" }
}
Figure 25. Figure 100 - Installation of SOLR (cont.) .png)
- Execute the below command as POST request in any of rest client such as Postman or Curl and Select Basic Authentication with Username as solr and Password as SolrRocks under Authorization tab and set the user role using Post request with the URL specified below:
- This step will provide admin rights to user which will is
mentioned in <username> tab.
http://<IP>:<SOLRPORT>/solr/admin/authorization
- Enter the respective IP and Solr Port.
- In the Body tab, select input as raw JSON (application/json) and provide the below input.
{ "set-user-role": {"<user-name>":["admin"]}}
- e.g. – This will provide admin rights to solradmin
{ "set-user-role": {"solradmin":["admin"]}}
- Execute the below command as POST request in any of rest client such as Postman or Curl and Select Basic Authentication with Username as solr and Password as SolrRocks and set the user permission.
http://<IP>:<SOLRPORT>/solr/admin/authorization
- Now, a Solr user has been created with UserName as ‘solradmin’ and Password as ‘Admin098’.
{
"set-permission": { "name":"all","role": "admin"}
}
- Open the Command Prompt as Administrator and run the below command:
solr stop -p <port of solr>
- Go to path where Solr is installed < SOLR_HOME >\bin
- e.g. - C:\solr\solr-8.5.0\bin
- Open solr.in in Edit mode. Uncomment the two lines mentioned below and edit them:
set SOLR_AUTH_TYPE=basic
set SOLR_AUTHENTICATION_OPTS="-Dbasicauth=<user-name>:<password>"
e.g. –
set SOLR_AUTH_TYPE=basic
set SOLR_AUTHENTICATION_OPTS="-Dbasicauth=solradmin:Admin098"
SOLR as a Service
This section describes the procedure for enabling Solr as a service.
Please follow the below steps:
- Download nssm-2.24.zip file from the path mentioned in the source field of Table 16 – Apache SOLR Requirements and unzip it.
- Copy nssm.exe from nssm-2.24\win64 to SOLR_HOME\bin.
- Go to the SOLR_HOME\bin. Open the Command Prompt as Administrator.
- Execute the below command:
nssm install solrservice
- The window shown in below image appears.
.png)
- Click Application tab and enter the information as mentioned below:
Path: C:\solr\solr-8.5.0\bin\solr.cmd
Startup Directory: C:\solr-8.5.0\bin
Arguments: <Enter values as mentioned below>
start -m 2g -cloud -h <SOLR_IP> -f -p <SOLR_PORT> -s <SOLR_HOME\server\solr>
e.g.
start -m 2g -cloud -h localhost -f -p 8983 -s C:\solr\solr-8.5.0\server\solr
.png)
- Click the Details tab and enter the information as displayed in the below image:
.png)
- Click Install service.
- Upon successful installation, the following message will appear.
.png)
- Press Win+R, type services.msc and press Enter.
.png)
- Search for Solr Server service and click on it.
- Click Start the service on the left panel to start the service.
.png)
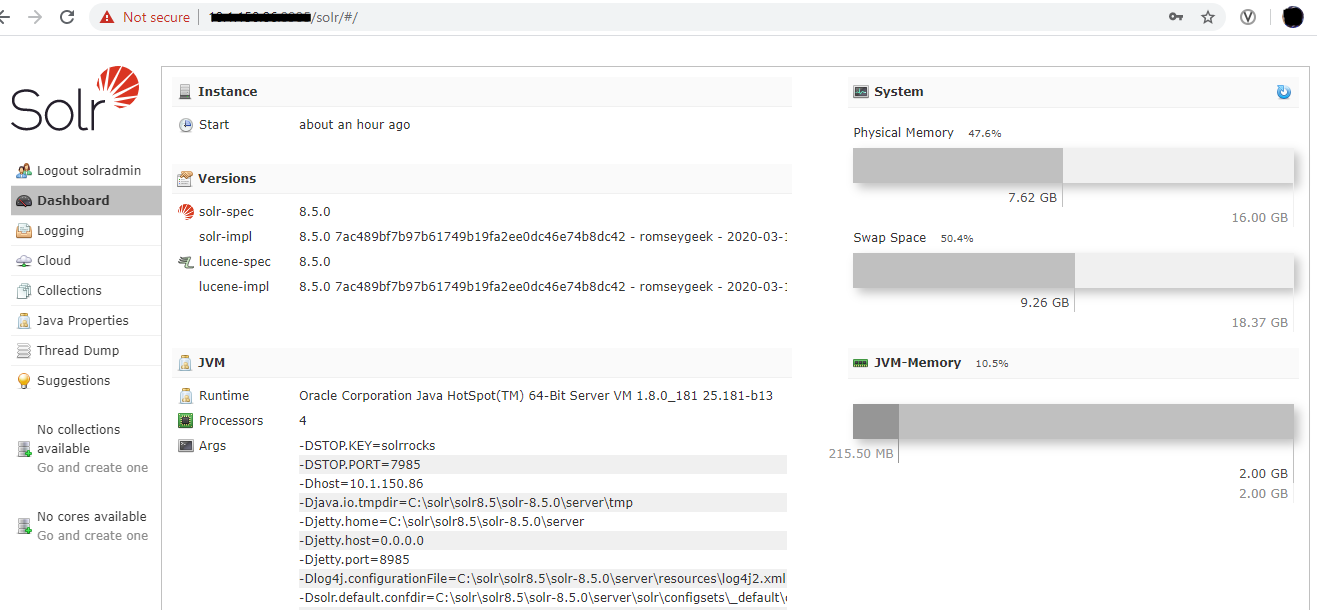
- Check in browser, if Solr is properly configured.
.png)
- Create collection named as ‘ScriptKnowledgeData’ in Solr for Basic Knowledge and iScrape using the below url:
http://<SOLR_IP>:<SOLR_PORT>/solr/admin/collections?action=CREATE&name=ScriptKnowledgeData&router.name=implicit&shards=iScrape,Knowledge&replicationFactor=1&maxShardsPerNode=4&collection.configName=ticketschema&router.field=shardType
- On successful creation of the collection, the following response is received:
{
"responseHeader":{
"status":0,
"QTime":3373},
"success":{
"<SOLR_IP>:<SOLR_PORT>_solr":{
"responseHeader":{
"status":0,
"QTime":2464},
"core":"ScriptKnowledgeData_iScrape_replica_n1"},
"<IP>:<PORT>_solr":{
"responseHeader":{
"status":0,
"QTime":2737},
"core":"ScriptKnowledgeData_Knowledge_replica_n2"}}}