Creating snapshots of license metric utilization for auditing purposes
Create the snapshot of the report, and store it as a record of license metric utilization in your enterprise over a particular period. You can create the snapshot with any frequency that is suitable for your purposes. However, it is a good practice to create the snapshot every quarter. You can also regenerate the snapshot at any time as the historical data is always editable.
Before you begin
 You must have the following permissions to perform this task:
- View License Metric to open the report.
- View Audit Trail if you want the snapshot to contain the audit trail file.
About this task
- Software scan data is collected from the entire environment. To verify whether there are any problems, check the Software Scan Health widget on the Overview panel.
- Capacity data is collected from the entire environment. To verify whether there are any problems, check the Capacity Scan Health widget on the Overview panel.
- Imports of data are successful. To check the import history, go to .
- Software is correctly classified. For more information, see: Software classification.
Procedure
- Log in to BigFix Inventory, and go to .
- Optional:
To configure the period for which you want to create the snapshot, hover over the
Configure icon
 , and click Configure View. Then, select the time range.
- If you specify a period from a particular date until the last successful import, the reports contain entries from that date starting at 00:00:00.
- If you specify a period from a date to a date, the reports contain entries from the first date starting at 00:00:00 to the second date ending at 23:59:59.
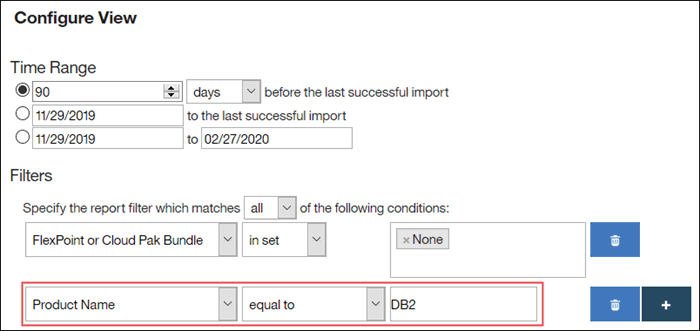
- Optional:
To limit the number of products that are included in the snapshot, specify the name of the
product in the Filters section.
-
To create the snapshot, in the top navigation bar, click Audit
Snapshot.
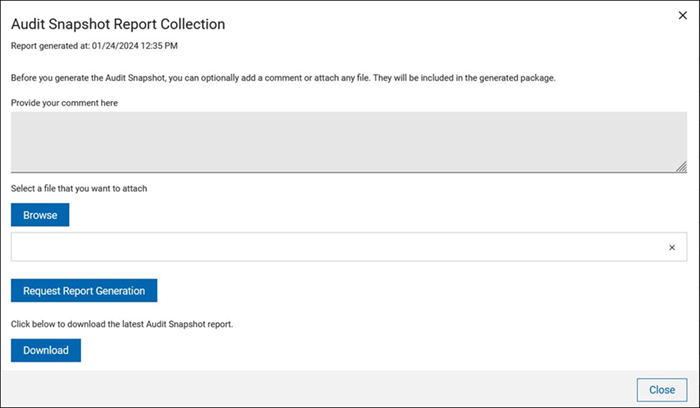
- Optional: In the Provide your comment here field, enter your comments.
- Optional: Click Browse and select the file that you want to attach to the snapshot.
-
Click Request Report Generation to generate a report.
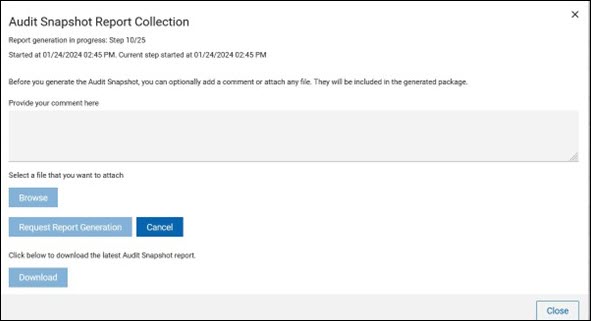
The status bar at the top of the window shows the current state of the report generation with the time when the last report was generated. If the report generation is in progress, you can see the live status of the progress.
-
Once the report generation is in progress, you may choose to perform these:
- Click Cancel to cancel the report generation.
- Click Close or click the close icon to close the Audit Snapshot window and come back to it later while report generation is done in the background.
-
When the report generation is complete, click Download to
download the report.
The audit_snapshot_date_time.zip file is downloaded to your computer. The date that is provided as part of the file name is expressed in the GMT time zone. For information about the content of the file, see: Content of the audit snapshot.