Scheduling an ETL
The ETL (Extract, Transform, Load) process pulls data from a datasource and stores it in the Insights' database. An ETL process may consume significant time and resources and hence it is run on a customizable schedule to minimize disruption. In BigFix Insights, you can schedule an ETL daily, weekly, or monthly and also determine the history of an ETL for a datasource and a set of ETLs for all datasources.
Setting up ETL
About this task
Perform the following steps to schedule an ETL in Insights:
Procedure
-
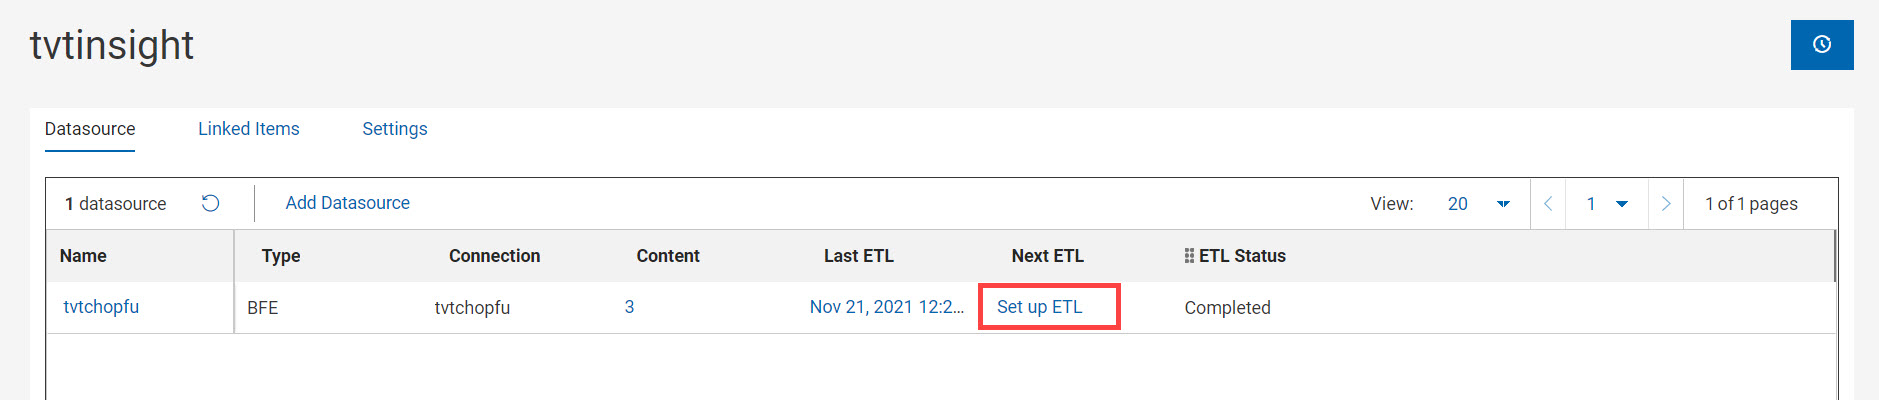
Navigate to the Datasources tab in Insights.

-
Click Set up ETL for the datasource for which you
want to schedule an ETL.
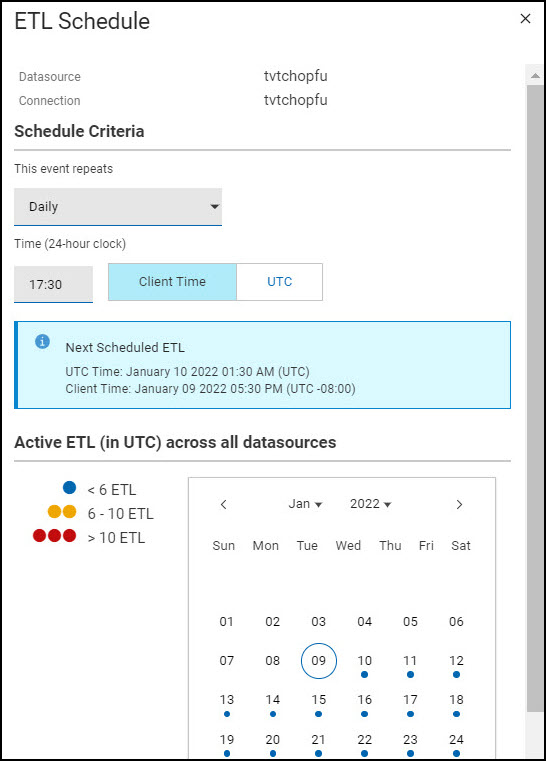
The ETL scheduler is displayed:

Note: Client Time refers to the time on the datasource. The circled date in the calendar indicates the current day.The ETL calendar has dates with dots of colors Green, Blue, or Red.- Blue: Indicates that less than 6 ETLs are scheduled for that current day.
- Green: Indicates that 6-10 ETLs are scheduled for that current day.
- Red: Indicates that more than 10 ETLs are scheduled for that current day.
-
Select the frequency at which you want to run the ETL and enter values for
the other fields.
Note:
- Click Queue ETL Now to run an ETL now. If another ETL is in progress, Queue ETL Now adds the ETL to the queue.
- For a given datasource, if an ETL initiated by Queue ETL Now is running when a scheduled ETL is expected to run, the scheduled ETL is skipped and will run at its next scheduled ETL time.
- Select the time when you want to run the ETL. You can change the meridiem by clicking the meridiem.
-
Click Save.
You have successfully scheduled an ETL in Insights.
You can view the next ETL event from the Next ETL column in the Insights Details page:
Rescheduling an ETL
About this task
Procedure
- Navigate to the Datasource tab.
- Click the date in the Next ETL column for the datasource for which you want to edit the ETL Schedule.
- Edit the fields as required.
-
Click Save.
The Next ETL column for the datasource is updated with the updated schedule.Note: You cannot edit an ETL schedule when the ETL Status is Running.
ETL History
About this task
To display the duration, status, start time and end time for the ETL that ran on that date, click on a highlighted date in the ETL History calendar.
To refresh the Last Successful ETL and Next ETL fields with the latest updates, click the Refresh icon. Clicking the Next ETL link brings you to the ETL Scheduler for that datasource.
Accessing Live ETL page
About this task
The Live ETL Feed page can only be accessed directly via URL and is accessible after logging into Insights in the WebUI. There are no direct links or buttons that will lead you to this page.
To access the Live ETL Feed page, open your web browser and enter the following URL: https://<webui_server>/insights/live