User Experience
To enhance the User experience, several UI changes have been included in Z and I Emulator for Web Client (ZIEWeb-Client) that makes it more responsive and user-friendly.
Below are some of the UX updates:
- For config-based model, the Login page includes a'Remember me' option and displays appropriate error message for invalid login attempts.
- The Dashboard shows a list of available and active sessions.
- A Search bar has been added to the Settings panel.
- A Ribbon bar is availablein the Full screen mode.
- The Property panel includes a Search bar and Help link.
- TheColor Remap feature is updated with aResetbutton that can be used to reset to the default color.
TheColor Remap feature is updated with a Hex code fieldthat shows the Hex valueof a color.
Touchpad support
Support for touch-enabled devices for ZIEWeb-Client users, so that the users can work with system touch keypad or use tap events on green screen.
Feature Enhancements
a) Auto-update of filesWith the Auto Update feature in ZIEWeb-Client, Users need not manually change the context root or clear the browser history after every build deployment, to run the application.
- Once the User deploys a new build, application automatically updated the client-side java script files and CSS files.
- Users get the new build changes with new features.
- No need to clear the browser cache.
The purpose of this feature is to provide options to customize the UI in ZIEWeb-Client.
- User can customize the UI design of the ZIEWeb-Client web page by specifying a custom template.
- Need to specify the templateURL (parameter name) and value is the full specified path of the custom template in web.properties file
For example:
templateURL=C:/Users/admin/Documents/UI.jsp
- If the file is not available, then default ZIEWeb-Client page will be shown.
-
By using this sample custom template, user can customize the logo bar, about panel, background color, and image of the login page. The user can also change the images of 3270 and 5250 icons and can disable the properties under the settings panel.
Sample code for template.jsp:
<%@ page contentType="text/html; charset=utf-8"%>
<%@ page language="java"%>
<meta http-equiv="Content-Type" content="text/html; charset=ISO-8859-1">
<meta http-equiv="X-UA-Compatible" content="IE=edge">
<meta name="viewport" content="width=device-width, initial-scale=1">

<div id="cust_container" style="display:none"><!-- This line shouldnot be modified. -->

<!-- The sample syntax for each ids have been provided below could be commented or removed if it is not used   -->
<!-- Use the following ids in the below mentioned syntax to disable the properties under settings panel-->
<!-- For Screen- font_div_remove, Key Remap- key_div_remove, Color Remap- color_div_remove, Print Screen- printScreen_div_remove, Hotspot- HotSpot_div_remove  -->
<!-- For cut/copy/paste- CutCopyPaste_div_remove, Mouse wheel- mousewheel_div_remove, Cursor- CursorStyle_div_remove, Preferences- Preferences_Settings_div_remove -->

<INPUT TYPE="HIDDEN" id='color_div_remove'>

<!-- Use the following ids in the below mentioned syntax to replace the default images-->
<!-- Images to be deployed under HTTP Server location -->
<!-- For 3270 icon- img_3270, 5250 icon- img_5250, 3270 inactive icon- img_3270_disable, 5250 inactive icon- img_5250_disable -->
<!-- For product logo in the login panel- cust_myModal_logo, IBM logo in the Nav bar- cust_logo-->

<img id="img_3270" src="http://localhost/zieweb/imagesfol/sample1.svg">

<!-- Use the following ids in the below mentioned syntax to change the background color Login Page-->
<!-- For login page Outer- cust_login, login page Inner- cust_login_inner, Nav bar- cust_nav_background -->

<div id="cust_login" style="background-color:#ECECEC;"></div>


<!-- For Changing the product name in Nav Bar-->
<p id="cust_product_name">
<!-- Here product name can be added -->
</p>


<!-- About panel-->
		<div id="cust_abt_header">
		<!-- Here images or any other content can be added to the header part of About panel  -->
		</div>

		<div class="row" id="cust_abt_body">
		<!-- Here images or any other content can be added to the existing corp. details in About panel  -->
		</div>

		<p id="cust_abt_top">
		<!-- Here any content can be added at the top of version info  -->
		</p>

		<p id="cust_abt_bottom">
		<!-- Here any content can be added at the bottom of version info  -->
		</p>
<!-- About panel ends-->

	<div id="home_last" class="row">
	<!-- Here images or any other content can be added to the bottom of login and home page  -->
	</div>


</div><!-- This line shouldnot be modified. -->
Handling PF Keys Externally
a) Pre-requisite for enabling this feature:
To enable this feature, the path to the custom template must be configured using the Admin Console (applicable from ZIEWeb 2.1) or using the ‘templateURL’ parameter in the web.properties file present in the ZIEWeb publish directory or private directory.
b) Steps to enable this feature:
- To enable this feature for ZIEWeb client, the Administrator must set the ‘isHandleKeyExternaly’ parameter to True (Set the parameter to False in the custom template to disable the feature).
-
To handle the host function keys externally using the custom code, use ‘handledKeyExternally’ that contains the parameters.
keyPressed: gives the value of Host function keys in the current screen.
data: an array that holds the ‘text, startRow, startCol’ of the current screen.
TEXT_PLANE: an array that holds the current screen data.
sessionName: holds the current session name where the key is pressed.
- These methods can be accessed using the <script></script> tags in
the custom template or by calling the “isHandleKeyExternaly” parameter
and “handledKeyExternally(keyPressed, data, TEXT_PLANE, sessionName)”
function in an external javascript, where the script file is placed inside the
ZIEWeb publish directory and configured in the custom template.
For example:
<script src="http://localhost/hod/externalscript.js"></script>
Where,
localhost can be replaced with ‘appserver location’,
ZIEWeb can be replaced with ‘alias of the ZIEWeb server’.
externalscript.js can be replaced with the name of the custom script file that handles the host function keys.
Config Server-based model log in with Microsoft Authentication
Introduction:
In ZIEWeb, users have an option “Automatically log users on to Z and I Emulator for Web using their Windows username” for the Configuration server-based model to enable the login option with Windows credentials. By enabling the same option in ZIEWeb Client, users can log in to the configuration server-based model page with Microsoft credentials.
Create Config Server-Based Model in DW for ZIE for Web Client:
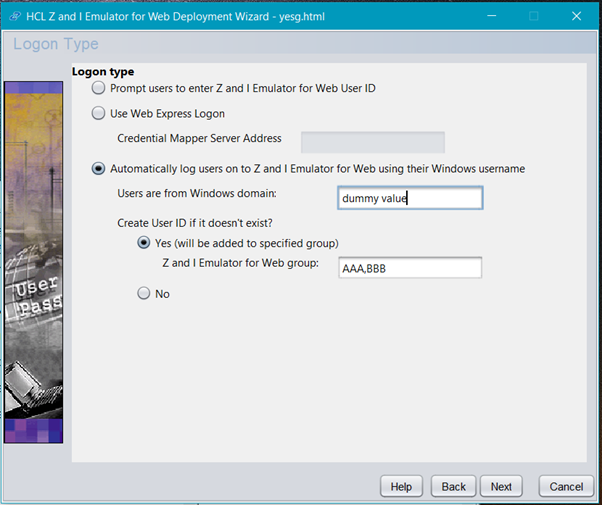
Select the Configuration server-based model in the deployment wizard and enable the “Automatically log users on to Z and I Emulator for Web using their Windows username” option.

Then, select any one of the following Logon type options and click Next:
- Users are from the Windows domain: It is optional. If needed, enter the dummy value.
- Create a User ID if does not exist?
- Yes - Enter the group name where the user needs to be created.
- No – Choose this option if the user already exists.
Follow the below steps to set up the ZIEWeb Client:
- Register the ZIEWeb Client application in Microsoft Azure AD using Microsoft credentials.
- After registration, get the ClientID & RedirectURL and configure it in ZIEWeb Client build (EAR/WAR – need to update Client ID and RedirectURL in web.xml file).
- After configuration, launch the Config server-based model in ZIEWeb Client.
- While launching the Config server-based model, Microsoft Authentication will pop up. Here, users need to provide MS credentials to log in.
- Once login is successful, the Config server-based model page will be launched.
- For the first time log-in, the user will be created with the name of MS mail ID’s first half under the mentioned group.
- If the mail id name part contains other than a dot(.) and a hyphen (-), the special characters are replaced with a hyphen (-).
- If the user does not configure the application with ClientID and RedirectURL, then the MS authentication fails, and a warning message pops up like Configuration not done properly/wrong credentials.
- While launching ZIEWeb Client, check the user in the mentioned group. If the user already exists, the page will be launched.
- If the user does not exist in the mentioned groups, it will create a new user in the mentioned groups.
- While creating a user, check in the ZIEWeb user/group window whether the ‘Allow users to create accounts’ checkbox is selected.
- If Allow users to create accounts checked, users will be created in the mentioned groups.
- If Allow users create accounts checkbox is clear, the ZIEWeb Client page and a warning message for authentication exception will go through.
- If the mentioned groups do not exist in the ZIEWeb user/group, the ZIEWeb Client page will through a warning message for the group does not exist exception.
- Go with this option only when the user exists in any group.
Limitation:
While adding a path for printedFileLocation in Printer Session or templateURL in Custom UI in web.properties at the private directory, use a double backslash instead of a single backslash.
Example: D:\\FolderName\\FileName.jsp instead of D:\Foldername\FileName.jsp