Upload connection by SFTP
The Recipient List Uploader (RLU) uses SFTP protocol as a preferred mechanism to securely upload recipient lists. The RLU establishes a connection with HCL Unica hosted services over SFTP port 2222. Over the secure connection, the RLU negotiates authentication details with the SFTP server and uploads recipient list once authentication is successful.
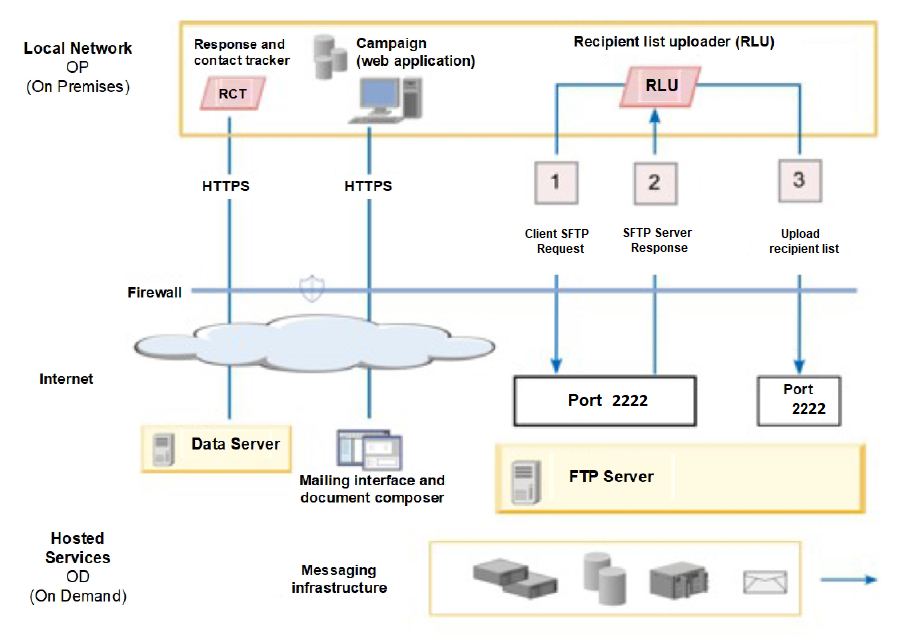
The following diagram illustrates this method for uploading recipient data from Campaign to HCL Unica hosted services.
In the Configuration page, you can view the SFTP option under ftpProtocol (serverComponentsAndLocations -> hostedServices).
The RLU connects to SFTP server and uploads the recipient list to SFTP server. A
certificate-based authorization is used to connect to auth server. It uses the SSH
private key configured in PEM file and SSH RSA fingerprint configured in known_hosts
file to establish connection with SFTP server. Customers are required to configure
separate PEM file per Deliver account, so that it can be configured separately for each
Deliver partition. In addition to the PEM file, RLU requires known_hosts file containing
SSH server fingerprint.This is configured globally at the following path
Affinium|Deliver|serverComponentsAndLocations|hostedServices. and a
flag to control whether RLU requires a pre-configured SSH server fingerprint in
known_hosts file.
Once authenticated, recipient list uploads are done using SFTP and there is no impact to Deliver process box execution from where this will be triggered.
In case if public or private keys are generated using passPhrase, create
a new datasource with name "SFTP_PASSPHRASE_DATASOURCE" under Platform
user specified at "amUserForAcctCredentials". For example: asm_admin
and specify same password or Passphrase to this datasource which you
have used while generating public or private keys. Data source login can be mentioned as
any text.
If public or private keys are not generated using passPhrase, the
datasource must not be created.
To generate keys, perform the following steps.
Steps to generate public / private key pair for SFTP authentication.
- Create the Key Pair
The first step is to create a key pair on the machine, where Campaign web is installed. Log in to the machine, where Campaign web is installed. Open the command prompt and execute the following command.
ssh-keygen - Specify the location to save the keys.
You can press ENTER here to save the files to the default location in the .ssh directory of your home directory. Alternately, you can choose another file name or location by typing it after the prompt and pressing ENTER.
- Create a passphrase.
The second and final prompt from ssh-keygen will ask you to enter a passphrase. It depends on your requirements, whether you want to use a passphrase or not.
For example
[root@Host bin]# ssh-keygen
Generating public/private rsa key pair.
Enter file in which to save the key (/root/.ssh/id_rsa):
Enter passphrase (empty for no passphrase):
Enter same passphrase again:
Your identification has been saved in /root/.ssh/id_rsa.
Your public key has been saved in /root/.ssh/id_rsa.pub.
The key fingerprint is:
61:ca:14:c2:7a:71:e2:aa:bd:2e:ff:25:b8:b1:fd:ac root@Host
The following is the key's randomart image.
.. .
+...
o +. o
. oo o .
o o S
..
oo . .
o .= +
+*oEoo
[root@Host bin]#
Your public key is saved in - /root/.ssh/id_rsa.pub. Send the public key generated to Deliver Dev Ops team through HCL support for configuration.