IBM® WebSphere® Application Server creates a
certificate chain when the signed certificate is received. The chain
is constructed from the signer certificates that are in the keystore
at the time the certificate is received. Therefore, it is important
to import all intermediate certificates as signer certificates into
the keystore before receiving the Certificate Authority-signed certificate.
When you purchase a server certificate for Sametime® Gateway, the certificate
is issued by a Certificate Authority (CA). The CA can either be a
root CA or an intermediary CA.
About this task
If your server certificate is issued by an intermediary
CA, then complete the steps that follow, otherwise skip these steps
and click Next topic at the end of this topic.
Procedure
- Before you import an intermediate CA, first determine if
your server's certificate was issued by an intermediary CA:
- Save the signed certificate to a text file with a
.cer extension.
For example: signed-certificate.cer. Include the Begin
Certificate and End Certificate lines when
you save the file. For example:-----BEGIN CERTIFICATE-----
ZZZZ3zCCAkigAwIBAgIDB5iRMA0GCSqGSIb3DQEBBQUAME4xCzAJBgNVBAYTAlVT
MRAwDgZZZZQKEwdFcXVpZmF4MS0wKwYDVQQLEyRFcXVpZmF4IFNlY3VyZSBDZXJ0
aWZpY2F0ZSBBdXRZZZZpdHkwHhcNMDcwNjE4MTkwNDI3WhcNMDgwNjE4MTkwNDI3
WjBqMQswCQYDVQQGEwJVUZZZZwGA1UECBMFVGV4YXMxDzANBgNVBAcTBkF1fc3Rp
bjEMMAoGA1UEChMDSUJNMRAwDgYDVQQLEwdzdXBwb3J0MRowGAYDVQQDExFydGNn
YXRlLmxvdHVzLmNvbTCBnzANBZZZZiG9w0BAQEFAAOBjQAwgYkCgYEAlb7fl36ti
obgdUzUYoFuJhRVZqItvBskeVFSOqDuQ4TwOAvaPTySx3z7ddFHSHwoFVOVIkU2g
OPiRcPY8oYlZ5R7Bq1fI/t5MFUTJhYw7k6z95jfIufzai2Bn3e+jzm7ivJ5dckEZ
Gm3ajjYQgwjCJBfOh7P9fE13dWJSZZZZzWcCAwEAAaOBrjCBqzAOBgNVHQ8BAf8E
BAMCBPAwHQYDVR0OBBYEFMHrh2oiTGbcBH759lnRZZZZn+NSMDoGA1UdHwQzMDEw
L6AtoCuGKWh0dHA6Ly9jcmwuZ2VvdHJ1c3QuY29tL2NybHMvc2VjdXJlY2EuY3Js
MB8GA1UdIwQYMBaAFEjmaPkr0rKV10fYIyAQTzOYkJ/ZZZZGA1UdJQQWMBQGCCsG
AQUFBwMBBggrBgEFBQcDAjANBZZZZkiG9w0BAQUFAAOBgQBKq8lUVj/DOPuNL/Nn
IGlrr1ot8VoZS7wZZZZlgeQLOmnZjIdRkbaoH04N3W3qZsQVs2/h4JZJj3mKVjjX
FeRVHFFyGZZZZ4hHWH+Zqf/PJwjhVPKEwsiKFaAGJS5VzP3btMG8tGan02zZUE4L
wPZZZZpMmvPI3U12W+76bqyvVg==
-----END CERTIFICATE-----
- Double-click on the new file that you created and a
Certificate dialog box opens.
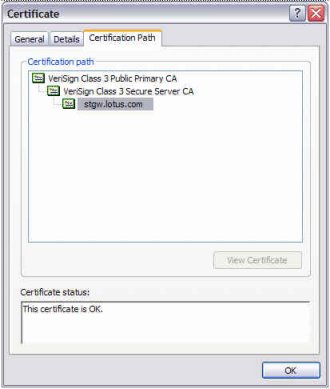
- Click on the Certification Path tab.
- Look at the tree-like structure representing the full
certificate chain and determine whether your certificate was issued
by the root CA or an intermediary CA.
If your server
is listed one level after the root CA, this indicates that it was
issued by that root CA; otherwise the certificate was issued by an
intermediary CA.
For example, the following screen
capture shows a certificate chain where an intermediary CA, VeriSign
Class 3 Secure Server CA, issued a certificate for stgw.lotus.com.
- If the server certificate is not issued by an intermediary
CA, stop here and click Next topic at the end
of this topic.
- One you determine that the certificate is an intermediate
certificate, you must export the certificate from the chain into its
own certificate file:
- Double-click the server's certificate (i.e. server.cer)
file and a Certificate dialog box opens.
- Click Certification Path tab.
- Highlight an entry of the certificate chain.
- Click View Certificate.
- In the Certificate dialog window,
click the Details tab.
- Click Copy to File...
- In the Certificate Export Wizard that
appears, click Next.
- Select Base-64 encoded X.509 (.CER),
and click Next.
- Type in a unique name for the certificate you are exporting
and click Next. For example, "VS-intermediary-CA"
for VeriSign's intermediary certificate authority.
- Click Finish.
- Click OK in the dialog box that
displays the following message: The export was successful.
- Repeat the preceding sub steps for each intermediate
certificate in the chain. Note that there is no need to repeat these
steps for the last entry of the chain because the server's certificate
already exists. When you are done, you will have a certificate file
(.cer) for each entry of the chain.
In our example,
there are three certificate files:
Table 1. Certificate types
and names
| Certificate type |
Name |
Certificate file name |
| Root |
VeriSign Class 3 Public Primary CA |
VS-root-CA.cer |
| Intermediary |
VeriSign Class 3 Secure Server CA |
VS-intermediary-CA.cer |
| Server |
stgw.lotus.com |
stgw.cer |
- Finally, import the intermediary CA certificate into the
keystore by completing the following steps:
- Using the Integrated Solutions Console, click .
- Click Key stores and certificates.
- Click CellDefaultKeyStore.
- Click Signer certificates.
- Click Add.
- In the Alias field, type a short
descriptive name for the certificate. For example, "Verisign Intermediary
CA."
- In the File name field, type
the path to the certificate file of the intermediary CA. For example,
C:\certs\VS-intermediary-CA.cer.
- Accept the default file data type.
- Click Apply and Save.
- Repeat the preceding steps for each intermediary CA
that is part of the certificate chain. In most cases, only one intermediary
CA exists.