Adding an SQL Command action to a test
The SQL Command action runs an SQL command (insert, update, or delete rows) against a selected database. As you add this action, you can validate or store into a tag the number of rows that are affected.
Before you begin
Ensure that the database resource is properly configured in the Architecture School perspective. For more information about configuring a database resource, see Database resources, connections, and bindings.
You must have a test. For more information about creating tests, see Test Factory. Tests include steps and actions. For more information about test steps and actions, see Test actions.
About this task
Selecting a test
Procedure
- In HCL OneTest™ API Test Factory perspective, double-click the test where the SQL Command action is to be added.
- In the Test Editor window, click .
- To edit the action, double-click SQL Command action.
The SQL Command dialog opens where you can add the SQL statements.
Adding SQL statements
About this task
To insert, update, or delete rows against the selected database, add SQL statements.
Procedure
- Select a database resource from the available
resources in the project by clicking Browse.
The initial list of databases is derived from the information that is provided in the Architecture School perspective. If the operation that you are creating a test for has a dependency on a database, then that database shows in the list when Obey References is set to Yes. If you want to work with a database where there is no dependency link to the current operation, all databases in the project can be viewed by setting Obey Referencesto No.
- Enter a statement (
INSERT,UPDATE, orDELETE) in the Statement field.You can add multiple SQL statements and separate them by a semi-colon (;).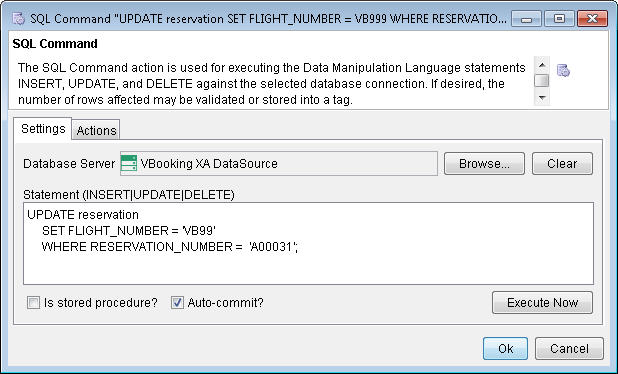
- If you are entering a stored procedure,
click the Is stored procedure? check box and
modify the syntax of the query, for example,
{call procedure (var, var)}.Tip: If you are using a stored procedure call, you might want to use the Stored Procedure action instead (see Adding a Stored Procedure action to a test). This action presents the available functions and input and output parameters more clearly. - To commit the changes to the database after each statement runs, click the Auto-commit? check box. If you clear this option, the changes are saved to the database only after all the statements are successfully run.
- Save the SQL Command action by clicking OK.
Testing the SQL statements
About this task
Before you run the SQL statements against a selected database, it might be a good idea to test the SQL statements.
Procedure
INSERT, UPDATE,
or DELETE) command. 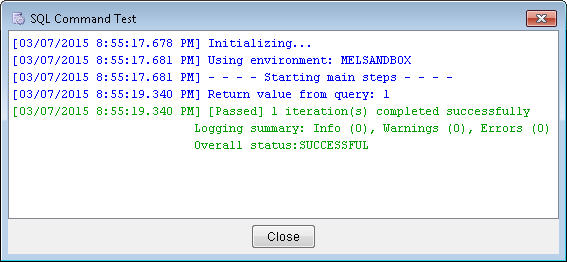
Validating return values
About this task
To specify a condition that relates to the return value, such as validating the number of rows that are affected by the command, use the Validate tab under the Actions tab.
Procedure
- Click the Actions tab.
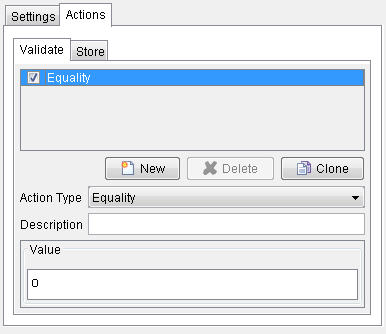
In the example above, the return value is validated by the condition that it equals zero. Hence, this test step fails if any rows are updated by the specified command.
- Click the Validate tab and choose an option. For more information about each option, see The Field Editor.
Storing the return value in to a tag
About this task
To store the number of database rows that are affected into a tag for later use, use the Store tab under the Actions tab. For example, you might want to insert a record into a database, by using tags instead of hardcoding the values to be inserted into the database. With tags, you gain flexibility to provide different values in the test and to reuse the test.
Procedure
- Click the Actions tab.
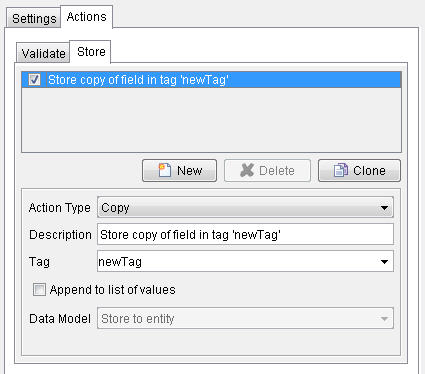
- Click the Store tab and choose an option. For more information about each option, see The Field Editor.