Roadmap: Creating content authors, groups, and setting permissions
Administrators must understand the roles and goals of content authors to grant the appropriate permissions. Learn how to create users, create content author and reviewer groups, and grant access to resources and libraries.
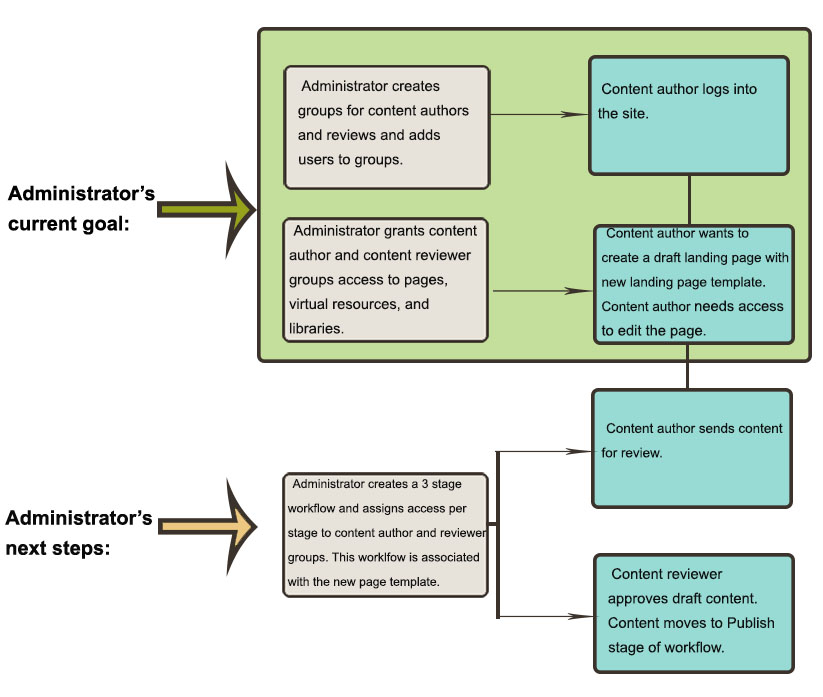
Background information for the administrator: Identify the goals of the content authors
As the administrator, you must understand the various content author roles. For example, a content author might want to create a landing page from a page template. For this type of site update, the content author creates a project and then creates a page from a page template in site manager. To accomplish these goals, the content author needs to exist in the system and belong to a content author group. The content author would need access to projects to create or enter a project and access to other resources types like pages in order to create a draft page.
A content reviewer role also exists in the content authoring story. You need to add the content reviewer to the system to a content reviewer group. The content reviewer group needs sufficient access to view draft content and to move drafts to the next workflow stage.
The flow chart highlights the content authors and reviewers goals and the tasks that administrators must complete for these roles to accomplish their goals.
This roadmap focuses on creating users and groups, assigning resource permissions, and assigning library permissions.
To learn more about how an administrator defines workflow access control, go to Roadmap: Controlling who can create drafts, review, and publish content with workflows
Creating content authors and content reviewers in your site
Learn how to create the Content Authors Group and the Content Reviewers Group. Then, learn how to add users to these groups.
Procedure
- Log in as the administrator.
- Click the Administration menu icon. Then, click .
- Click All Portal User Groups.
- Click New Group and enter Content Authors Group as the ID for your new group. Click OK to save your group.
- Click New Group and enter Content Reviewers Group as the an ID for your new group. Click OK to save your group.
- Click Content Authors Group to open the group. Then, click New User to create your content author, such as Author1, to your group. To create a new content author, you must enter profile information for the user. Profile information includes user ID and password. Click OK to save your changes.
- Click All Portal User Groups.
- Click Content Reviewers Group to open the group. Then, click New User to create a content reviewer, such as Reviewer1, that you want to review content.
Assigning the authoring groups access to pages and vanity URLs
The content authoring options that are available to content authors depend on the resource permissions that you assign.
About this task
Procedure
- Click the Administration menu icon. Then, click
-
Assign access to pages. Assign the Content Authors Group to the Contributor role. Assign the
Content Reviewers Group to the User role.
If the access control is set up correctly, Create Sibling Page and the Create Child Page options are available and enabled in the context menu from Site Manager for the content author. Content authors must have access to these options to create a new landing page from a page template. For content authors to create drafts from published content, the administrator must assign the appropriate workflow access. Instructions for workflow permissions are contained in a later roadmap.
- Assign access to virtual resources. Assign the Content Authors Group to the Editor role. Assign the Content Reviewers Group to the User role. From Resource Permissions, go to to assign access to these roles. Follow the instructions that are outlined in the earlier step for assigning access to these roles.
Setting up library access
Libraries store content and pages on the site. Draft pages that the content author creates from Site Manager in the site toolbar are stored in the portal site library. Workflows, content, and other design elements are stored in the web content library. You must give your content author the correct permissions to work with the web content and portal site libraries.
About this task
Procedure
- Click the Administration menu icon. Then, click .
-
Set permissions for the Portal Site library.
- Click the Set permissions icon for the Portal Site library.
- Click the Edit Role icon for the Editor role.
- Click Add. Then, click Search to show all groups.
- Select the Content Authors Group and Content Reviewers Group.
- Click .
-
Set permissions for the Web Content library.
- Click the Set permissions icon for the Web Content library.
- Click the Edit Role icon for the Editor role.
- Click Add. Click Search to show all groups.
- Select the Content Authors Group and Content Reviewers Group.