SSFS is a flexible and powerful system.
Due to this, each installation is likely configured differently. This
task includes common configurations made to SSFS to function with
the mediation module.
Important: Review the following information for your version of WebSphere
Commerce:
These
configurations require:
 SSFS Version 9.0
 SSFS Version 9.1
See General mapping rules for
a general overview of how WebSphere Commerce fields map to SSFS fields.
About this task
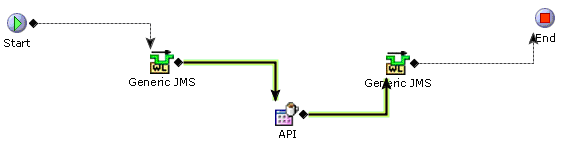
To enable SSFS to receive API calls over JMS, you must
create a custom async service for each API call. The SSFS API calls
to enable are:
- findInventory
- reserveAvailableInventory
- createOrder
- multiAPI
To enable an API call, you must create a new service which:
- Receives the request on a JMS queue
- Performs the API call
- Puts the response on another JMS queue
The flow resembles the following diagram:
Procedure
- To create an API Service:
- Launch the Applications Manager.
- Select from the
menu.
- Double click on Process Modeling.
- Double click on the Order Fulfillment icon.
- Click on the Service Definitions tab
at the bottom of the left pane.
- Create a new service called EXTN_WC_API_NAME,
where API_NAME is the name of the API you will
be calling. Ensure it is added to the WebSphere Commerce group.
- Drag components onto the palette so it resembles the
above flow diagram.
- For the line going from the API node
to the Generic JMS node, use the following
for the configuration parameters.
Note:
- These are just sample parameters. Your environment might be
different so some of them might have to change. In particular, you will have to update the
Provider URL to match the hostname and SOAP port of your WESB server.
- If a parameter does not appear in the tables below, it denotes
that the field is left blank.
Runtime tab
| Parameter |
Value |
| Sub Service Name |
WC_findInventory |
| Queue Name |
WCToSSFSMediationModule/SSFSAPIsImport_SEND_D |
| Provider URL |
corbaloc:iiop:your_host_name:your_port_number |
| Initial Context Factory |
WebSphere MQ |
| QCF Lookup |
WCToSSFSMediationModule/SSFSAPIsImport_QCF |
| Transactional |
Selected |
| Initial Threads |
5 |
| Selector |
TargetFunctionName = 'findInventory' |
| Default Reply To Queue Name |
WCToSSFSMediationModule/SSFSAPIsImport_RECEIVE_D |
Server tab
| Parameter |
Value |
| Server Name |
WC_API_Receiver Note: This is the name of the
JMS listener server that is set up on Sterling Commerce that listens
for the JMS queries. |
| Needs Decompression |
Not selected |
Reconnect tab
| Parameter |
Value |
| Maximum Time Between Reconnects (min) |
2 |
Exception tab
| Parameter |
Value |
| Alert Type |
WC_API_Exception |
| Alert Queue Name |
System Announcement Queue (DEFAULT) |
| Suspend API |
Not selected |
| Is Reprocessible |
Not selected |
- For the line going from the API node
to the second Generic JMS nodes, use the following
samples for the configuration parameters.
Runtime
tab
| Parameter |
Value |
| Queue Name |
WCToSSFSMediationModule/SSFSAPIsImport_RECEIVE_D |
| Time To Live (seconds) |
10 |
| Provider URL |
corbaloc:iiop:your_host_name:9104 |
| Initial Context Factory |
WebSphere MQ |
| QCF Lookup |
WCToSSFSMediationModule/SSFSAPIsImport_QCF |
| Persistent |
Selected |
| Needs Compression |
Not selected |
| Commit of this message depends on parent transaction |
Selected |
| Enable JMS Security |
Not selected |
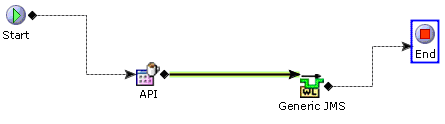
- Enable Outbound API Calls over JMS:
Similarly
to enabling inbound API calls, for SSFS to notify WebSphere Commerce
of changes to order status, we must setup custom services. These services:
- Make an API call
- Send the results of that call over a JMS queue.
The flow resembles the following diagram:
Once we create the services, they can be
added to an action which, in turn, can be added to a transaction event.
When the transaction event is fired, it will call the action, which
will call the service. The service will then send order or shipment
details to WebSphere Commerce
We will create two custom services.
The first will notify WebSphere Commerce of order updates and the
second will update WebSphere Commerce of shipment updates.
To
create the order update service:
- Launch the Applications Manager.
- Select from the
menu.
- Double click on Process Modeling.
- Double click on the Order Fulfillment icon.
- Click on the Service Definitions tab
at the bottom of the left pane.
- Create a new service called EXTN_WC_sendOrderDetails_JMS.
Ensure it is added to the WebSphere Commerce group.
- Drag components onto the palette so it resembles the
above flow diagram.
- Double click on the API node
and set the API Name parameter to getOrderDetails.
- For the line going from the first Generic
JMS node to the API node, use the
following for the configuration parameters.
Note:
- These are just sample parameters. Your environment might be different
so some of them might have to change.
- If a parameter does not appear in the tables below, it denotes
that the field is left blank.
Runtime tab
| Parameter |
Value |
| Queue Name |
WCToSSFSMediationModule/SSFSAPIsExport_RECEIVE_D |
| Time To Live (seconds) |
10 |
| Provider URL |
corbaloc:iiop:your_host_name:2809 |
| Initial Context Factory |
WebSphere MQ |
| QCF Lookup |
WCToSSFSMediationModule/SSFSAPIsImport_QCF |
| Persistent |
Selected |
| Needs Compression |
Not selected |
| Commit of this message depends on parent transaction |
Selected |
| Enable JMS Security |
Not selected |
Header tab
| Parameter |
Value |
| TargetFunctionName |
sendOrderDetails |
Reconnect tab
| Parameter |
Value |
| Retry Interval (ms) |
0 |
| Number of Retries |
0 |
| Use Backup JMS |
Not selected |
- Click on the Actions tab at the
bottom of the left pane.
- Click on the + icon at the top
of the left pane.
- Enter the following information:
- Action Code
- EXTN_SendOrderDetails
- Action Name
- Send Order Details
- Action Group
- WebSphere Commerce
Ensure
Invoke the following services as
part of this action is selected.
- Invoked Services
- EXTN_WC_sendOrderDetails_JMS
- Click Save.
- Go to the Transactions tab at
the bottom of the left pane.
- Double click on the Release Order transaction.
- Double click on the ON_SUCCESS event.
- Drag your newly created action from the Actions tab
of the left pane to the diagram in the right pane.
- Save the transaction.
To create the shipment update service:
- Launch the Applications Manager.
- Select from the
menu.
- Double click on Process Modeling.
- Double click on the Outbound Shipment icon.
- Click on the Service Definitions tab
at the bottom of the left pane.
- Create a new service called EXTN_WC_sendShipmentDetails_JMS.
Ensure it is added to the WebSphere Commerce group.
- Drag components onto the palette so it resembles the
above flow diagram.
- Double click on the API node
and set the API Name parameter to getShipmentDetails.
- For the line going from the first Generic
JMS node to the API node, use the
following for the configuration parameters.
Note:
- These are just sample parameters. Your environment might be different
so some of them might have to change.
- If a parameter does not appear in the tables below, it denotes
that the field is left blank.
Runtime tab
| Parameter |
Value |
| Queue Name |
WCToSSFSMediationModule/SSFSAPIsExport_RECEIVE_D |
| Time To Live (seconds) |
10 |
| Provider URL |
corbaloc:iiop:your_host_name:2809 |
| Initial Context Factory |
WebSphere MQ |
| QCF Lookup |
WCToSSFSMediationModule/SSFSAPIsImport_QCF |
| Persistent |
Selected |
| Needs Compression |
Not selected |
| Commit of this message depends on parent transaction |
Selected |
| Enable JMS Security |
Not selected |
Header tab
| Parameter |
Value |
| TargetFunctionName |
sendShipmentDetails |
Reconnect tab
| Parameter |
Value |
| Retry Interval (ms) |
0 |
| Number of Retries |
0 |
| Use Backup JMS |
Not selected |
- Click on the Actions tab at the
bottom of the left pane.
- Click on the + icon at the top
of the left pane.
- Enter the following information:
- Action Code
- SendShipmentDetails
- Action Name
- Send Shipment Details
- Action Group
- WebSphere Commerce
Ensure
Invoke the following services as
part of this action is selected.
- Invoked Services
- EXTN_WC_sendShipmentDetails_JMS
- Click Save.
- Go to the Transactions tab at
the bottom of the left pane.
- Double click on the Confirm Shipment transaction.
- Double click on the ON_SUCCESS event.
- Drag your newly created action from the Actions tab
of the left pane to the diagram in the right pane.
- Save the transaction.
What to do next
Once these services are created, they can be added to actions
which, in turn can be added to transactions. Transaction examples
include Release Order and Shipment Shipped.

 Review information about APAR fixes for integration of IBM WebSphere Commerce and IBM Sterling Order Management. For
more information about integrating IBM WebSphere Commerce Version 7 Feature Pack 8 (or later) with
IBM Sterling Order Management Release 9.3, see WebSphere
Commerce integration with Sterling Order Management. For more information about integrating
IBM WebSphere Commerce Version 7 Feature Pack 5 (or later) with IBM Sterling Order Management
Release 9.2.1 (or later), see WebSphere Commerce
integration with Sterling Order Management.
Review information about APAR fixes for integration of IBM WebSphere Commerce and IBM Sterling Order Management. For
more information about integrating IBM WebSphere Commerce Version 7 Feature Pack 8 (or later) with
IBM Sterling Order Management Release 9.3, see WebSphere
Commerce integration with Sterling Order Management. For more information about integrating
IBM WebSphere Commerce Version 7 Feature Pack 5 (or later) with IBM Sterling Order Management
Release 9.2.1 (or later), see WebSphere Commerce
integration with Sterling Order Management.  You can integrate Sterling Order Management with WebSphere Commerce using
either Direct Integration or IBM® WebSphere Enterprise Service Bus (WESB) integration. With Direct
Integration, the functions to convert message content and format are performed by services in the
Sterling Order Management Service Definition Framework (SDF). For information about using Direct
Integration to integrate Sterling Order Management with WebSphere Commerce, see Direct Integration with WebSphere Commerce.
You can integrate Sterling Order Management with WebSphere Commerce using
either Direct Integration or IBM® WebSphere Enterprise Service Bus (WESB) integration. With Direct
Integration, the functions to convert message content and format are performed by services in the
Sterling Order Management Service Definition Framework (SDF). For information about using Direct
Integration to integrate Sterling Order Management with WebSphere Commerce, see Direct Integration with WebSphere Commerce.