Once the customization has been completed and
tested, you are ready to deploy your custom code to a target WebSphere
Commerce Server and implement the customization on a live site.
About this task
Deploying to the server involves exporting code from the
WebSphere Commerce development environment and deploying code into
the target WebSphere Commerce Server.
Procedure
- Export code from the WebSphere Commerce development environment
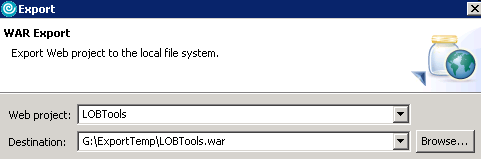
- To export the LOBTools project:
- In the Enterprise Explorer view, expand ; then click .
- Click Browse to select a destination.
- Click Finish.
- To export the WebSphereCommerceServerExtensionsLogic
project:
- In WebSphere Commerce Developer, switch to the Enterprise Explorer view. Navigate to ; right-click then click Export. The Export wizard opens.
- In the Export wizard:
- Select and click Next. The project WebSphereCommerceServerExtensionsLogic is selected by default. Leave this value selected.
- In the right pane, ensure that resources that begin with a period
are not selected. For example:
- .classpath
- .factorypath
- .project
- Ensure that Export generated class files and resources is selected.
- Do not select Export Java source files and resources.
- In the Select the export destination field,
type the fully-qualified JAR file name to use. In this case, type Driver:\ExportTemp\WebSphereCommerceServerExtensionsLogic.jar.
- Click Finish.
- To export DSL extension configuration files:
For XML configuration files, copy the assets to the directory
you are using to build your deployment package. The structure under
this directory must match the structure that you want inside the EAR
file.
- In the file system, navigate to your temporary directory. For
instance, drive:\ExportTemp.
- Create a directory like
xml\config\com.ibm.commerce.marketing-ext.
- Copy the files under driver:\WCDE_installdir\workspace\WC\xml\config\com.ibm.commerce.marketing-ext into driver:\ExportTemp\xml\config\com.ibm.commerce.marketing-ext.
For this tutorial, the file included is only wc-business-object-mediator.xml.
- Deploy code into the target WebSphere Commerce Server
- To deploy LOBTools.war:
- In the WebSphere Application Server, select administrative
console. Expand .
- In the Application name field, type an
application name. For example, WC_demo, and click Update.
- Select Single module and change the Specify path to your path.
- Select Detailed - Show all installation options and
parameters. Do not use the default Fast Path.
- In the next screen, do not make any changes and click Next.
- Click Continue on the following screen.
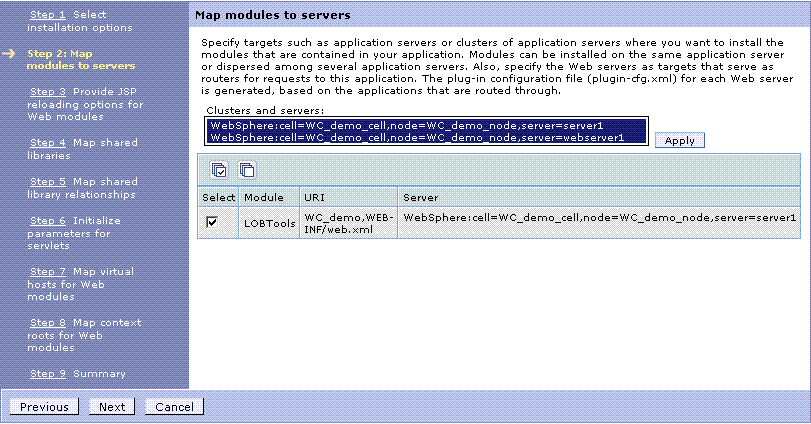
- To map the module to the servers, select the Module, press CTRL and select Clusters and Servers that are running your
WebSphere Commerce application and click Apply.
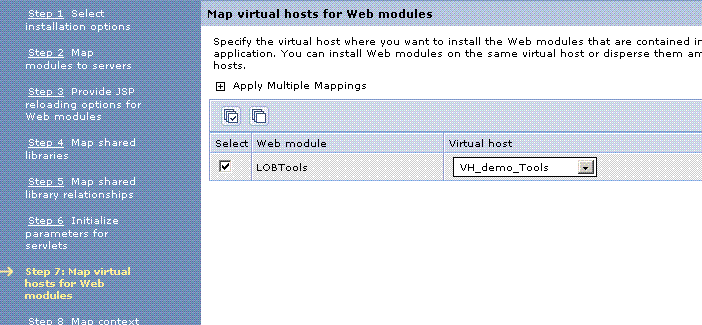
- Select Virtual host.
- Click Next, and then click OK.
- After the update has completed successfully, click Save to Master Configuration.
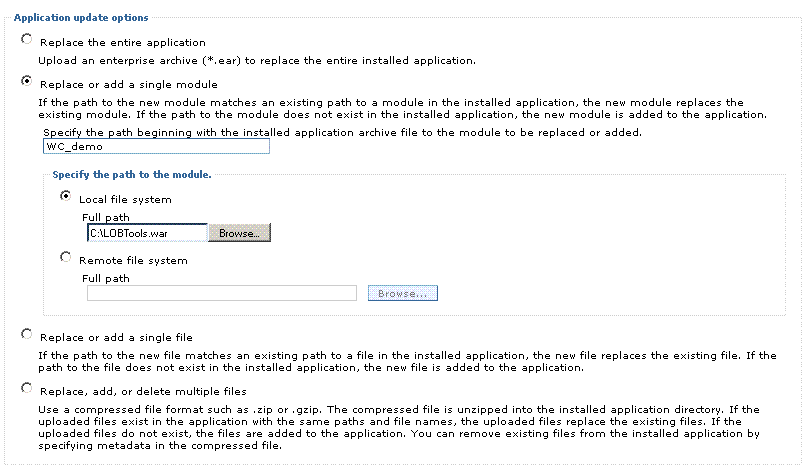
- To deploy the WebSphereCommerceServerExtensionsLogic.jar file and XML config files:
- Package the WebSphereCommerceServerExtensionsLogic.jar file and
the xml directory in a .zip file, for example, partialApp.zip.
- In the WebSphere Application Server administrative console, select .
- Select the application name, for example, WC_demo; then click Update.
- Click Replace, add, or delete multiple files.
- In the Specify the path to the file section,
select Local file system and click Browse; then specify the path
drive:\ImportTemp\partialApp.zip.
- Click Next.
- Click OK.
- After the update has completed successfully, click Save to Master Configuration.
- Click Save.
- Restart the Server.