Testing your customizations

In this section you will test your customization result.

About this task

You can test the result of your customized code by:
  • Verifying the customized code with the Management Center user interface
  • Verifying the customized code by viewing BOD messages in the trace

Procedure

  1. Test the customization by verifying with the Management Center user interface:
    1. Ensure that the WebSphere Commerce Server is running.
    2. In the Web browser, type https://hostname:8000/lobtools.
    3. Log on to the Management Center using the category manager user ID you previously registered.
    4. From the Management Center menu, select Catalogs to open the Catalogs tool.
    5. From the Store list, select Select Store > ConsumerDirect store.
    6. From the Find area list, select Advanced Search.
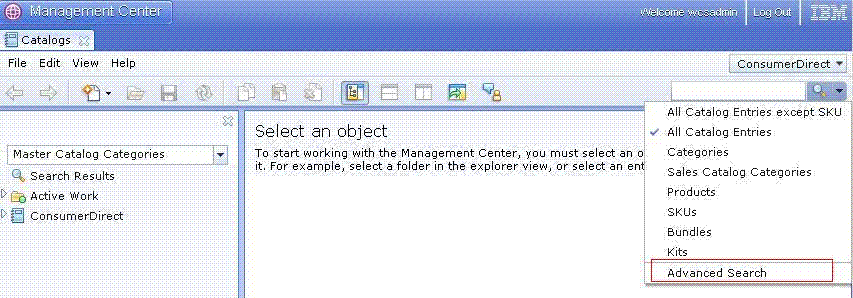
      Find area list
    7. The Warranty Term and Warranty Type appear in the Advanced Search dialog as search conditions that are specified using a list. These were added when you extended the Catalog Advanced Search dialog to include extended properties as search conditions.
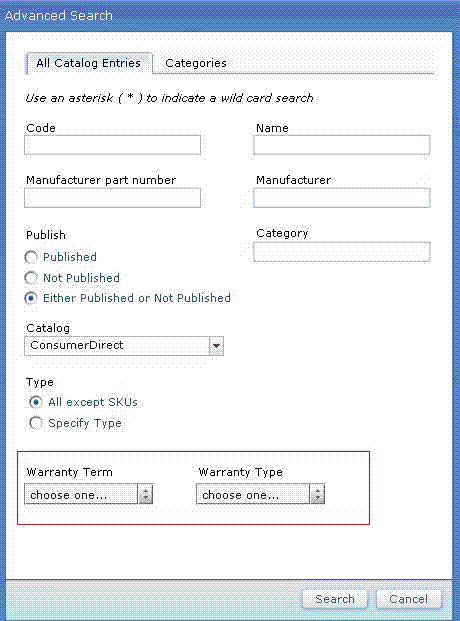
      Advanced Search dialog
    8. Specify the search conditions that you want to use and click Search to launch the search. For example, if you want to search all of the Catalog Entries with the Warranty Term as 30 and the Warranty Type as limited, from the Warranty Term list, select 30 and from the Warranty Type list, select limited. The search result appears in the Catalog Search Result list view, showing the FULO-01 product with its warranty term and warranty type displayed in the Warranty Term and Warranty Type columns.
      Warranty Term and Warranty Type columns
  2. Verify the user-defined data customization by viewing BOD messages in the trace. In addition to using the Management Center user interface, you can also verify your customization by viewing BOD messages in the trace. When you issue a search in the Management Center user interface, the LOBTools Web application and client library fetches the search parameters, packages them into BOD messages, and then sends the request to the server to invoke the corresponding Web service. After the query is executed on the server side, the query result is also packaged into response BOD messages and returned to the Management Center user interface. You can read these BOD messages in the trace to determine if your customization is working correctly. To turn the trace on:
    1. In a Web browser, type http://hostname:9060/ibm/console/ to open the Admin Console.
    2. Click Login to log in with your user ID information.
    3. Navigate to Troubleshooting > Logs and Trace.
    4. Select Server 1 to display the Logging and tracing page.
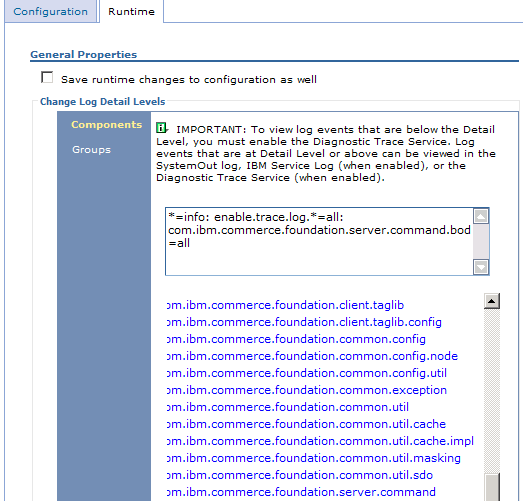
    5. Enable the trace "com.ibm.commerce.foundation.server.command.bod" in the Runtime tab.
      Runtime tab
    6. Click OK and close the Admin Console.
    7. After the trace is turned on, complete the search scenario again, and then locate the request and respond BOD messages in the WCDE_installdir\wasprofile\logs\server1\trace.log file. The following code snippet shows an example of the request BOD message:
      <_cat:GetCatalogEntry xmlns:xsi="http://www.w3.org/2001/XMLSchema-instance" xmlns:Oagis9="http://www.openapplications.org/oagis/9" xmlns:_cat="http://www.ibm.com/xmlns/prod/commerce/9/catalog" xmlns:_wcf="http://www.ibm.com/xmlns/prod/commerce/9/foundation" versionID="6.0.0.4">
         <Oagis9:ApplicationArea xsi:type="_wcf:ApplicationAreaType">
            <Oagis9:CreationDateTime>2008-02-14T15:13:32.328Z</Oagis9:CreationDateTime>
            <Oagis9:BODID>501a9350-db39-11dc-9be3-837747b497a5</Oagis9:BODID>
            <_wcf:BusinessContext>
                <_wcf:ContextData name="storeId">10001</_wcf:ContextData>
                <_wcf:ContextData name="catalogId">10001</_wcf:ContextData>
            </_wcf:BusinessContext>
         </Oagis9:ApplicationArea>
         <_cat:DataArea>
             <Oagis9:Get maxItems="25">
             <Oagis9:Expression expressionLanguage="_wcf:XPath">{_wcf.ap=MyCompany_All}/CatalogEntry[(@catalogEntryTypeCode='ProductBean' or @catalogEntryTypeCode='BundleBean' or @catalogEntryTypeCode='PackageBean' or @catalogEntryTypeCode='DynamicKitBean') and search(UserData/UserDataField/Warterm='45') and ParentCatalogGroupIdentifier[ExternalIdentifier[GroupIdentifier='']]]</Oagis9:Expression>
             </Oagis9:Get>
         </_cat:DataArea>
      </_cat:GetCatalogEntry>
      The following code snippet shows an example of part of the respond BOD message:
      ......
      <_wcf:UserData>
          <_wcf:UserDataField name="catentry_id">10001</_wcf:UserDataField>
          <_wcf:UserDataField name="warterm">45</_wcf:UserDataField>
          <_wcf:UserDataField name="wartype">LIMITED</_wcf:UserDataField>
          <_wcf:UserDataField name="optcounter">1</_wcf:UserDataField>
      </_wcf:UserData>
      ...... 

Results