You
can create and load
three versions of a custom icon to represent your new campaign element
in the Management Center user interface. These images help business
users identify the element when creating activities in the Activity
Builder.
Complete this procedure only if you want to
use your own custom icons to represent the campaign element. Alternatively,
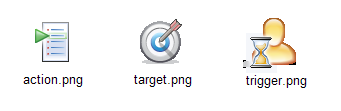
you can use a set of generic icons supplied with Management Center.
The generic icons are shown below. To use the generic icons, you must
specify the generic icon image names in the object definition for
the campaign element. These steps are covered in the next procedure, Creating the object definition for the campaign element.
About this task
Rather than hard-coding image file names
in the OpenLaszlo
class files, include all paths to images in resource files, and associate
the files with resource keys. This way, you maintain the user interface
code in one area (the OpenLaszlo file) and the images in another (resource
file). This is particularly useful if you have images that will change
often or require translation. In the Activity Builder user interface,
each campaign element is represented by an icon. Each icon is displayed
in three different locations in the user interface, and each location
requires the same icon in a different size. The following table summarizes
these requirements:Specifications for palette icons| Location of icon
in Activity Builder | Suggested size of
icon |
|---|
| In the
palette | 20x20 pixels |
| In the work area (after a business user drags
the icon from the palette onto the activity flow) | 32x32 pixels |
| In
the properties view (top-left corner) below
the work area | 63x60 pixels |
Procedure
- Open
WebSphere Commerce Developer and switch to the Enterprise Explorer
view.
- Copy the three image files to the following locations:
- For the icon in the palette:
LOBTools/WebContent/WEB-INF/src/lzx/your_company_name/marketing/resources/pal/
- For the icon in the work area:
LOBTools/WebContent/WEB-INF/src/lzx/your_company_name/marketing/resources/dgm/
- For the icon in the properties view:
LOBTools/WebContent/WEB-INF/src/lzx/your_company_name/marketing/resources/hdr/
- Define a resource file to reference
the images:
- Navigate to the directory
to store your new resource
file, for example:
LOBTools/WebContent/WEB-INF/src/lzx/your_company_name/marketing/resources/
- Create an OpenLaszlo file
for your customized resources, for example, extMarketingManagementResources.lzx.
- Within the resources file, list the three
images and
associate a resource name with each path and file name.
Here
is an example of the contents of the file:
<library>
    <resource name="customLevelOfSupportPaletteIcon" src="pal/cLevelOfSupport_pal.png"/>
    <resource name="customLevelOfSupportIcon" src="dgm/cLevelOfSupport_dgm.png"/>
    <resource name="customLevelOfSupportHeaderIcon" src="hdr/cLevelOfSupport_hdr.png"/>
</library>
- Save and close
the file.
- Add a reference
to the new resource file in the MarketingExtensionsLibrary.lzx file.
The file is stored at this path:
LOBTools/WebContent/WEB-INF/src/lzx/commerce/marketing/
The
line of code that references the new object
definition should look like the following example:
<include
href="../../your_company_name/marketing/resources/extMarketingManagementResources.lzx"/>