Federating two LDAP servers without a common root organization
You can leverage the directory integration features of Virtual Member Manager (VMM) in WebSphere Application Server to map between different organizational hierarchies in LDAP.
Before you begin
Ensure that before you federate multiple LDAP servers (with common root or different root), you check that the RDN prefix for users is the same, for example uid or cn, but not a mix of both.
About this task
The mapping of these disjointed organization structures is specified in the VMM configuration file. To map between different organizational hierarchies in LDAP and WebSphere Commerce database, you must set the mapping in Virtual Member Manager.
Procedure
- Manually run VMM setup (Federated Repository setup) in
WebSphere Application Server admin console:
- Start WebSphere Commerce server1.
- Open the WebSphere Integrated Solutions Console.
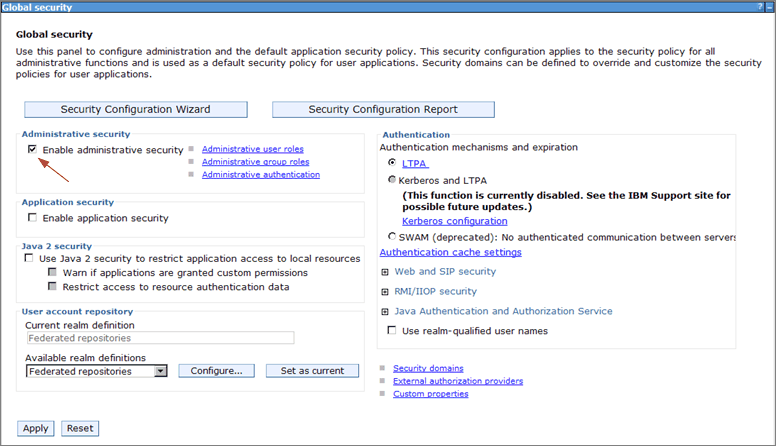
- Expand Security and click Global Security.
- In the User account repository section, select Federated repositories from the Available realm definitions drop-down menu. Then, click .
- Click Add Base entry to Realm...
- Click Add Repository... to add the LDAP 1 (Shopper) repository if it does not exist.
- Complete the following fields:
- Repository identifier
- Directory type
- Primary host name
- Bind DN and bind password
- Login properties: uid or cn, depending on how user DNs are configured on the LDAP server. For instance,uid=xxx,o=root organization or cn=xxx,o=root organization
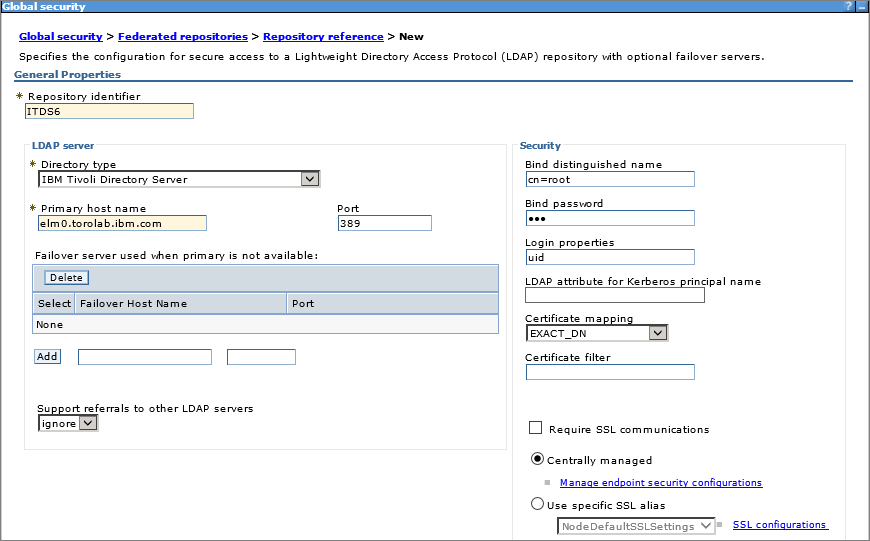
For more information, see Configuring LDAP in a federated repository configuration.
- Click OK. The values that are entered are validated and the default values are populated based on the Directory type.
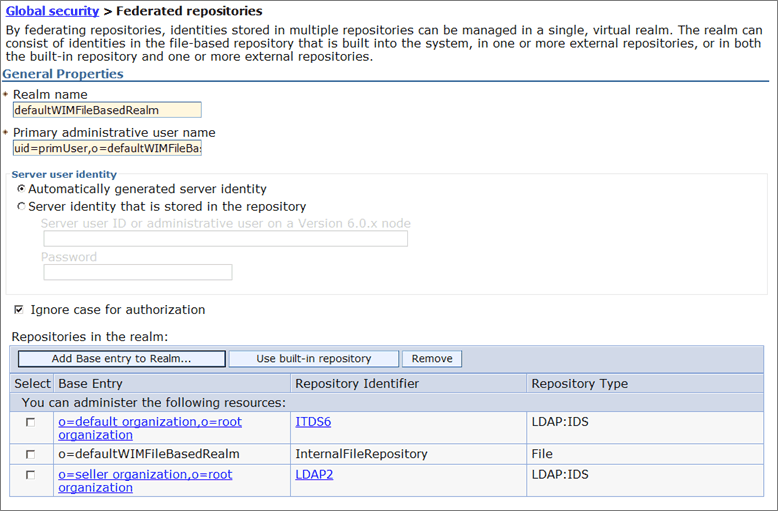
- Back on the Add base entry to realm page,
select the added repository, for example, ITDS6.
Then, complete the two DN fields with the top-level organization for
LDAP 1. For instance:
Distinguished name of the base entry that uniquely identifies this set of entries in the realm: o=default organization,o=root organization
Distinguished name a base entry in this repository: cn=customers,cn=area1,dc=local
- Click OK when done.
- Click Add Repository... to add the LDAP 2 (Admin) repository if it does not exist.
- Complete the following fields:
- Repository identifier
- check
- Directory type
- Primary host name
- Bind DN and bind password
- Login properties: uid or cn, depending on how user DNs are configured on the LDAP server. For instance, uid=xxx,o=root organization or cn=xxx,o=root organization. This must be the same as LDAP 1.
- For more information, see Configuring LDAP in a federated repository configuration.
- Click OK. The values that are entered are validated and the default values are populated based on the Directory type.
- Back on the Add base entry to realm page,
select the added repository, for example, LDAP2.
Then, complete the two DN fields with the top-level organization for
LDAP 1. For instance:
Distinguished name of the base entry that uniquely identifies this set of entries in the realm: o=seller organization,o=root organization
Distinguished name a base entry in this repository: ou=people,o=companyname
- Click OK when done.
- Specify the following, and then click OK:
- Realm name, such as myRealm.
- Primary administrative user name: any existing user in any of the realm’s repositories that are used to log on to WebSphere Application Server Admin Console and run wsadmin tasks. It is recommended to use a user from the default internal file repository, rather than the LDAP server. As a result, even if the LDAP server is down, the administrator can still log on to the WebSphere Application Server Admin Console and run wsadmin tasks. If the user does not exist in the file repository yet, it is created there now.
- Select Automatically generated server identity radio button. The server identity is used for internal WebSphere Application Server intra-component communication. By using an automatically generated server identity, an extra password does not have to be stored in WebSphere Application Server and WebSphere Commerce.
- Click Use built-in repository if the InternalFileRepository is not already part of the realm.
Clear the Enable administrative security check box if it is not being used. In most cases application security is not needed either.
- Save all changes.