Deploying Fixlets
Learn how to deploy Fixlets using the Fixlet Explorer deployment wizard. Get to know about the optional customizations that you can configure for each step of the wizard.
A Fixlet comprises instructions executed by the BigFix agent on an enrolled device. At BigFix, the process of executing a Fixlet is termed a deployment. BigFix provides numerous customization opportunities for optimizing performance during Fixlet deployment.
This topic elaborates on using the Deploy Wizard within the Fixlet Explorer app. To access the deploy menu, navigate to Fixlet Explorer in the app menu.
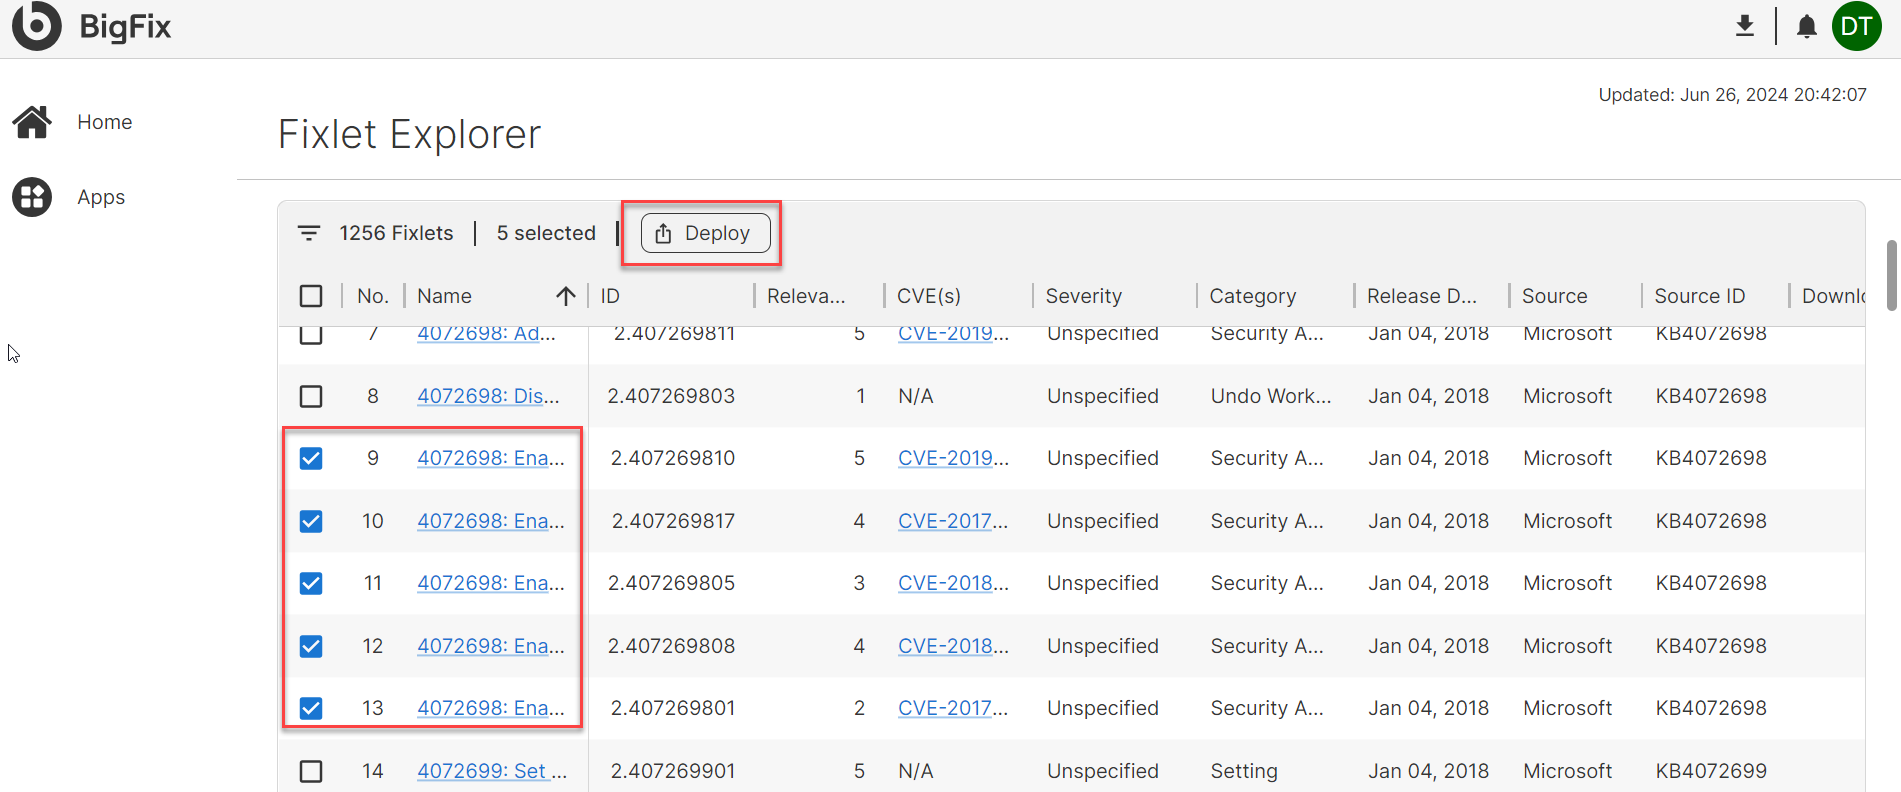
By default, the Deploy Wizard is inactive. It becomes active once Fixlets are selected in the data table. Multiple Fixlets can be selected and combined into a single deployment.
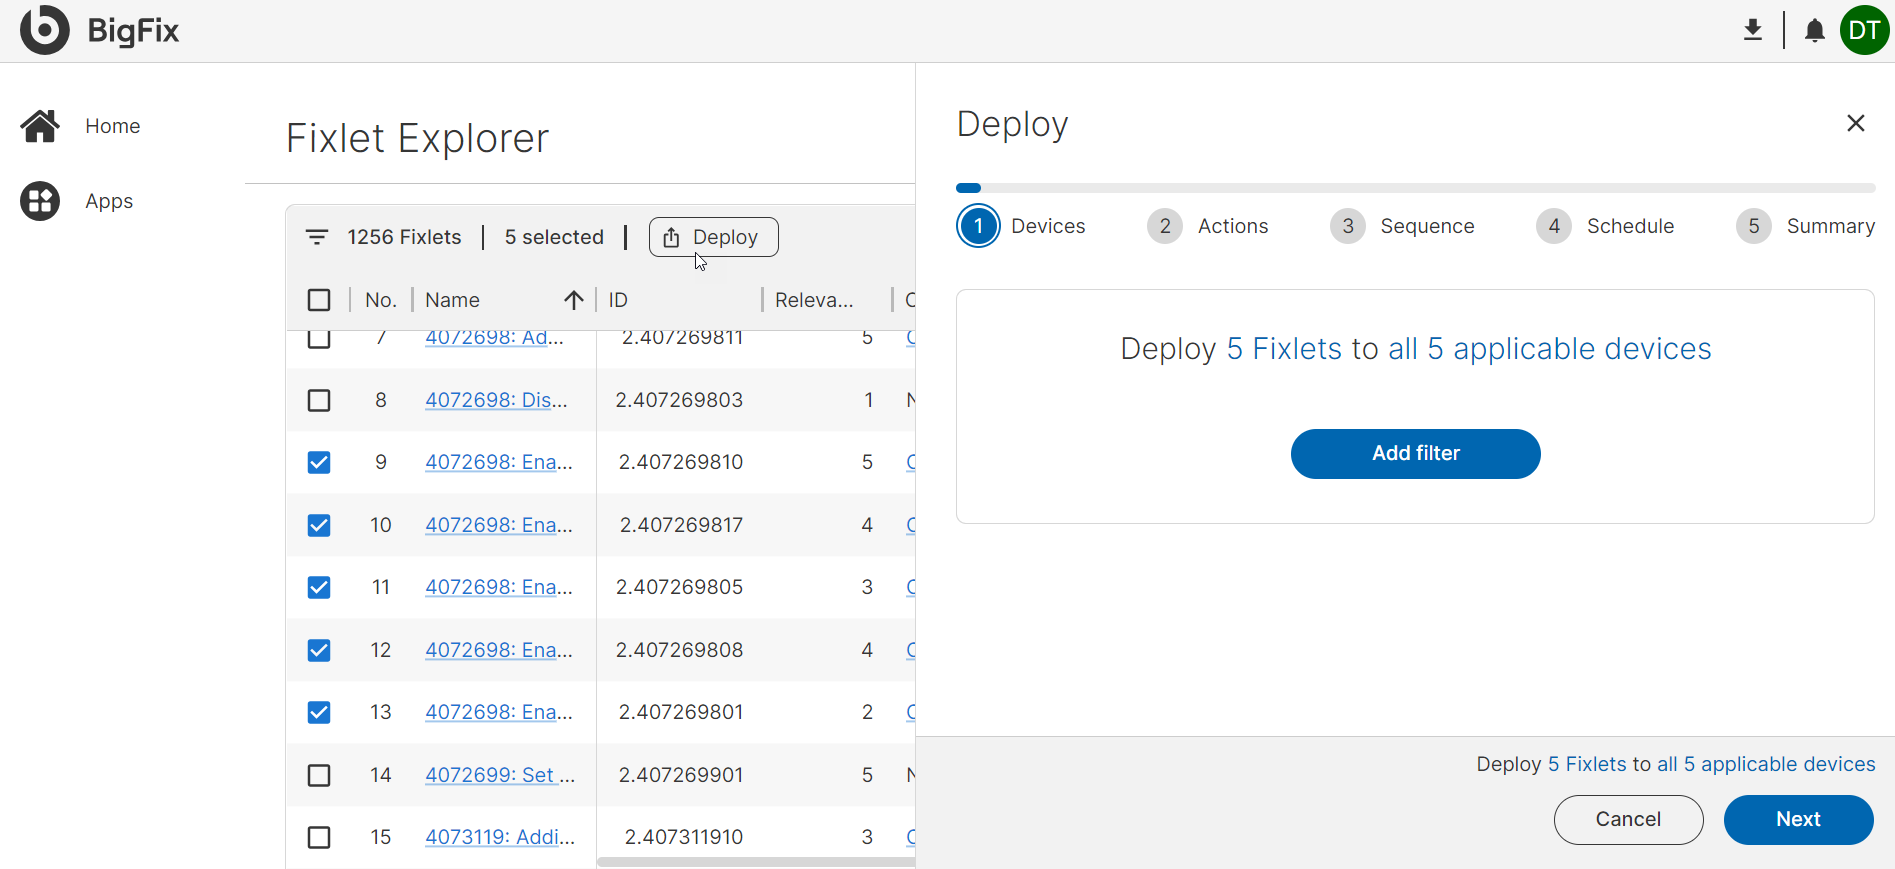
After selecting at least one Fixlet and clicking the Deploy button, the Deploy Wizard slides out from the right. The wizard will guide you through the steps to create a new deployment.
The Deploy Wizard allows to customize user deployments; however, these customizations are optional.
-
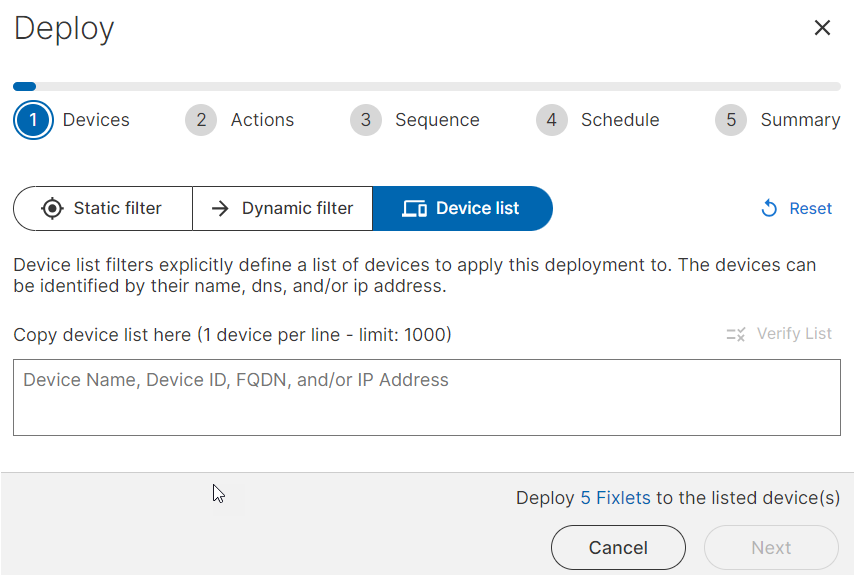
Devices - The first tab of the Deploy Wizard prompts you to confirm the devices for the deployment. Choose to deploy to all applicable devices or utilize various filters to narrow down the deployment size. Since filtering is optional, it is possible to skip this step by clicking Next.
To access the filter menu, click the Add Filter button. BigFix supports three types of filtering: static, dynamic, and device list.
-
Static Filter - a static filter reduces the number of devices using information that is known about a device when the deployment is created. In the static filter tab, it is required to first select an attribute to filter devices. Examples of attributes include computer type, BIOS, and Agent Version. Then, specify the condition , such as "contains", "equals", or "starts with". Finally, input a value in free text that is used for purposes of filtering.
To add additional static filter groups, click Add Group.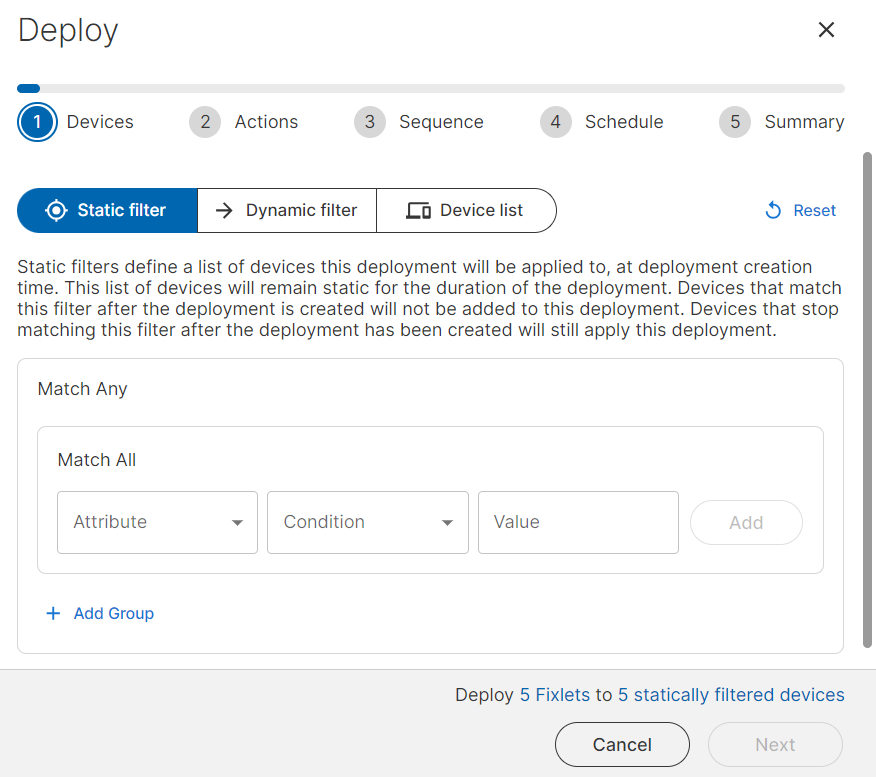
-
Dynamic Filter - While static filtering is a subset of a list of applicable devices at the time when the deployment is created, dynamic filtering continuously evaluates whether a device is applicable as long as the deployment is active. When using dynamic filtering, the Deploy Wizard displays the number of applicable devices at that time. That number, however, may go up if additional devices become eligible for the deployment.
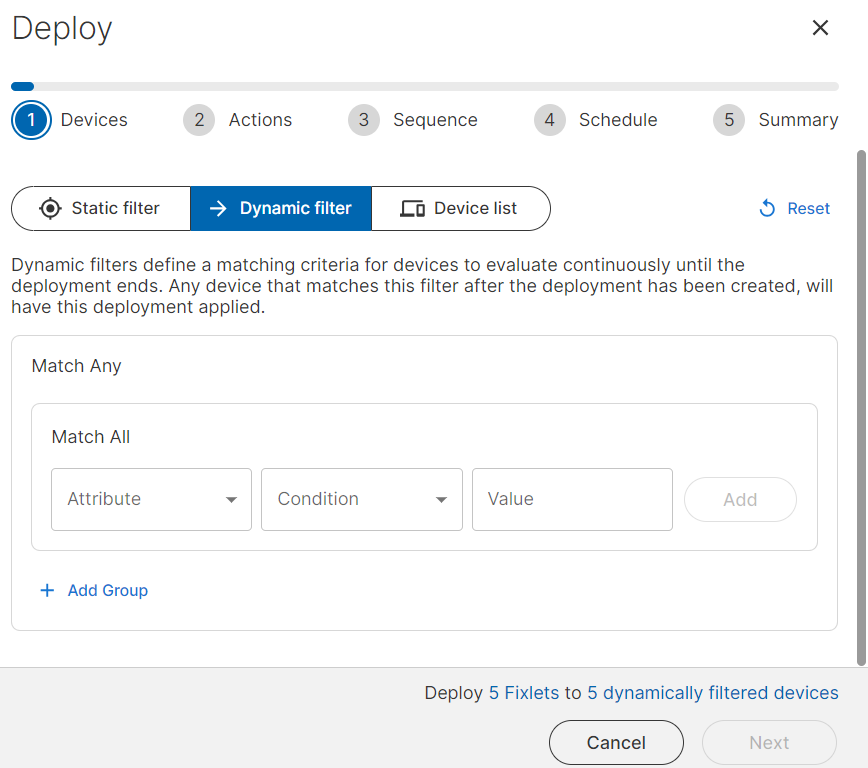
In the dynamic filter tab, first select an attribute to filter devices. Examples of attributes include computer type, BIOS, and Agent Version. Then, specify the condition , such as "contains", "equals", or "starts with". Finally, input a value in free text that is used for purposes of filtering.
To add additional dynamic filter groups, click Add Group.
- Device List - This option allows to input a fixed list of devices where the deployment will be applied. Devices can be identified using their name, DNS, and IP address.Regardless of how they are identified, each device must be in a separate row. A maximum of 1,000 devices can be added in a single device list. If you intend to target more than 1,000 devices using device lists for filtering, create separate deployments. Once the appropriate filters have been selected, or if no filter is needed, click Next.
-
Actions - The next tab in the Deploy Wizard is actions. In this tab, confirm the actions you want the Fixlets you have selected to perform. This is important because not every Fixlet has a single, default action. It is also possible to remove Fixlets that do not have any actions that can be performed on the devices selected in the prior tab.
There are two different types of Fixlets that may require attention before deployment: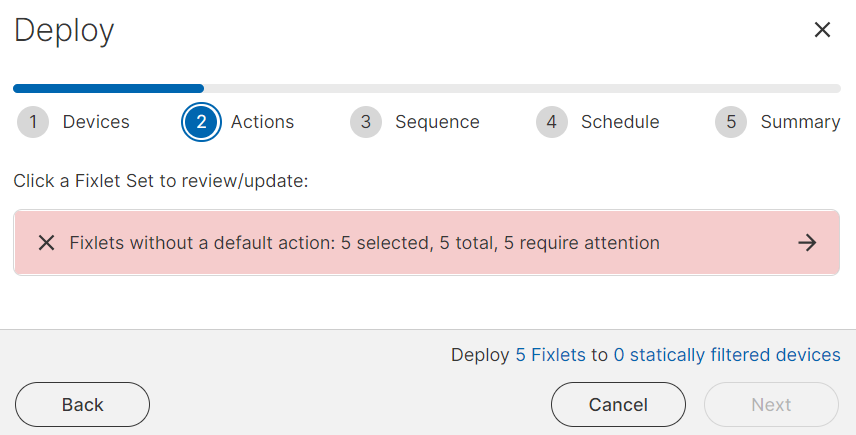
- Attention required - requires input from the user to be able to deploy successfully. To aid with visual identification, attention required Fixlets are highlighted in red and are marked with a cross icon. Some Fixlets require attention because they cannot run without some input from the user, such as a password.
- Attention recommended - requires user input to select the action the Fixlet should perform. To aid with visual identification, attention recommended Fixlets are highlighted in orange and are marked with a warning icon. Some Fixlets have multiple possible actions and users must select which action they wish for the deployment to perform. Users must select at least one action per Fixlet.
Once the necessary information is provided for all Fixlets to run correctly, a green checkmark will appear and the highlighting will be removed.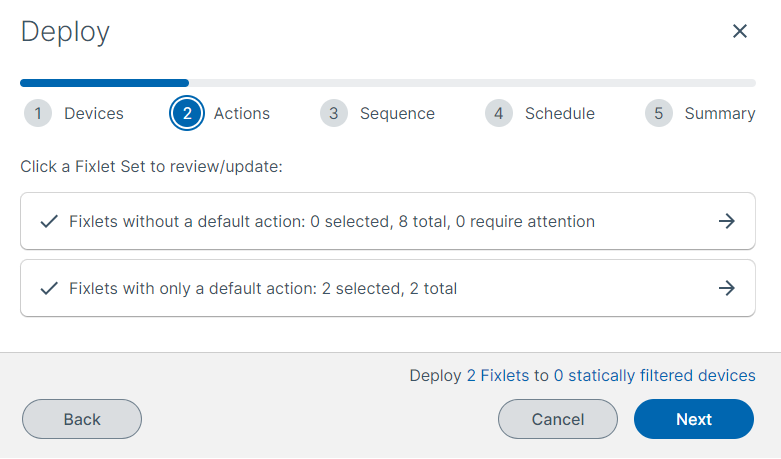
Until you provide the required information for all attention required and attention recommended Fixlets, you cannot proceed with their deployment. Once this information is provided, click Next to proceed to the sequence tab.
-
Sequence - Some deployments can affect many devices simultaneously. The sequence tab provides you with control over deployment timing, display of alerts indicating Fixlet deployment availability for devices, and actions upon deployment completion. Note that selecting any of the provided options is not mandatory.
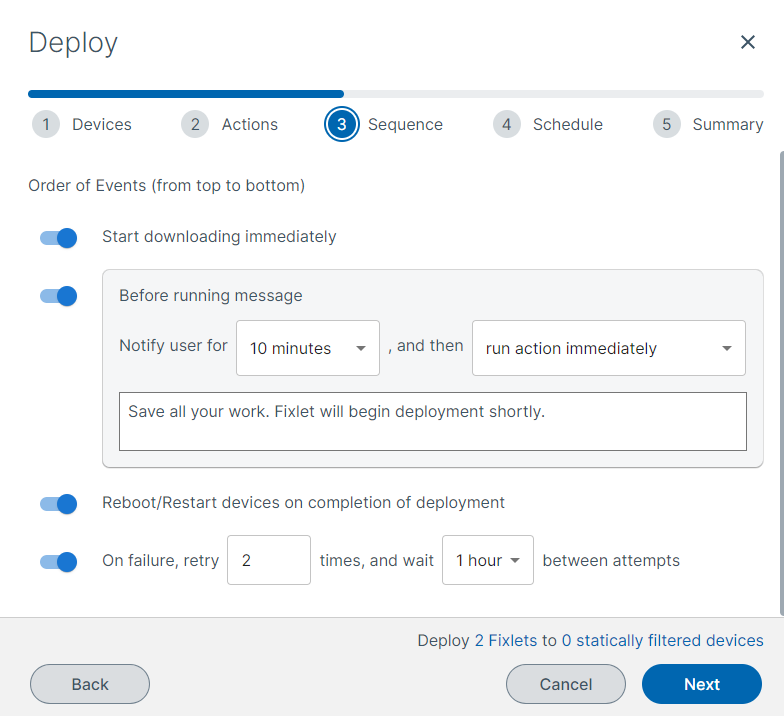
The sequence tab has a number of toggle switches users can turn on or off. They are presented as an order of events from top to bottom. The sequence order is as follows:
- Start download immediately - Some Fixlets can contain large files. This option allows users to control whether all applicable devices should begin downloading the Fixlet as soon as the deployment is created.
- Before running message - As a device may become unresponsive while a Fixlet is being deployed, this gives users the option to display a warning for an amount of time before the Fixlet is applied. This may also be useful if a restart is required, so end users can save work.
- While running message - As a device may be unresponsive while a Fixlet is being deployed, this allows users to write a message that will be displayed on the screen until the deployment is complete.
- Reboot/restart device on deployment completion - This determines whether the device will be forced to restart after the deployment is complete.
- On failure retry - Occasionally, deployments fail to complete successfully on a device. Should this occur, this allows users to determine if they would like BigFix to automatically try the deployment again. Users may also specify the maximum number of retries and the time interval between retry attempts.
After selecting the desired sequence, click Next to proceed to the schedule tab.
-
Schedule - not required. Determining a deployment’s start and end time gives BigFix users a tool to control their deployments. Typically, deployments do not happen immediately. Some devices may be powered down, or disconnected from the Internet, or otherwise unable to have the Fixlet applied. Scheduling allows to control how long BigFix will attempt this particular deployment.
There may be other reasons to control the end time. For example, an organization may wish to ensure that all deployments run overnight to minimize business impact.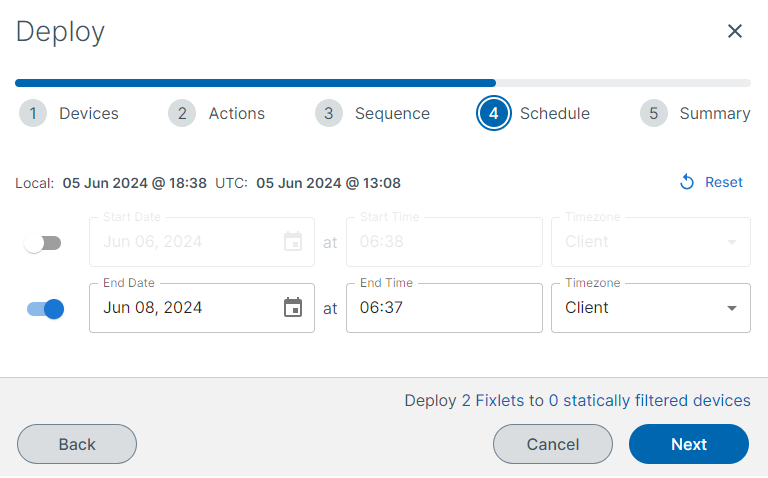
The schedule tab has two options: Start Time and End Time. In the first, select the calendar date and the start time when BigFix will begin attempting to apply the deployment. You may also select if you want to use client time (e.g., the time zone where the device is located) or UTC.
In the second, select the calendar date and the start time when BigFix will stop attempting to apply the deployment. You may also select if you want to use client time (e.g., the time zone where the device is located) or UTC.
If no scheduling option is selected, BigFix will begin the deployment immediately. After selecting the desired schedule, click Next to proceed to the summary tab.
-
Summary - The summary tab shows all of the choices made related to the deployment created. This allows to review all of the things the deployment will do in one location. It is also required to input a name for the deployment on the summary page.
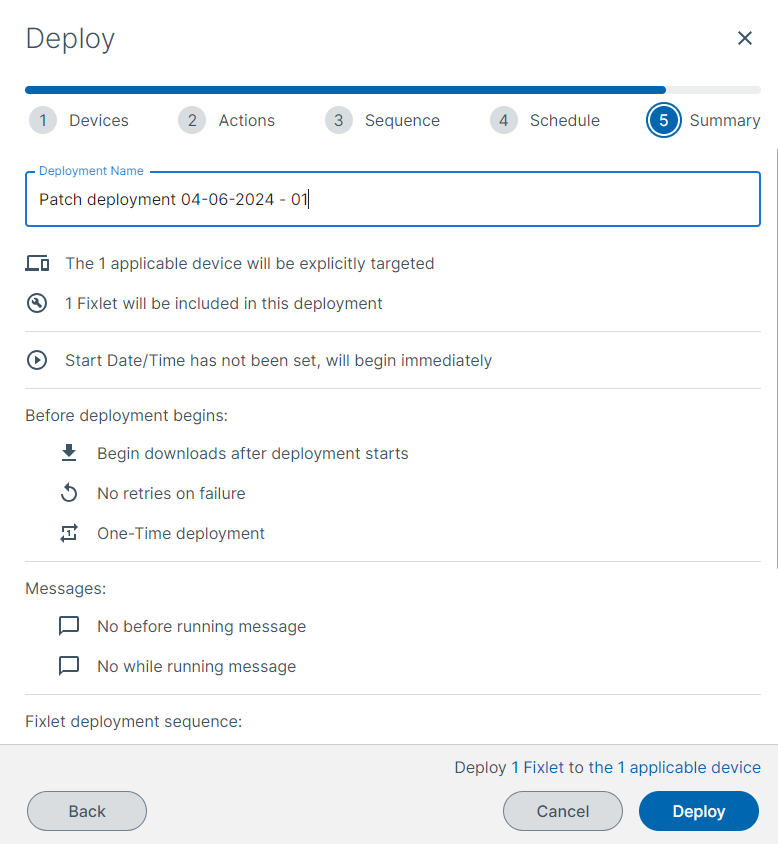
After reviewing your selections, click Deploy.