BigFix Runbook AI Installation
This section provides installation instructions for BigFix Runbook AI installer. It includes steps for copying and extracting the installer files, configuring the database, selecting and installing the different components, and running the pre-requisite checker.
This section explains how to install BigFix Runbook AI components using the installer on any server or standalone machine. The installer can be further used for deployment of web server, application server, advanced AI server and , database server, and the underlying components.
BigFix Runbook AI implementation contains the following menus:
Run Run the Installer the Installer Run the Installer
Before running the installer, ensure that the ‘write’ permission is enabled for the user on the Apache24 folder.
Run the Installer
Review the prerequisites carefully before proceeding with the installation.
After confirmation that the system meets the prerequisites to run the BigFix Runbook AI installer, perform the following steps:
- Copy the zipped installer file to the server where you want to run the BigFix Runbook AI installer.
- Unzip and extract all the contents to the default folder.
- Browse the HCL_BigFix_RunbookAI_v6.3_Installer.exe in the folder and click Run as administrator to start installation.
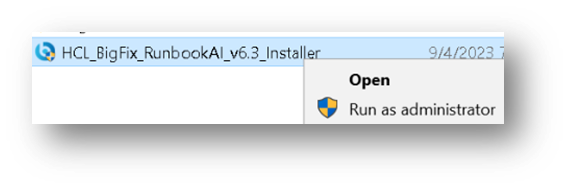
Figure 2 – Run the Installer
Install BigFix Runbook AI
This section lists the steps to install the BigFix Runbook AI components on all hosts. Ensure that user meets all requirements in the section Environment Preparation and Prerequisites to Run the Installer before starting the installation procedure.
To install BigFix Runbook AI, perform the following steps:
- On running the Installer, the following page appears.
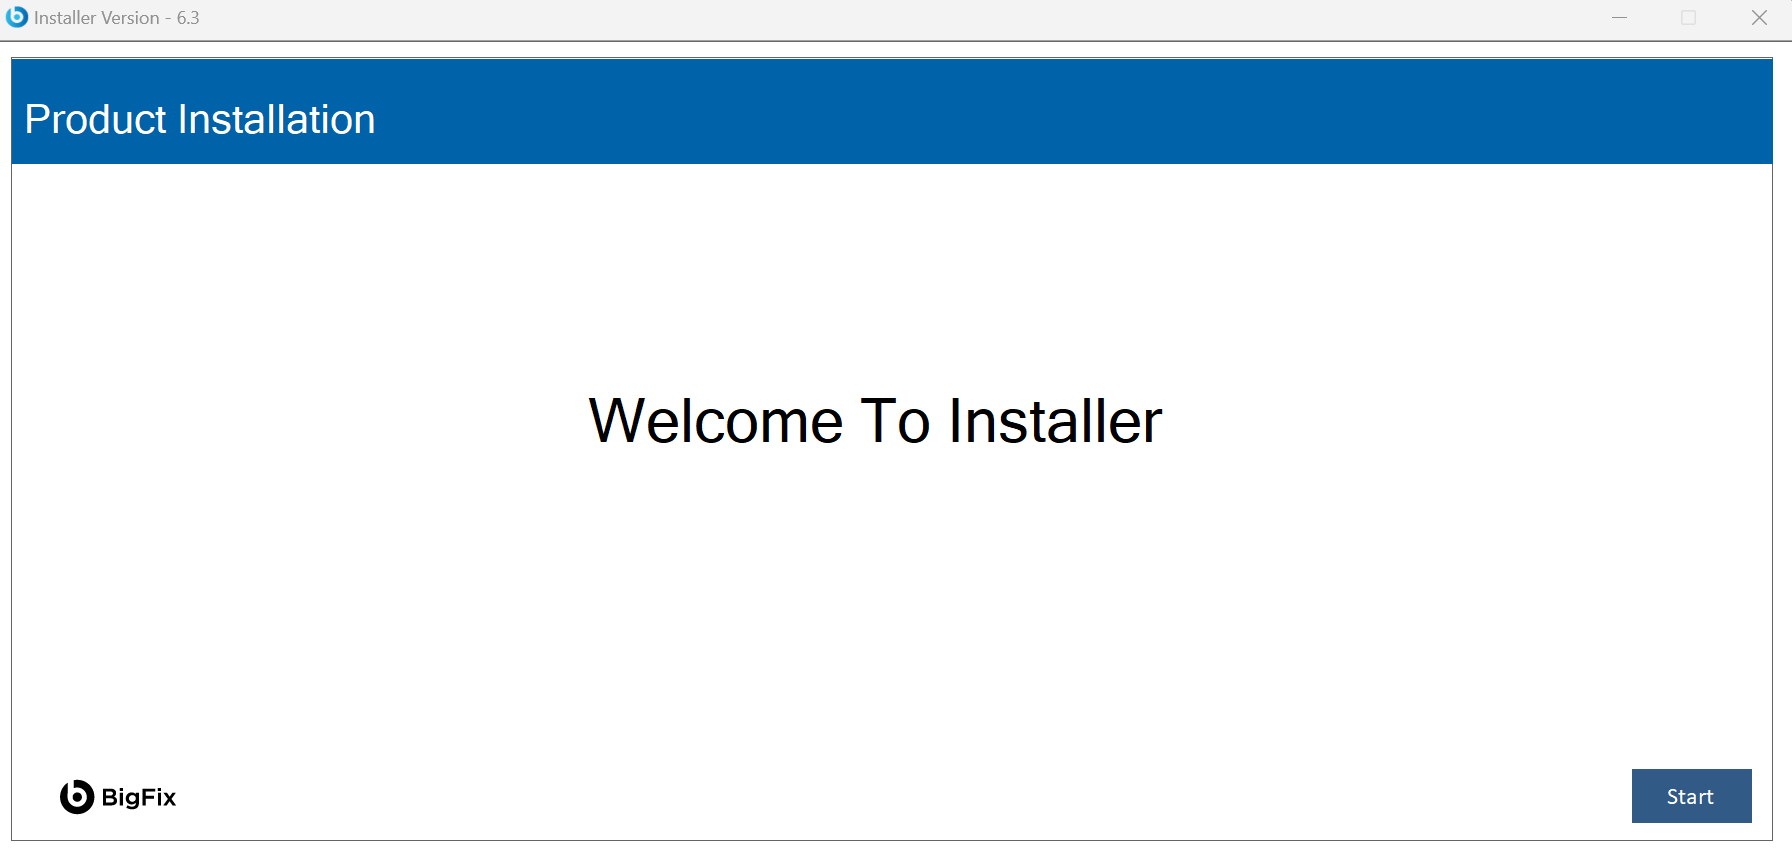
Figure 3 - BigFix Runbook AI Implementation
- Click Start. It will extract required binaries and the following page will appear.
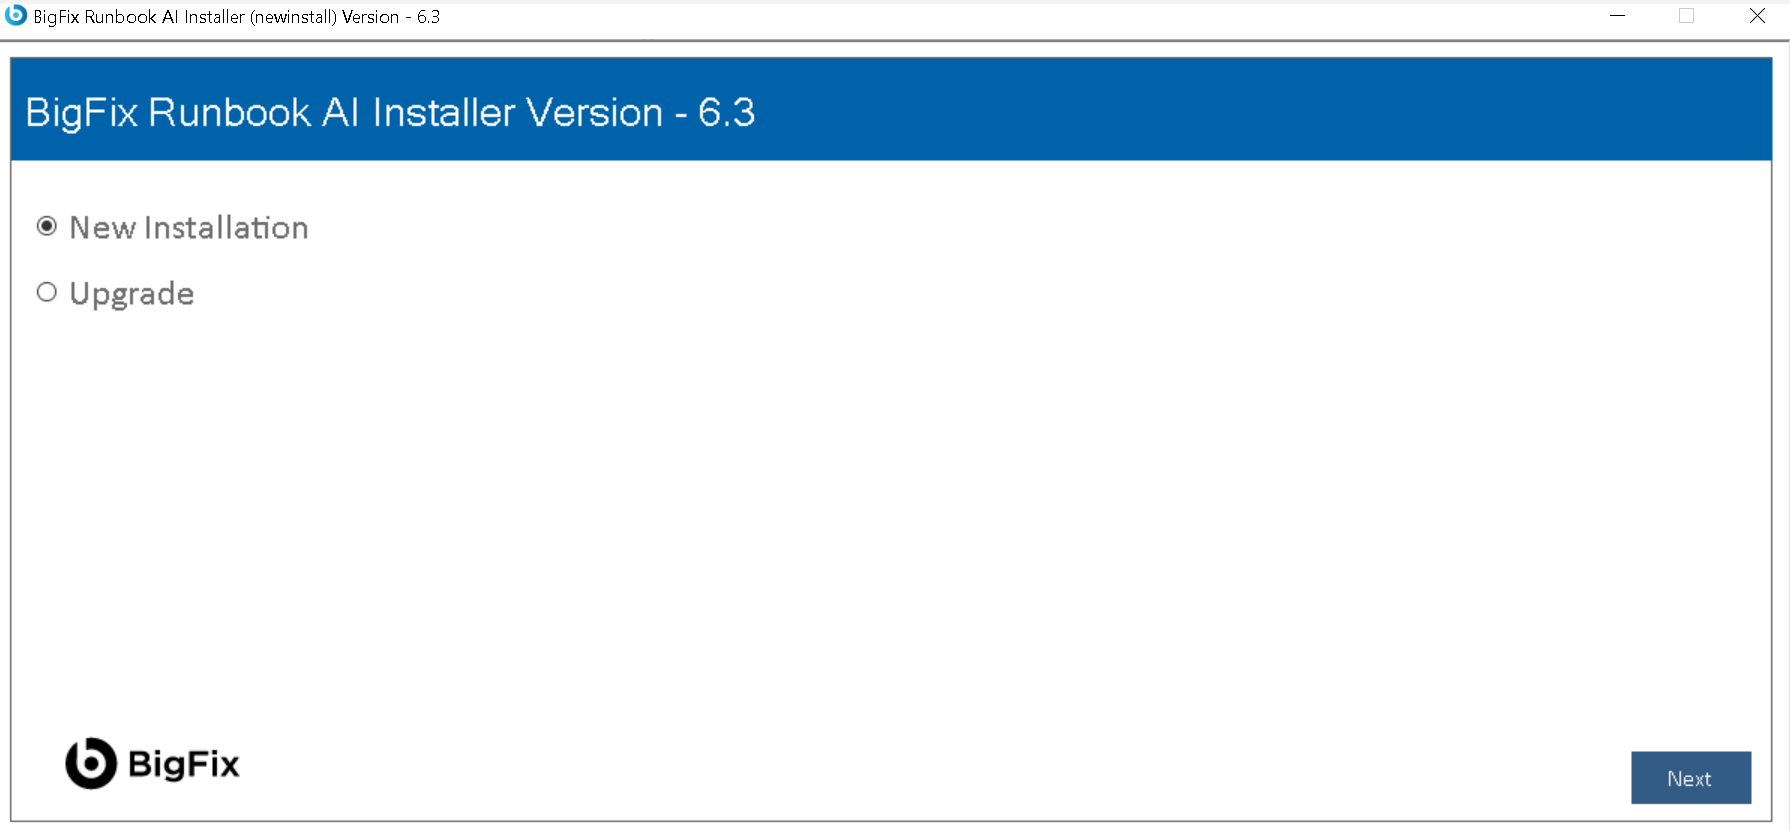
- Click Next. The page lists the setup required for installation in the left pane and the details of the selected setup in the right pane.
The next step is to create the database.
On Left Menu click on “View Installation Guide” to view installation guide.
Database Setup
User can create a customized database using the following steps.
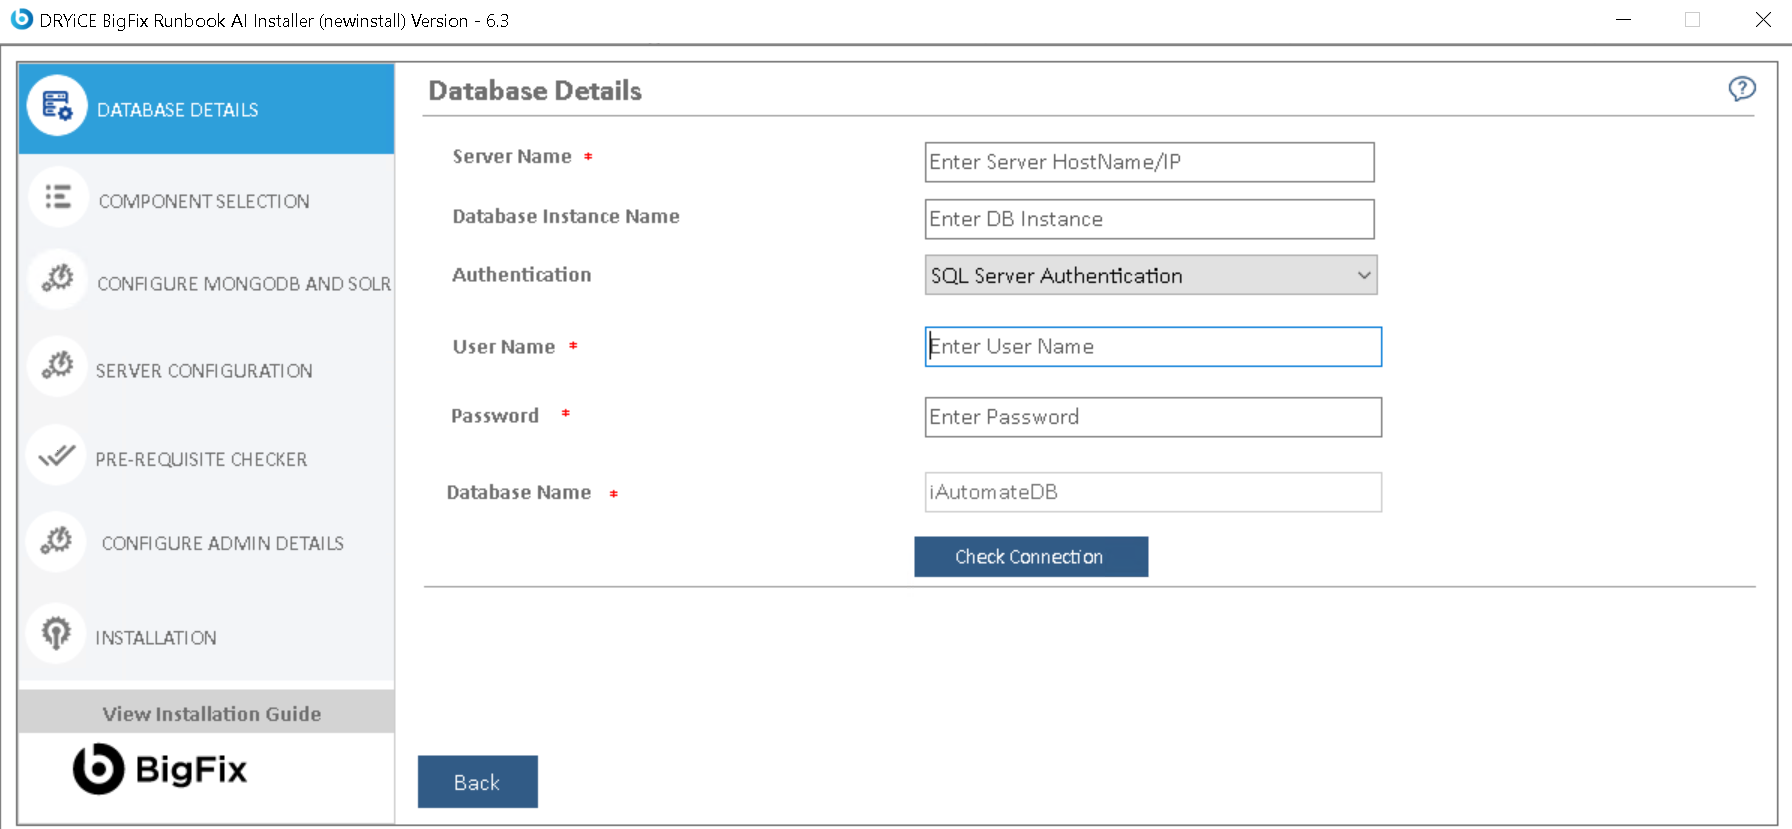
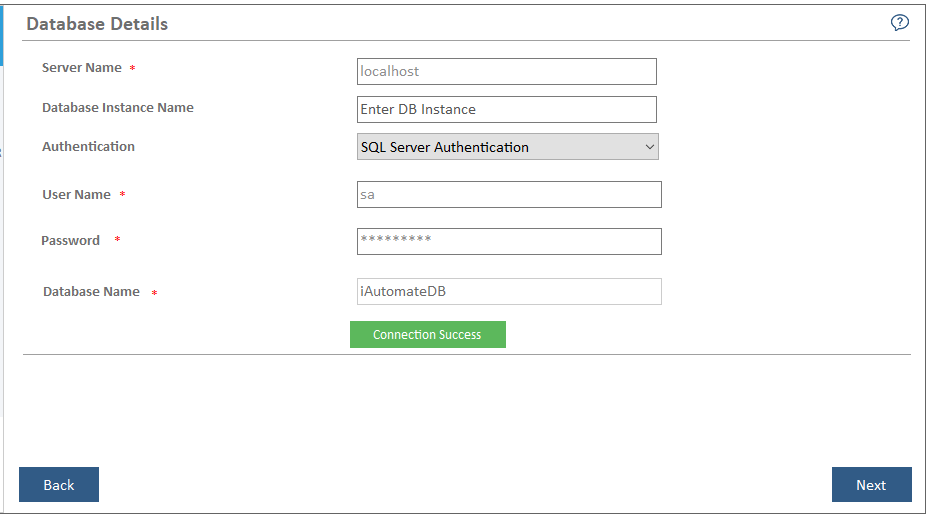
- On the Database Details view, type the Server Name , and then the Database Instance Name.
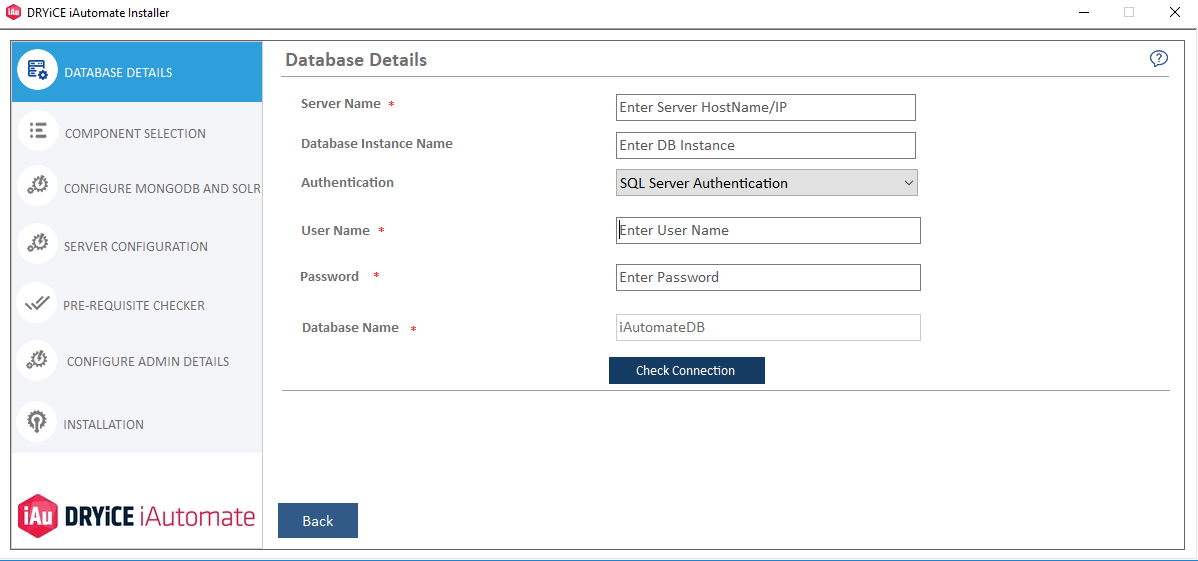
- Select the Authentication type. The type of login authentication used to configure the database determines the resulting username.
- There are two types of authentications used for database configuration:
- Windows Authentication
- SQL Server Authentication
- In the UserName and Password fields, type username and password to access the server.
- In the Database Name field, iAutomateDB is auto filled by default.
- To check the connectivity to a server using the credentials provided, click Check Connection. This displays a message for Connection Success or Connection Failure .
- Successful connection to the database enables the Next button.
- Click Next. The Component Setup page appears.
All fields marked with an asterisk (*) are mandatory.
Component Setup
After creating the BigFix Runbook AI database, perform the following steps to set up the Web UI components.
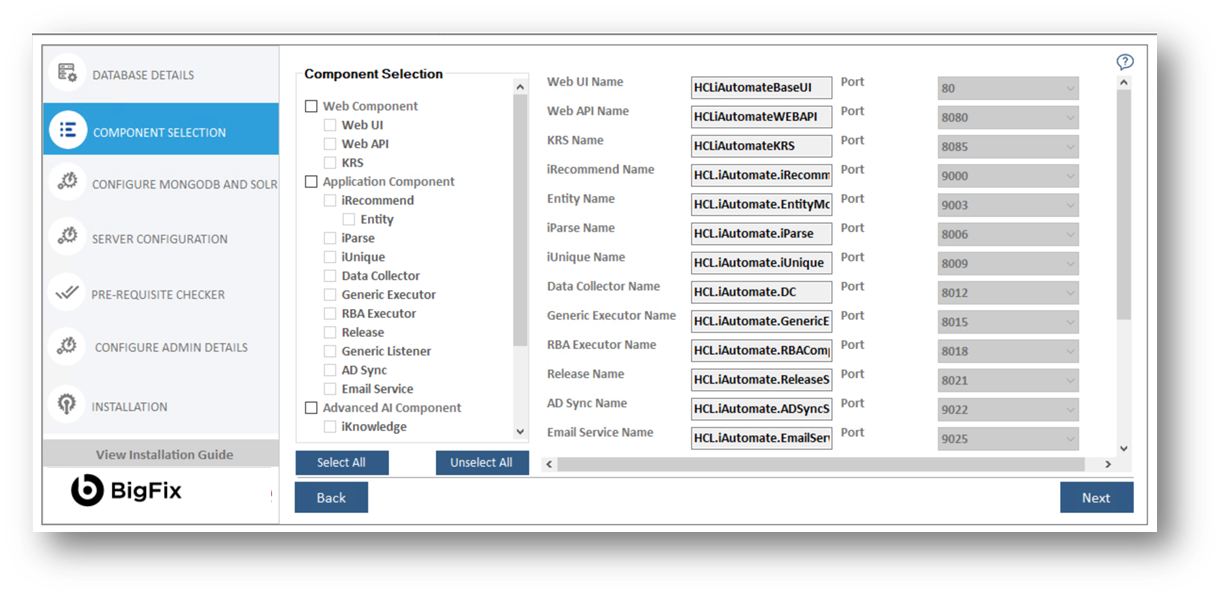
- The Component Selection view lists the components and their corresponding parameters based on the selected component.
- The following types of components are deployed in BigFix Runbook AI:
Web Component - It includes the user interface that enables the configuration, management, and resolution of tickets.
Service Component - This is further divided into two categories:
- Application Component - This includes essential services that work together to achieve the core functionality of BigFix Runbook AI.
- Advanced AI Component - This includes features like Solution Creation; Natural Language Processing (NLP) based assisted services, and so on.
The administrator can add or remove components based on their environment as decided during the planning phase.
The following table lists the components available on different servers.
Table 12 - BigFix Runbook AI Components
| Server Type | Components | Description |
| Web Component | Web UI | Web User Interface for Admin, Configuration, Operations Console, Dashboards and Knowledge Analysis and Search functionalities |
| Web API | It is an API in the BigFix Runbook AI web module that can be accessed using the HTTP protocol. | |
| KRS | The Key Rotation Service component which serves the purpose of providing additional security through rotation of keys on a periodic basis. | |
| Application Component | iRecommend | It leverages Natural Language Processing and is responsible for recommending the best suited runbook for resolving the issue based on the ticket description |
| iParse | It serves the purpose of analyzing the ticket description and summary for extracting relevant parameters to be passed to configurable runbooks | |
| iUnique | It helps in clustering the ticket data (incident, service requests, change requests) into different categories for identification of automation opportunities | |
| Data Collector | It is responsible for collecting ticket information from the ITSM tool | |
| Generic Executor | It is used for data processing at the DB layer for enabling backend processes. | |
| RBA Executor | It helps in triggering the identified runbook for automatic resolution using an underlying RBA tool | |
| Release | It is used to release the ticket in case an appropriate runbook is not recommended OR runbook execution for a ticket fails. In the latter case, the ticket is released and assigned to a human agent. | |
| Generic Listener | Ticket passes through multiple stages during the resolution lifecycle using BigFix Runbook AI. Generic Listener module is responsible for ensuring the ticket is moved to the next stage based on the current outcome. Its job is to identify the status of the present stage and based on success / failure, move the ticket to the consequent stage in the lifecycle | |
| AD Sync | It is responsible for fetching LDAP user from LDAP Server. | |
| Email Service | It is responsible for sending mail notifications to user | |
| Advanced AI Component | Advanced Knowledge | It returns a list of relevant documents for a query that have been crawled from different repositories like SNOW KB, Web URL, Satori repository, and internal files and folders. |
| iKnowledge | It returns a list of relevant results from Google for a query, if no relevant documents exist in the organization’s repository. | |
| Knowledge rating | It enables users to provide feedback as a rating for the document search corresponding to the ticket summary. | |
| iScrape | It helps in automated runbook creation for ticket categories for which runbooks don’t exist by exploring various internal and external data sources for relevant executable code snippets and scripts. |
- Select the components as planned for the server configuration.
- Select the Web Component, Application Component, or Advanced AI Component check boxes to install all the components listed under the servers simultaneously or select a single component to install it individually.
- After component selection, their corresponding details are auto filled and enables user to select the Port for each component.
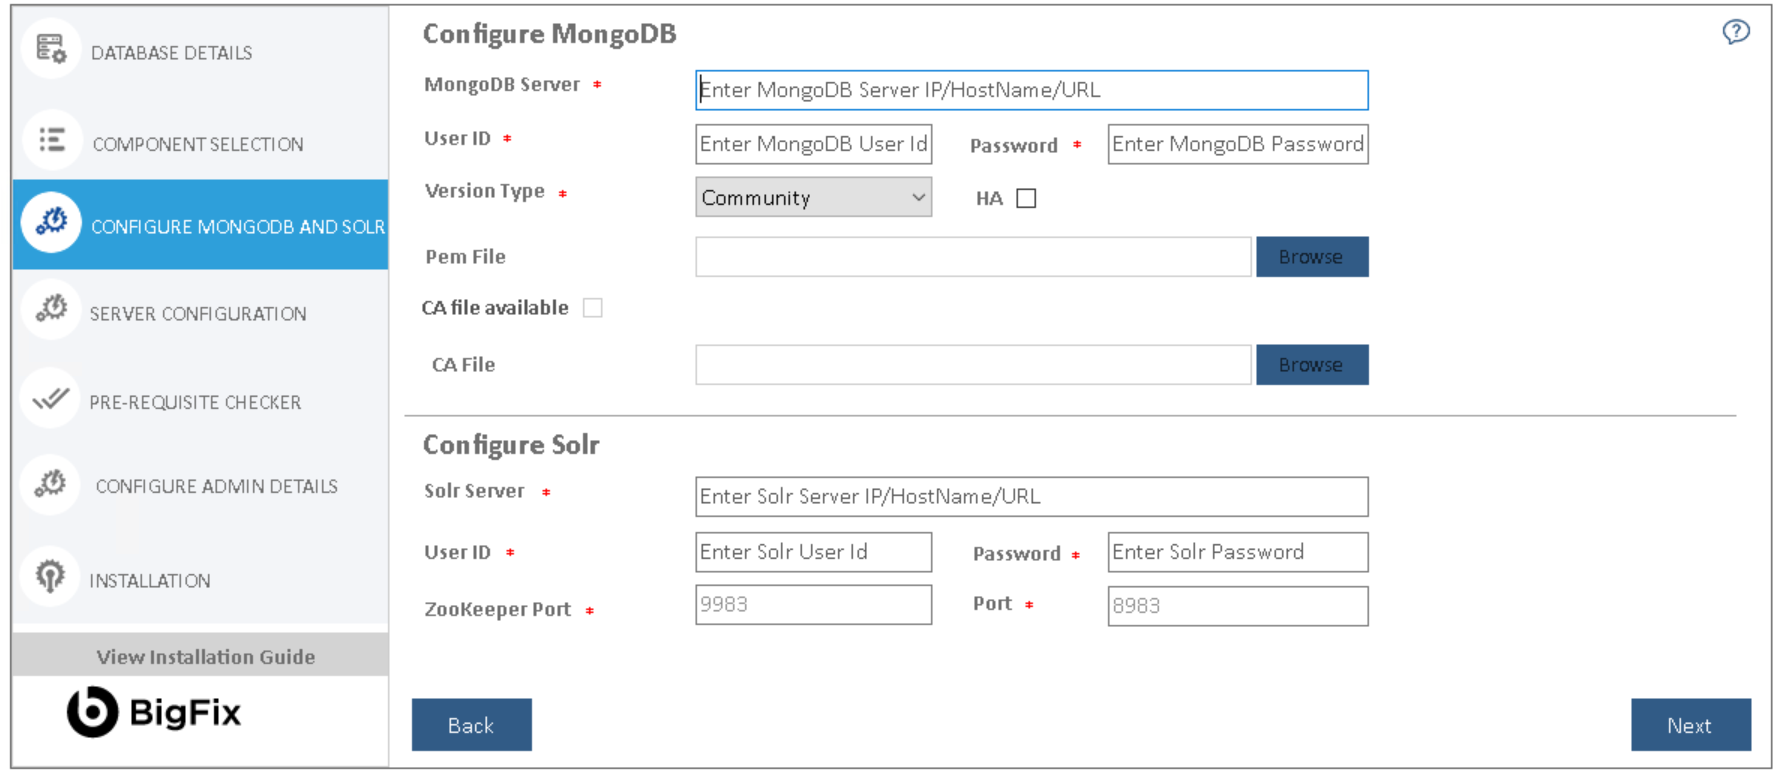
- On selecting Advance AI Components, user must provide the MongoDB and Solr database details else the setup will display the Server Configuration page.
- To continue with the installation, click Next. This enables the Configure MongoDB and Solr tab on the left navigation pane. Type the following details to set up the MongoDB and Solr databases:
- On the Configure MongoDB page:
- Type the MongoDB Server Name (including the port details).
- In the User ID and Password fields, type username and password to access the server.
- Select the Version Type.
- Select the HA mode.
- Based on the selected “Version Type” and HA mode (selected / unselected), please follow the below steps:
| Version Type | HA Mode | Number of Servers Required* | CA File Required | PEM File Required |
| Community | Enabled | At least 3 | Not Required | |
| Community | Disabled | 1 | Not Required | |
| Enterprise | Enabled | At least 3 | Depends** | Required |
| Enterprise | Disabled | 1 | Depends** | Required |
* - As per the best practices, number of servers required should be odd in numbers. Provide the list of all MongoDB instances as comma separated pairs of hostname and port.
** -. CA File is only required if and only if MongoDB installation mandates use of CA file
- On the Configure Solr page:
- Type the Solr Server.
- In the User ID and Password fields, type user ID and password to access the server.
- The default port is auto filled in the PORT field next to each component.
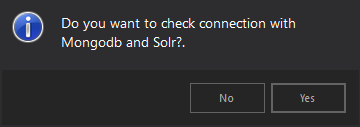
- Click Next.
- User will be prompted to check the connection status. Click Yes to proceed with checking the connection status or No to continue with the Installation.
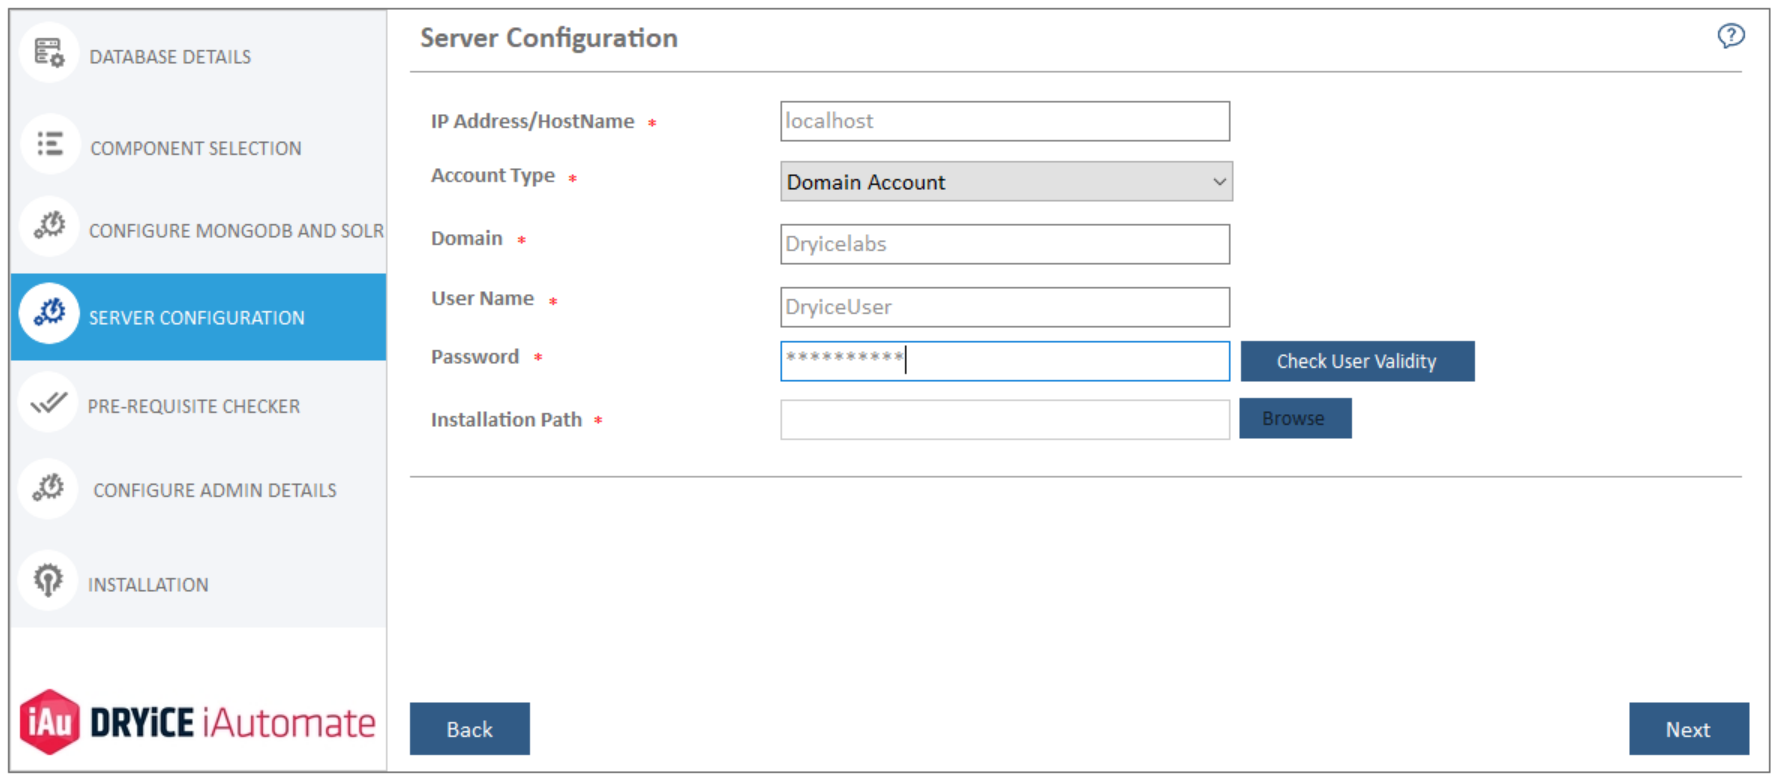
The Server Configuration page appears.
All fields marked with an asterisk (*) are mandatory.
Server Configuration
This section describes how to set up and configure a server for BigFix Runbook AI installation.
To configure servers, provide the following details:
- The IP Address/Host Name, where user wants to install the components.
The installer automatically detects the host name where the installer is running and auto-fills the information in the text box.
- Select the Account Type from the available options:
Local Administrator
Domain Account
- Type the Domain Name.
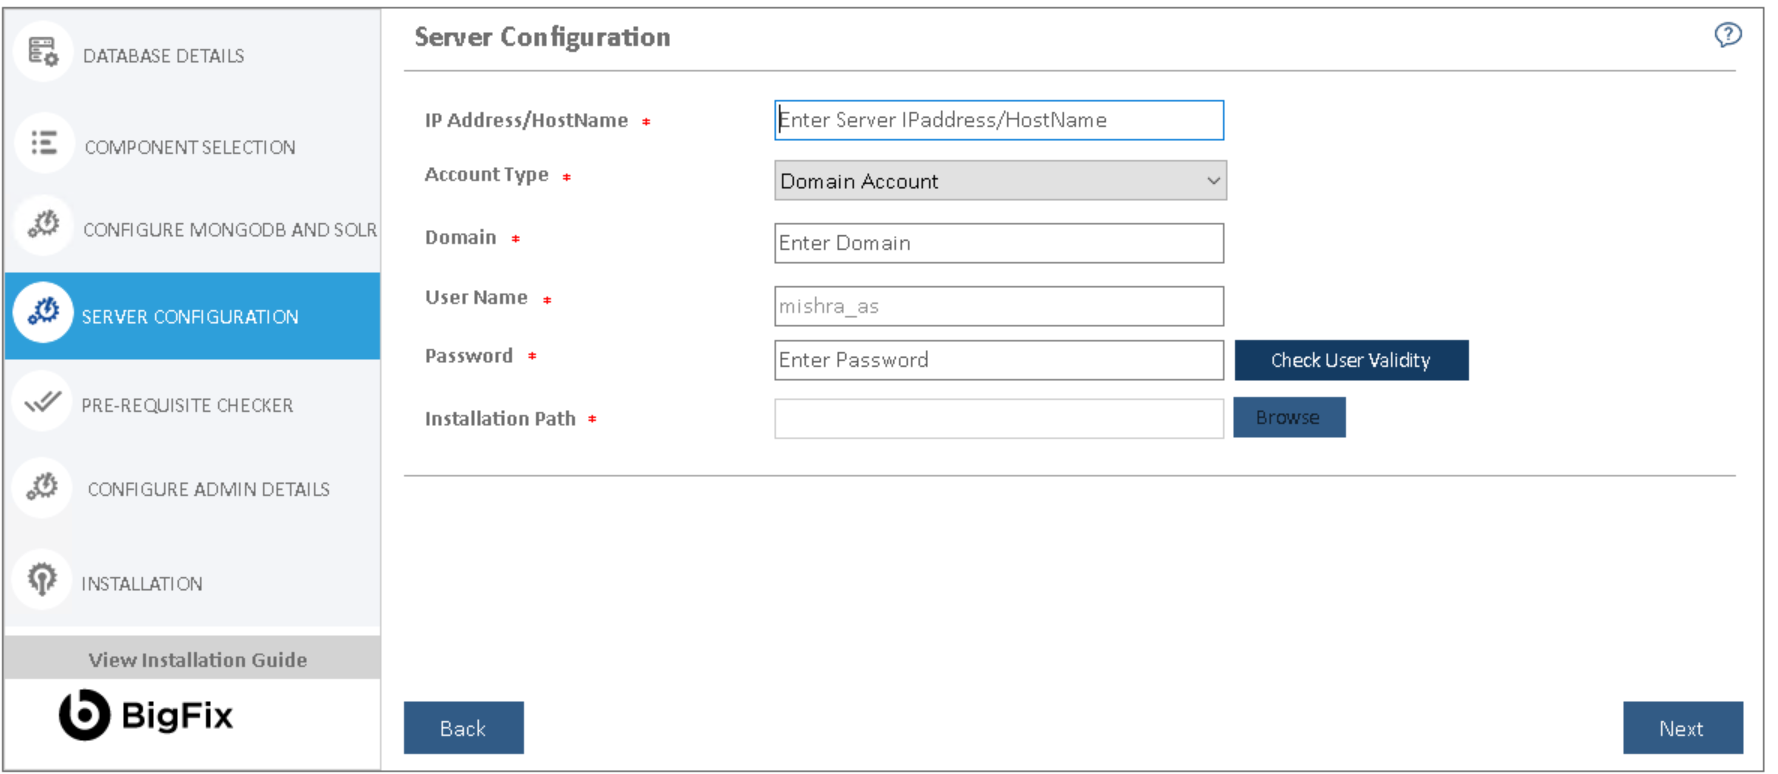
- In the User Name and Password fields, type the login credentials to access the application server.
- Click Check User Validity to validate the user to connect to the server.
- Click Browse to specify the appropriate Installation Path to install the server components.
- On successful connection to the server, a Validation Successful message appears beside the Password field.
-
Click Next.
The Pre-Requisite Checker page appears.
All fields marked with an asterisk (*) are mandatory.
Run Pre-Requisite Checker
This section describes the procedure to check if all BigFix Runbook AI installation prerequisites have been met before the installation. The Prerequisite Checker identifies all the missing pre-requisite software and utilities. User will have to ensure that the identified prerequisites are installed manually before proceeding further.
To run the Prerequisite Checker, perform the following steps:
- Click Run .
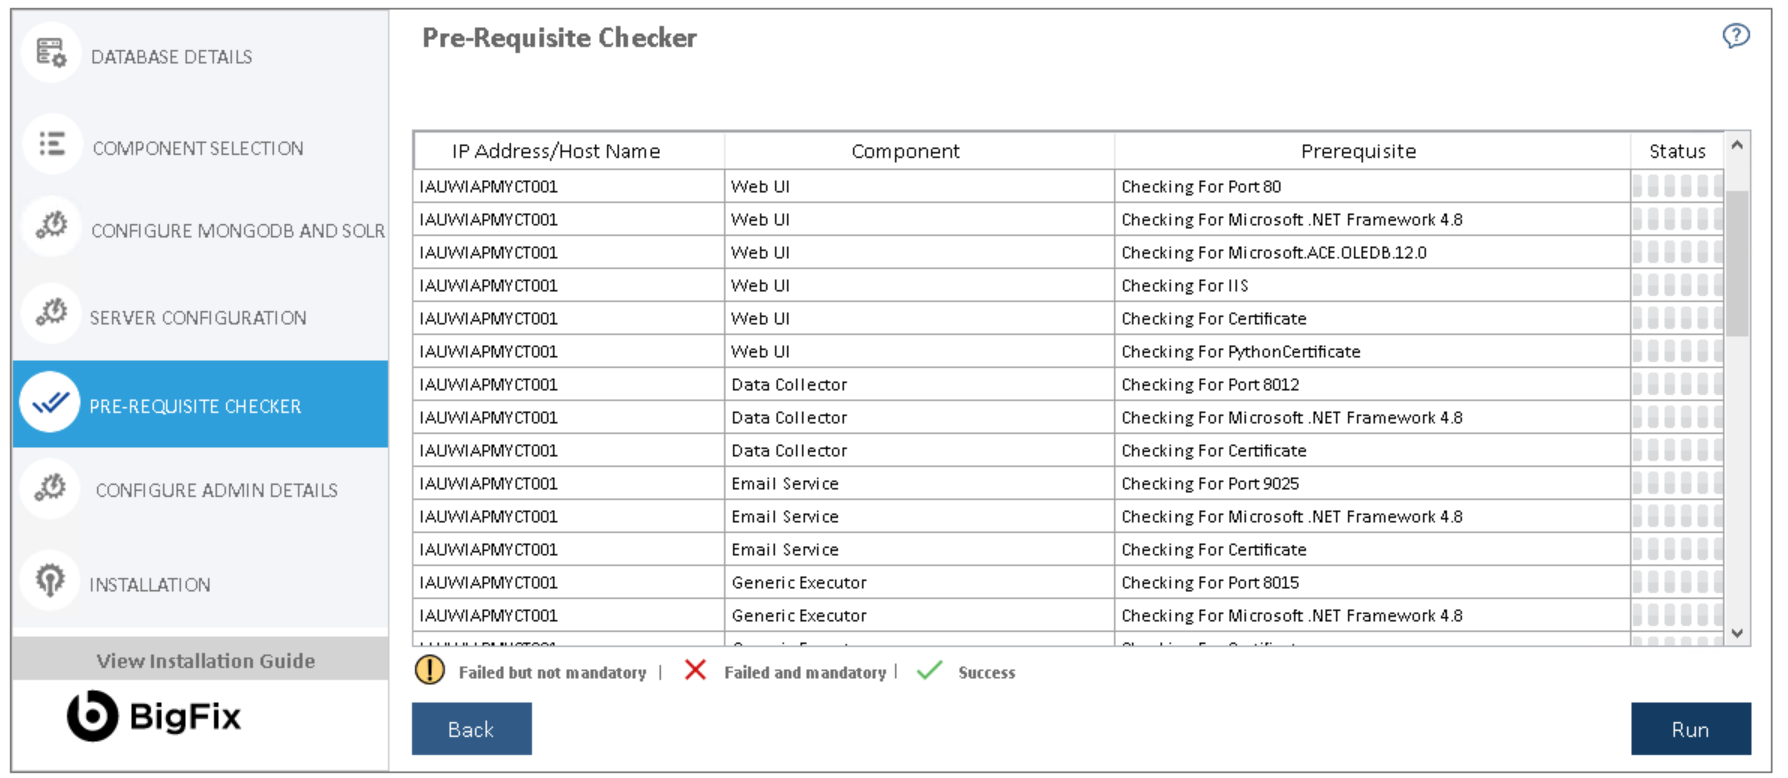
The Pre-requisite Checker always runs as part of the BigFix Runbook AI setup.
- A progress bar appears while the Pre-Requisite Checker runs.
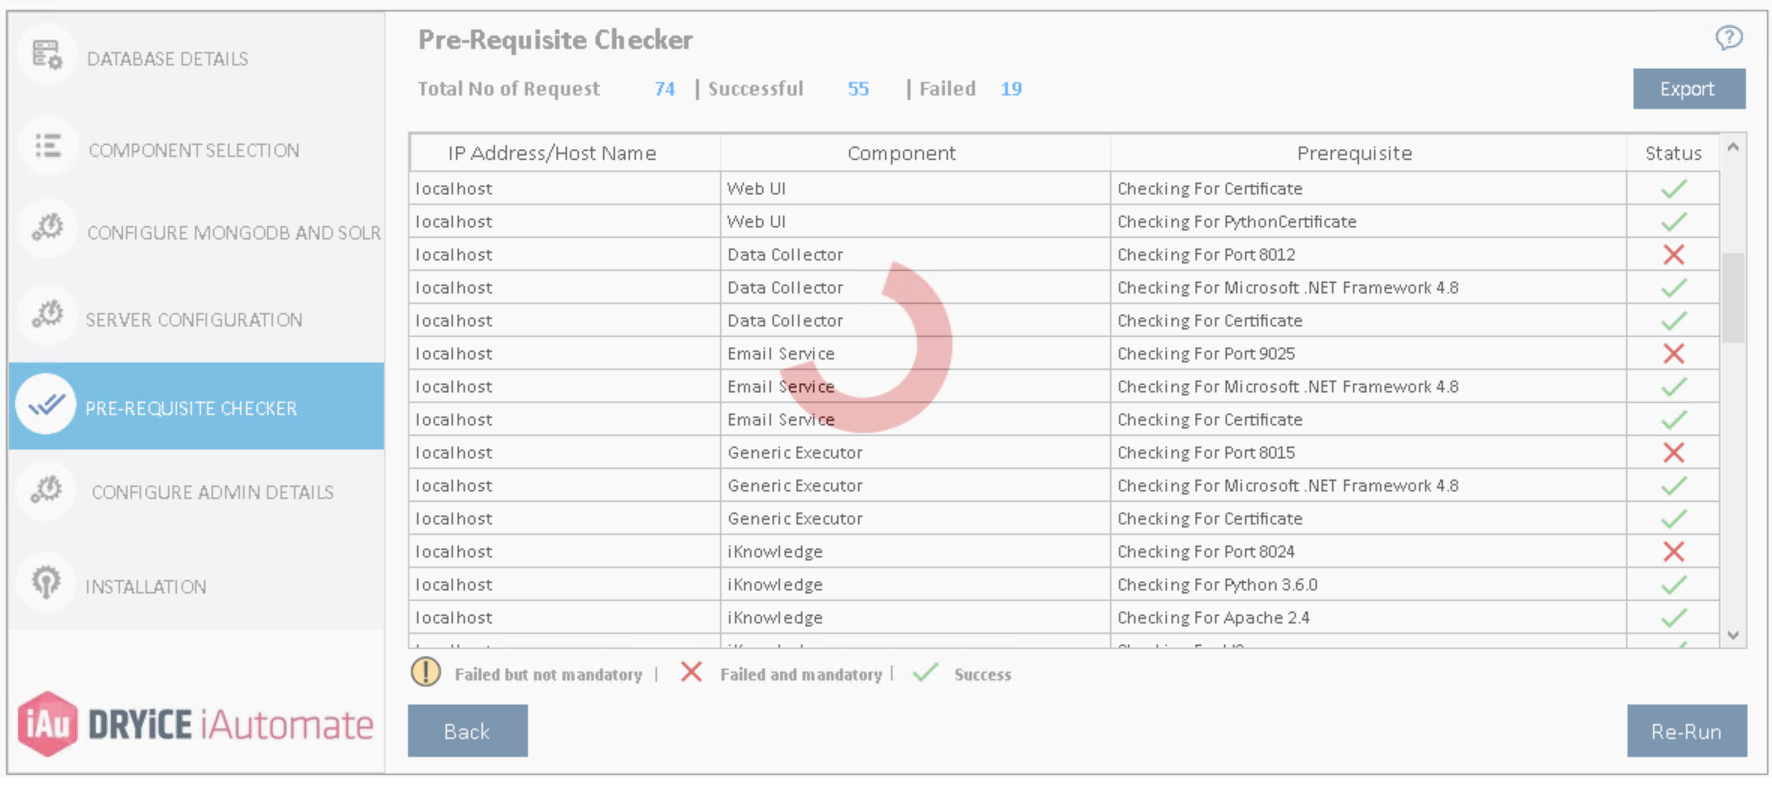
If you encounter a failure status for any of the Ports, either go back Section 3.4.4- Component Setup, to choose a different port, or make sure all the mentioned ports are available to use
- In the Status column, each prerequisite is marked a success or a failure.
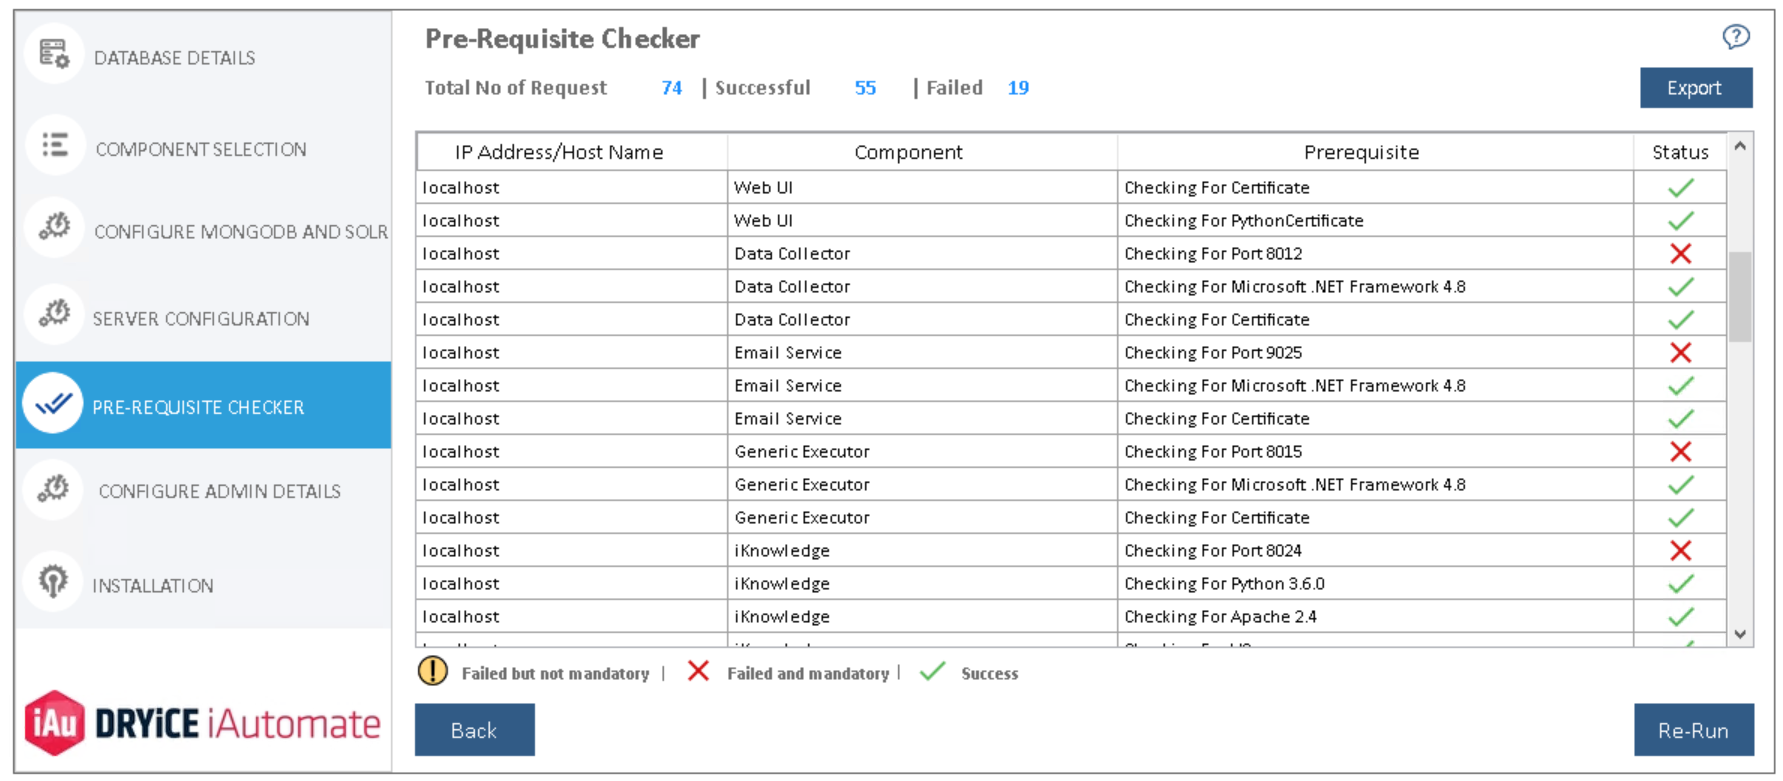
- In case of failure, Re-Run button appears.
- Please ensure that the identified issue is resolved and re-run the pre-requisite checker.
- Upon successful validation of all the pre-requisites, Next button is enabled
- Click Export to export the Pre-Requisite Checker report, if required.
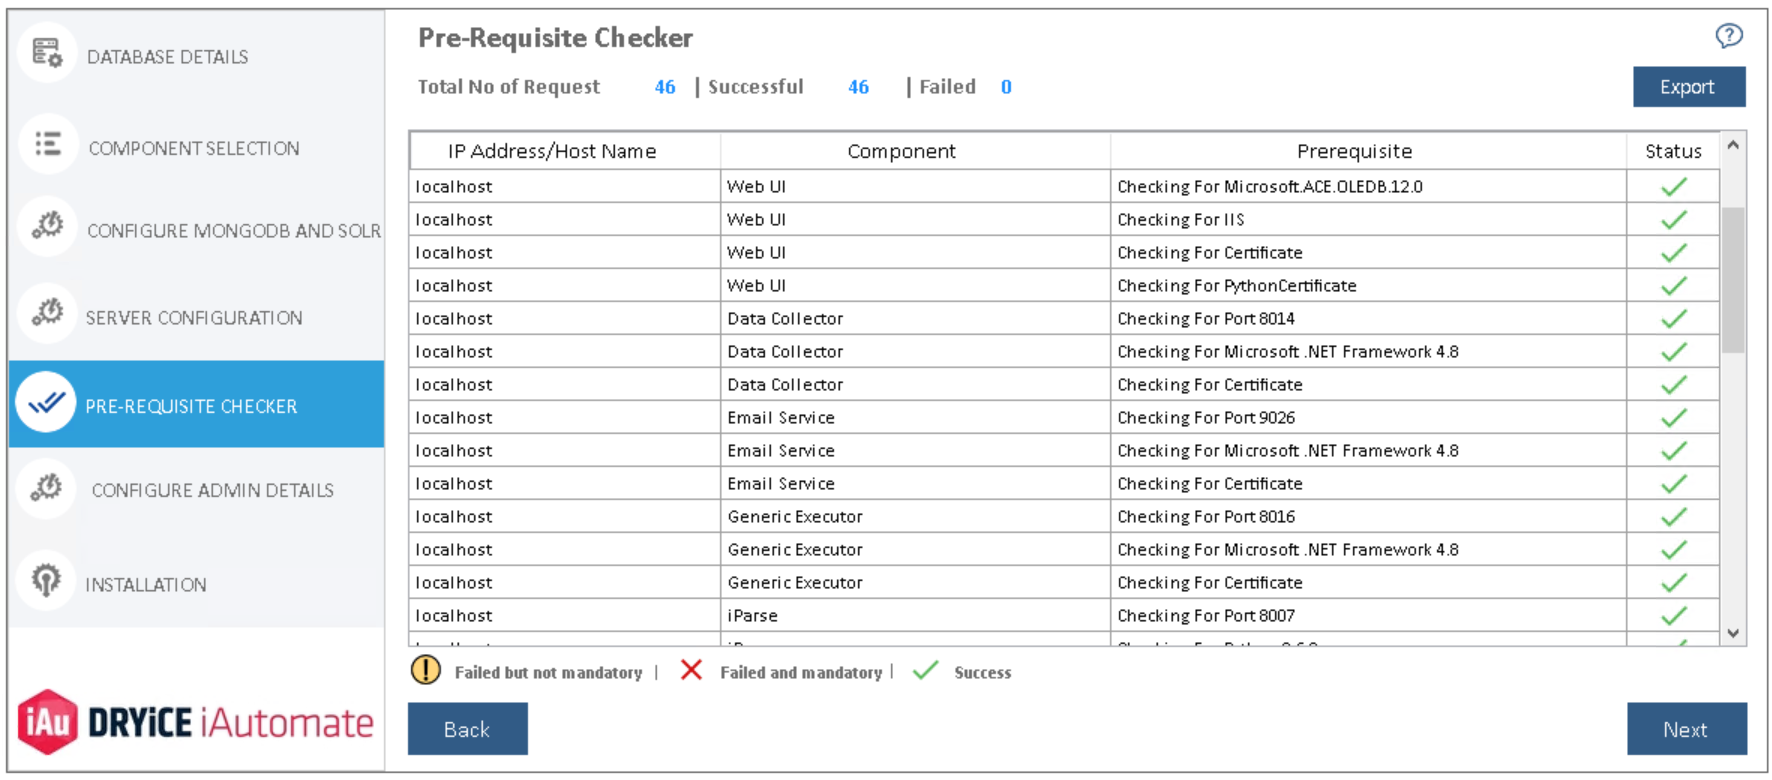
Use Back to go to the previous page.
- Click Next. The Configure Admin Details page appears.
Configure Admin Details
Administrative roles provide controlled decentralization of administrative responsibilities and the functionality to add or manage more administrators or users, manage settings, and perform governance actions.
This section describes the steps involved to configure the Super Administrator which is required after the initial setup of BigFix Runbook AI.
To configure Super Administrator details, perform the following steps:
- On the Configure Admin Details page, type the new administrator’s Name, Email and Password .
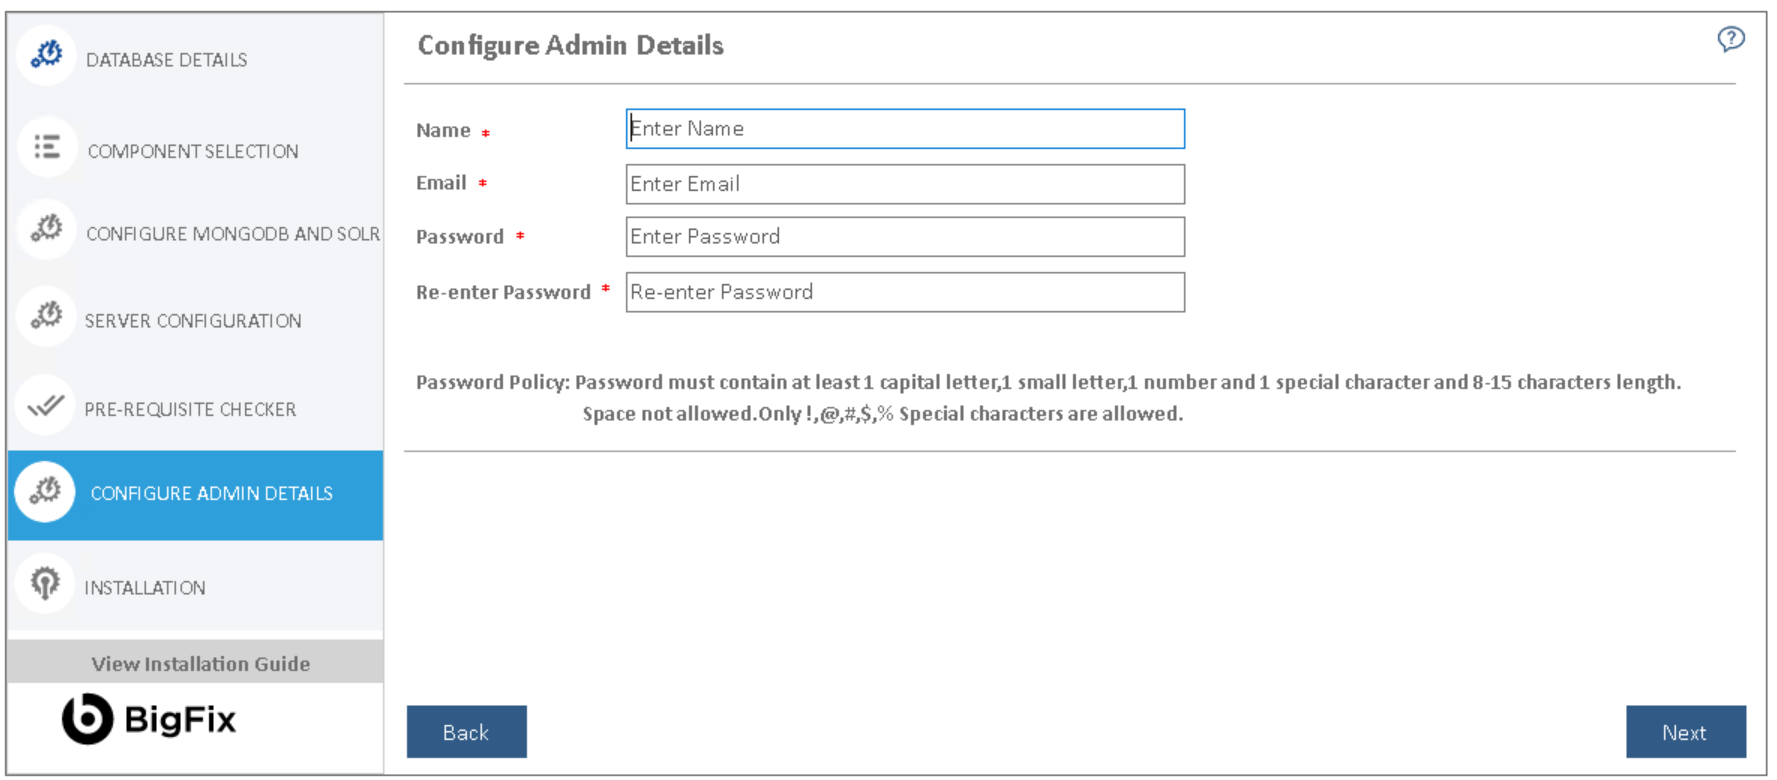
If the database provided in the Database Setup already exists at the time of installation, then the Configure Admin Details page will remain unavailable.
- Post installation, the administration console can be accessed by this Super Administrator account to configure BigFix Runbook AI.
- Click Next to review the information provided on previous pages.
Click Reset to reset the admin credentials. Click Back to navigate to the previous pages for making any changes. All fields marked with an asterisk (*) are mandatory.
Install
This section describes the installation of BigFix Runbook AI after all components and admin configuration is completed.
- Before proceeding with the Installation, review the information on the Installation page and, if required, click Back to make any changes.
- Click Run to start the installation.
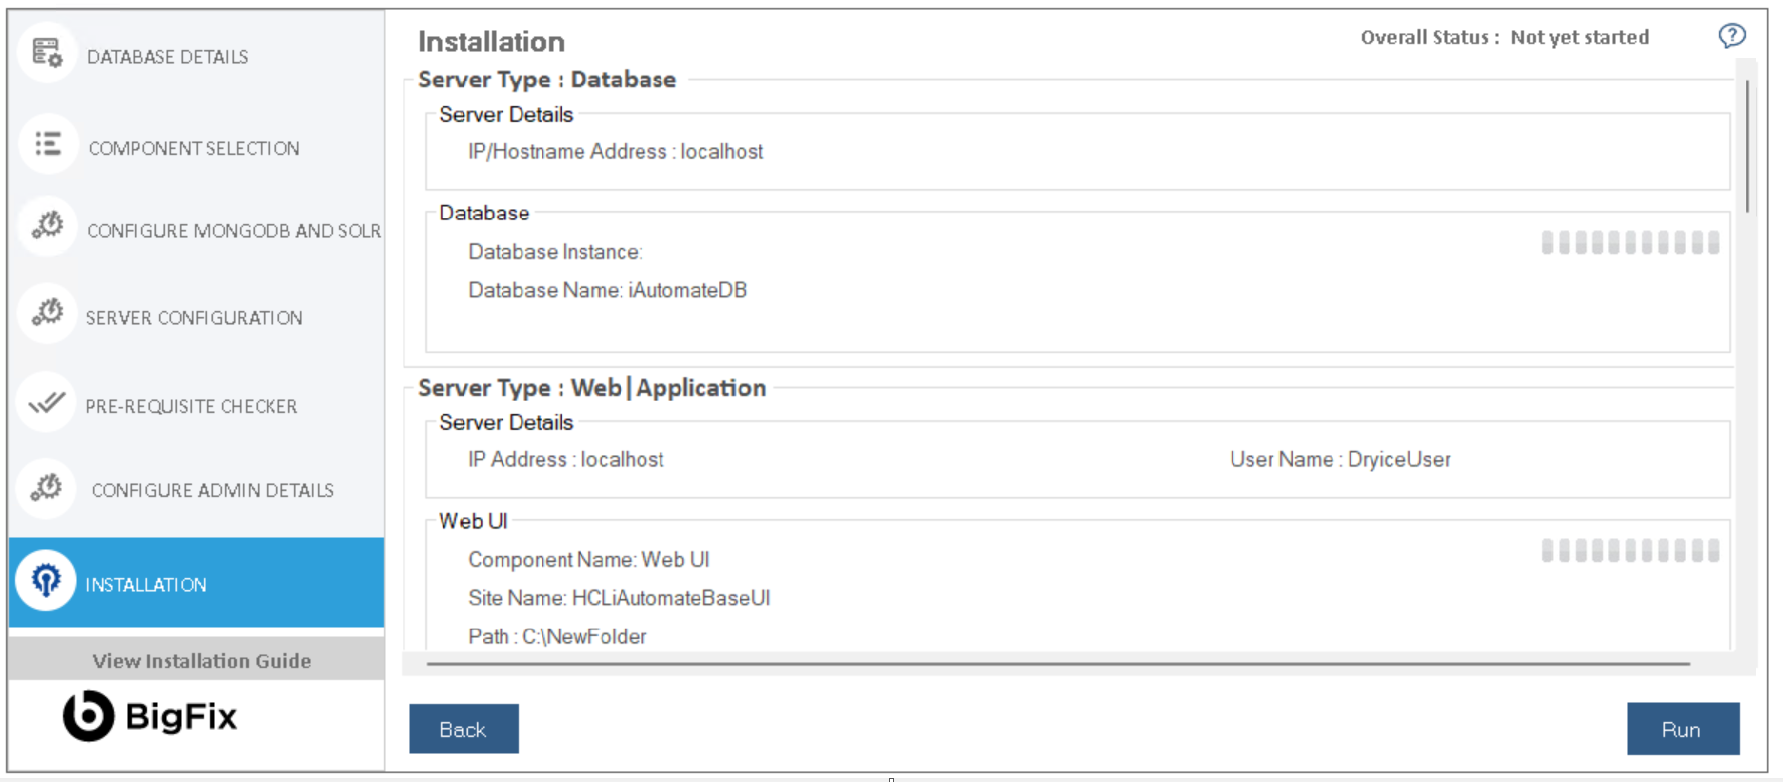
The progress bar displays the installation progress.

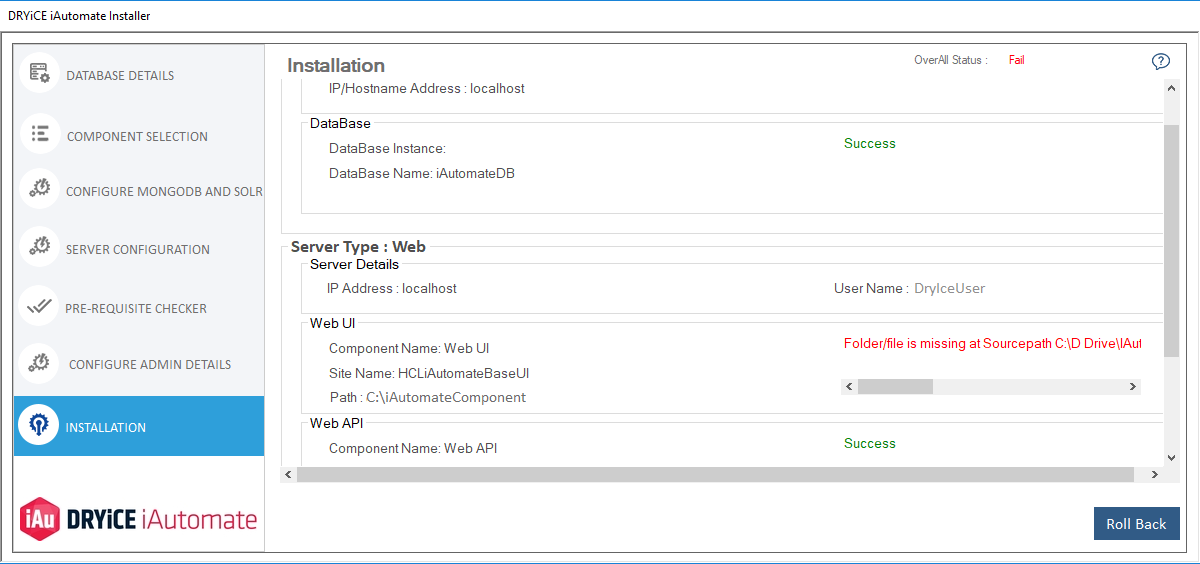
In case of installation failure, error messages for the corresponding component appear on the screen. Click Rollback button to uninstall the components and re-run the Installer after resolving the issues. To perform the cleanup, delete all the folders manually on the server installation path provided earlier. Contact the product team administrator for further assistance.
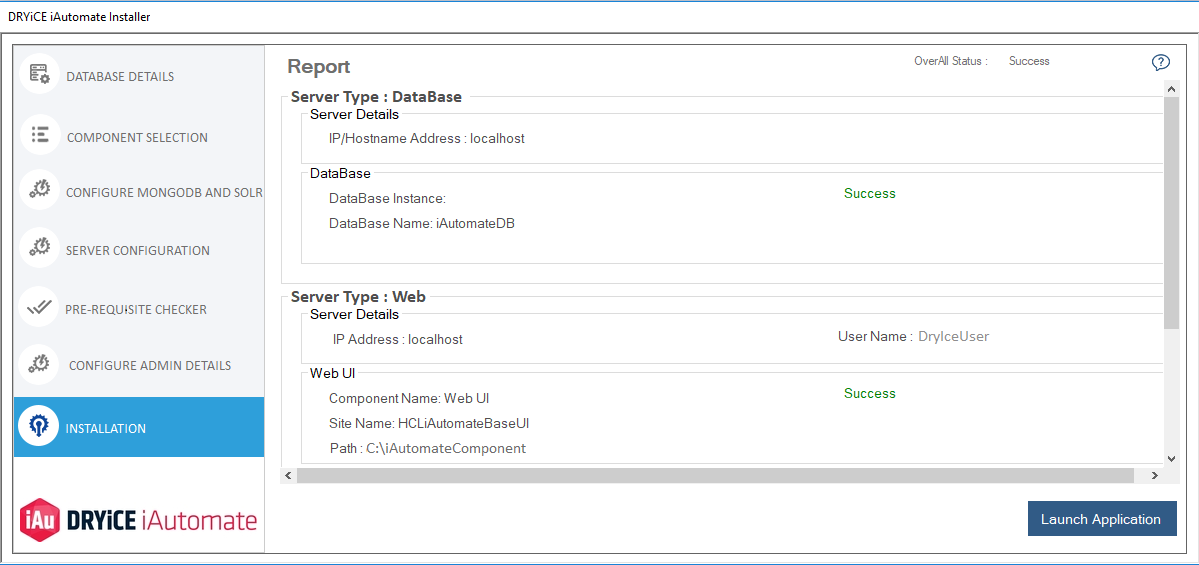
- After successful installation, the Launch Application button appears. Click Exit to exit the installer.
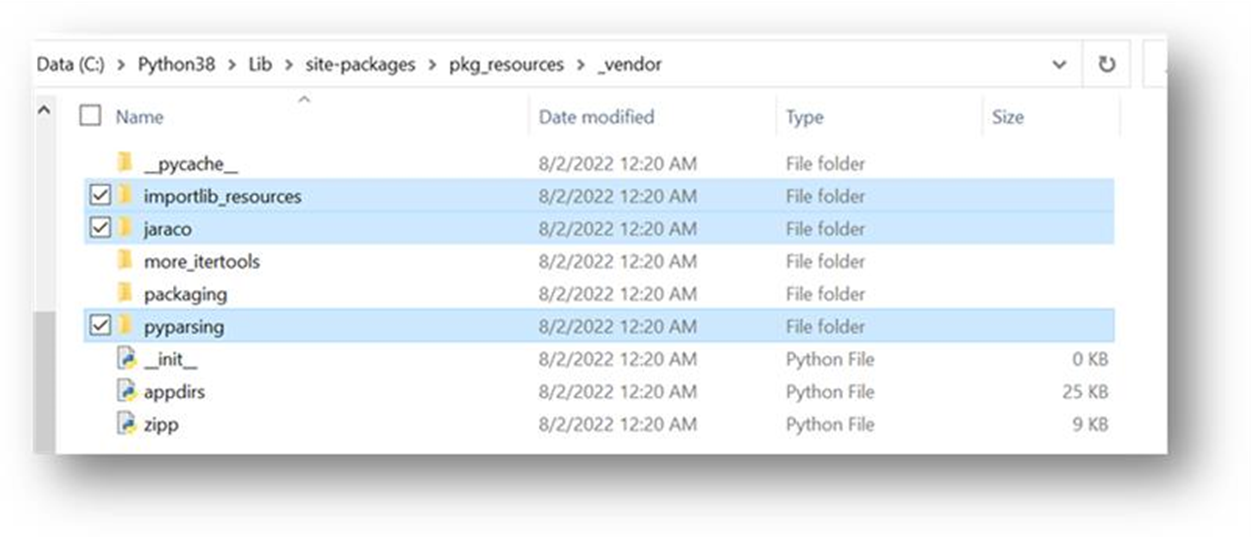
Navigate to the {PythonHome}/Lib/site-packages/pkg_resources/_vendor folder and Delete the below marked folders.
- Restart all Apache/ Python component services.
- Click Launch Application button to start BigFix Runbook AI.

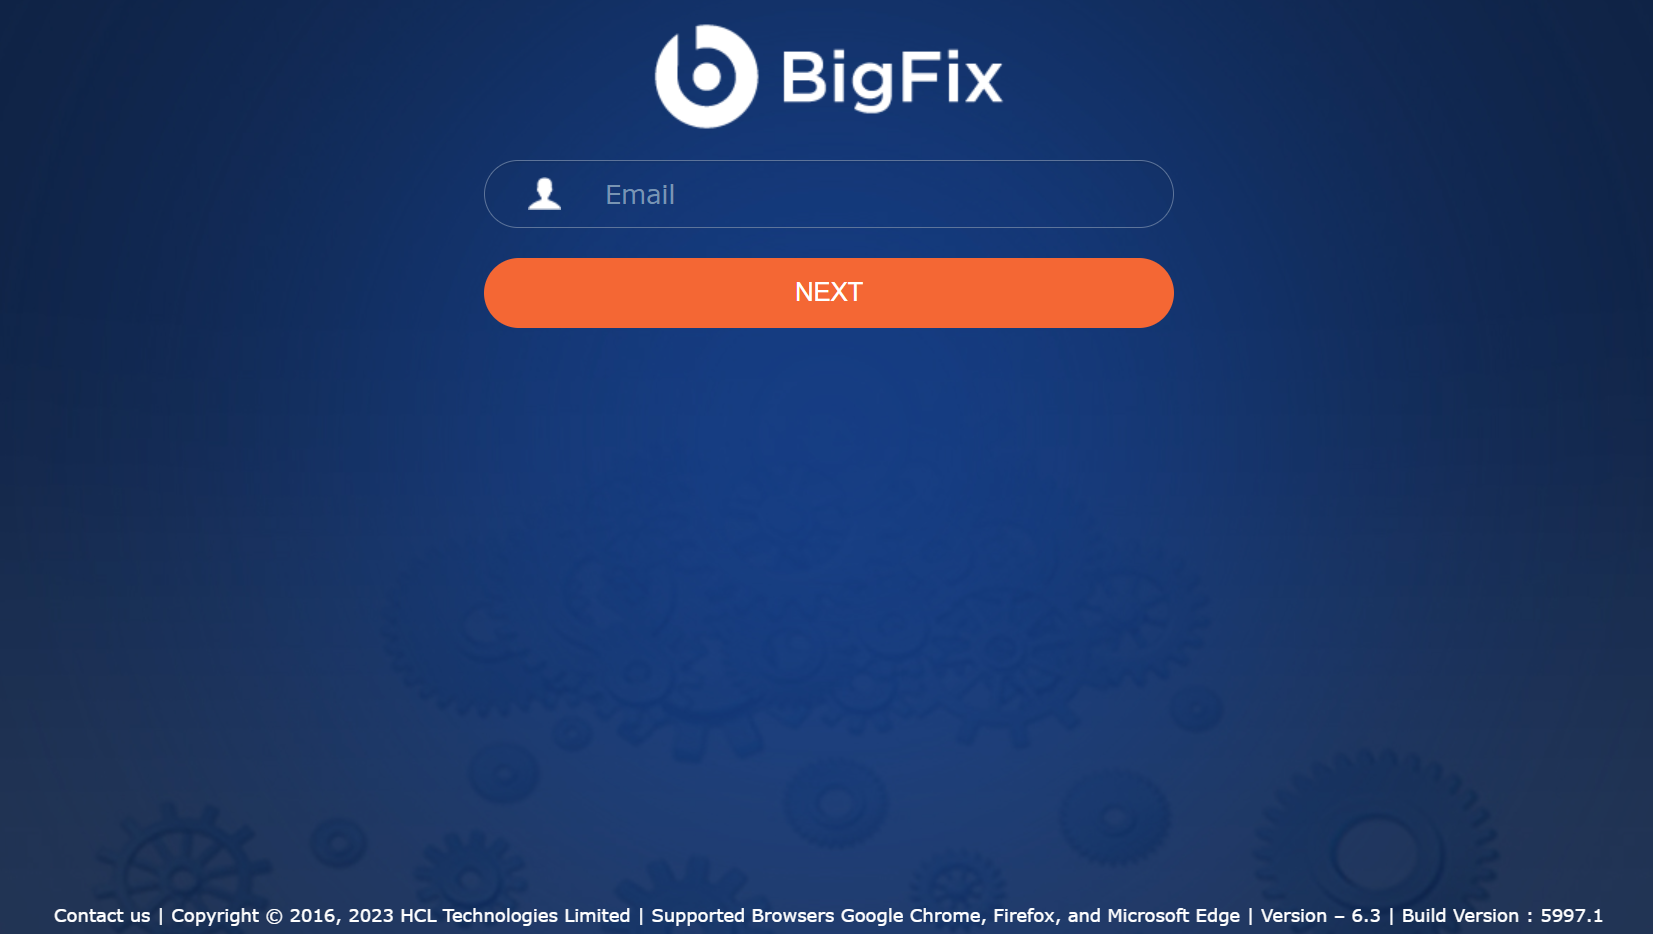
- Click OK to navigate to the BigFix Runbook AI Login Page.