Installing the server on Windows in interactive mode
To install the BigFix Inventory server on Windows, download the application installer to a selected computer and run the setup-server-windows-x86_64.bat script. Then, follow instructions in the installation wizard.
Before you begin
- Ensure that the BigFix client is installed on the computer on which you want to install the BigFix Inventory server.
- Log in as user with administrative privileges and run the installer with the Run as Administrator option.
- Disable or reduce the User Account Control in Windows to avoid warnings during the installation.
Procedure
-
Download the BigFix Inventory installer.
- Log in to the computer where you downloaded the installer as a user with administrative privileges.
- Go to the directory where the installer was downloaded, and extract the installation files.
-
To start the installation, run the setup-server-windows-x86_64.bat
file.
Run the installer with the Run as Administrator option.Tip: If you encounter a slow installation, check the following items:
- Check the performance and speed of the hard disk.
- Check whether the antivirus is scanning each file separately as it might slow down packaging. If this is the case, turn off the antivirus. If the antivirus cannot be turned off, expect the installation to be slower.
-
Select the language of the installation, and click OK. The installation
wizard starts, and the welcome panel opens. Click Next.
If you cannot choose your language in the installation wizard, set the system locale to a chosen language. For more information, see Troubleshooting.
- Read and accept the license agreement, and click Next.
- Follow instructions in the installation wizard and provide the required parameters.
-
On the last panel, specify the user account that you want to be used for running the
application service.
- If you choose Local System account, the service runs under the
NT AUTHORITY\SYSTEMuser, which has all required rights. - If you choose Other account, specify a user with the log on
as a service right and administrative privileges. The User Account Control in Windows
must be reduced or disabled, because it might block the service from starting. The user must be
entered as domain\username, machine\username, or
.\username if it is a local account.
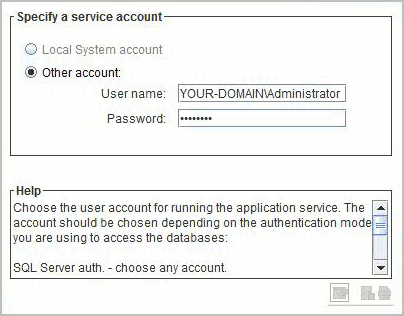
Important: To use Windows authentication to access the database, the service owner chosen on this panel must be available both to BigFix Inventory and the relevant database server for which you use this authentication. For local databases, you can use the Local System account. For remote databases, specify a domain user that is shared between the two servers. - If you choose Local System account, the service runs under the
-
When the installation is complete, click Done to exit the wizard.
Tip: If you encountered problems during the installation, analyze the log file that is in the following directory: %USERPROFILE%/BFI9.2.16.
Results
https://host_name:port, where
host_name and port are the values that you specified during
the installation.