Understanding the VM Managers panel
Before you start adding VM Managers, see the details of the VM Managers panel to understand the available options and columns.
To open the VM Managers panel, click . Starting from application update 9.2.4, the panel lists not only VM managers that are managed in the central mode, but also those from the distributed mode. However, options such as editing, deleting, or testing connection are applicable only for VM managers that are managed in the central mode. For information how to perform these tasks for VM managers that are managed in the distributed mode, see: Advanced VM management (distributed).
The number of VM managers that are shown on the panel depends on your computer group assignment. You can see only VM managers from which data is collected by the VM Manager tool that belongs to the computer group to which you are assigned.
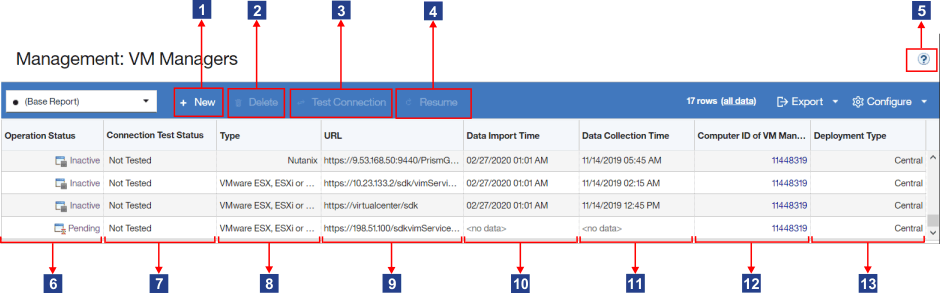
 New
New- Click this button to add a VM manager. Use this option to add
VM managers to which the BigFix server can
connect. If the VM manager is in a separated network to which the BigFix server cannot
connect, create the VM manager configuration file. For more information,
see: Advanced VM management (distributed).Important: The button is disabled when the computer where the main instance of the VM Manager tool is installed does not belong to the computer group to which you are assigned.
 Delete
- Click this button to delete the selected VM manager. The option
is applicable only to VM managers that are managed in the central
mode. If the selected VM manager is managed in the distributed mode,
the button is disabled. To delete such a VM manager, remove its configuration
file from the computer that is listed in the Computer ID
of VM Manager Tool column.Important: When you delete a configuration file of a VM manager that is managed in the distributed mode, the VM manager is removed from the BigFix Inventory user interface after the maximum visibility period is exceeded. The period is set by the maxVMManagerVisibility parameter and is set to 90 days by default.
 Test
Connection
Test
Connection- Click this button to test the connection to the selected VM manager. The option is applicable only to VM managers that are managed in the central mode. If the selected VM manager is managed in the distributed mode, the button is disabled. The status of the connection test is shown in the Connection Test Status column.

 Resume
- Click this button to resume a connection to a VM manager that is in the Invalid credentials - suspended status. When the number of failed login attempts is exceeded, connection to the VM manager is suspended to prevent the account from locking. After you correct the underlying issue, you can resume the connection.
 More information
- A link to a documentation topic that describes how to manage VM managers.
 Operation Status
- The status of the VM manager that reflects its condition. The status changes when connection or configuration problems occur. For more information, see: VM manager statuses.
 Connection Test Status
- The status of the connection test. The initial value is
Not
Tested
and it changes toTesting,Successful, orFailedafter you click Test Connection. The latter two statuses are always followed by a time stamp. For more information, see: Connection test statuses.The option is applicable only to VM managers that are managed in the central mode. If the selected VM manager is managed in the distributed mode, the connection status is
Not Applicable.  Type
Type- Type of the VM manager.
-
 URL
URL - Web address of the VM manager. Each virtualization type uses a different address format. The template is always provided when you add VM managers. For more information, see: Supported virtualization types.
 Data Import Time
- Date and time when the capacity data was imported from the BigFix server to BigFix Inventory.
 Column is hidden by default.
  Data Collection Time
- Date and time when the capacity data was collected from the VM manager by VM Manager tool. The time that is shown in this column might differ from the time in the Data Import Time column because the collected data might still need to be uploaded to the BigFix server and then imported to BigFix Inventory.
-
The
‘Data Collection Time’ column has been extended with an icon showing issues with VM
Manager tool results transfer.

 Computer ID of VM Manager tool
- Identifier of the computer on which the VM Manager tool that collects data from the particular VM manager is installed. Click the link to display the details of the computer, for example its IP address. You can use the information to learn which computer to access to change the configuration file of the VM Manager tool in the distributed mode.
 Deployment Type
- Indicates whether the VM manager is deployed in the central or distributed mode. If the
deployment type is central, you can edit the VM manager on the BigFix Inventory user interface.
If the deployment type is distributed, you can view information about the VM manager on the BigFix Inventory user interface, but you cannot edit nor delete it. To change the settings of such a VM manager, edit its configuration file. The file is on the computer that is listed in the Computer ID of VM Manager tool column. For more information, see: VM manager configuration parameters.
- Deprecated: User Name
- In earlier versions, this columns shows the user name that is used to connect to the VM manager.