Single Sign-On Settings
About this task
Authenticating users with Single Sign-On
BigFix Compliance supports
Single Sign-On (SSO) for user authentication through:
- Security Assertion Markup Language (SAML)
- Lightweight Third-Party Authentication (LTPA)
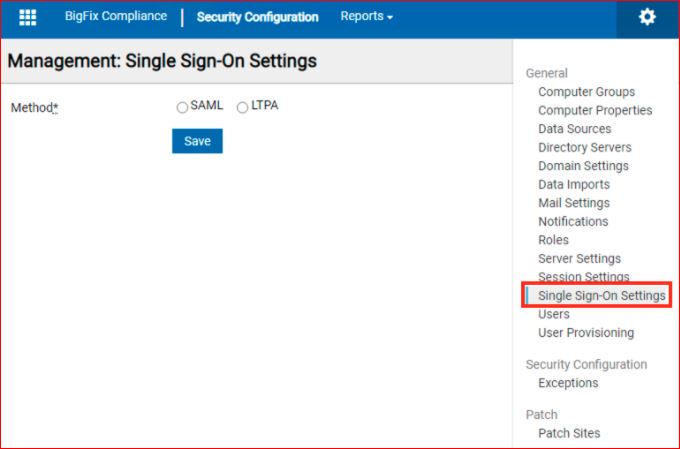
To open Single Sign-On Settings page, navigate to settings gear icon and click Single Sign-On Settings from the list.
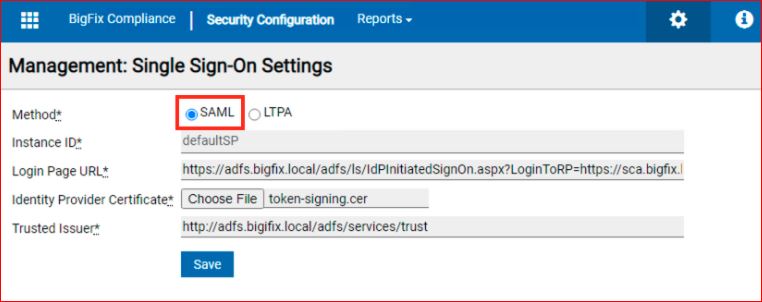
Configuring SAML Single Sign-On
Follow the steps below to set up SAML Single Sign-On for your system with Active Directory Federation Services (ADFS).
Before you begin
- Get the following information from the identity provider (IdP):
- Login URL
- Token-Signing Certificate
- Trusted Issuer
- Backup on the following .xml files:
- <Install Dir>\wlp\usr\servers\server1\server.xml
- <Install Dir>\wlp\usr\servers\server1\app\tema.war\web.xml
- When enabling Single Sign-On in Server Settings, you must have at least one
Single Sign-On user created. Before enabling Single Sign-On, you need to do
the following:
- Create Single Sign-On users from Management > Users. The operator must create at least one user with Administrators role and Single Sign-On as Authentication Method.
- Consider changing the authentication method of existing users to Single Sign-On.
- Create User Provisioning rules as necessary (optional)
Note: The user name format for user provisioning must be a User-Principal-Name
(or a SAM-Account-Name, without domain). User provisioning on Single Sign-On is
associated with what is indicated on the directory server.
Procedure
- Login to BigFix Compliance as an administrator (with FQDN URL).
-
Create a SSO user with administrator rights in the BigFix Compliance
server.
-
Follow these steps if you plan to use user provisioning.
- Add your directory server by creating an entry in . (See Directory Servers section).
- Configure the user provisioning rule in . When Single Sign-On is enabled, the authentication method of all the provisioned users is Single Sign-On. (See User Provisioning section)
-
Create a SAML configuration entry.
-
Download the metadata of the service provider and configure the service
provider details on the identity provider. Download the service provider
metadata file, spMetadata.xml from the link.
After the service is restarted, BigFix Compliance login page will redirect to the login page of the identity provider. Enter your credentials. Once authentication is successful, it will be redirected to BigFix Compliance landing page (Security Configuration Overview page).
Configuring LTPA Single Sign-On for your system
About this task
Before you begin
Note: After the
Single Sign-On is enabled, only Single Sign-On users can log in to BigFix
Compliance Analytics. To avoid log-in access issues, all existing users, except
the local Administrator user, should convert to Single Sign-On
users.
When enabling Single Sign-On in Server Settings, you must have
existing Single Sign-On users. Before enabling Single Sign-On, you need to do
the following:
- Identify ISAM server, Directory Server and Compliance Server
- Backup on the following .xml files:
- <Install Dir>/wlp/usr/servers/server1/server.xml
- <Install Dir>/wlp/usr/servers/server1/app/tema.war/web.xml
- Create Single Sign-On users from . The operator must create at least one single sign-on user with Administrators role.
- Create User Provisioning rules.
Note: The user name format for user provisioning must be a
User-Principal-Name (or a SAM-Account-Name, without domain). User provisioning
on single sign-on is associated with what is indicated on the directory server.
Procedure
- Login to BigFix Compliance and go to .
- Create a Directory Server entry for single sign-on authentication. (See Directory Servers section for how to add a Directory Server).
-
Go to to create an Single Sign-On user.
- Go to . Click Create User.
- Enter a user name that is registered in the directory server.
- Check Administrators role (at least one single sign-on user needs to have Administrators role).
- Specify Computer Groups, as necessary. (not applicable for administrator).
- Select Single Sign-On as the Authentication Method.
- Enter the email address and contact information (optional).
- Click Create.
-
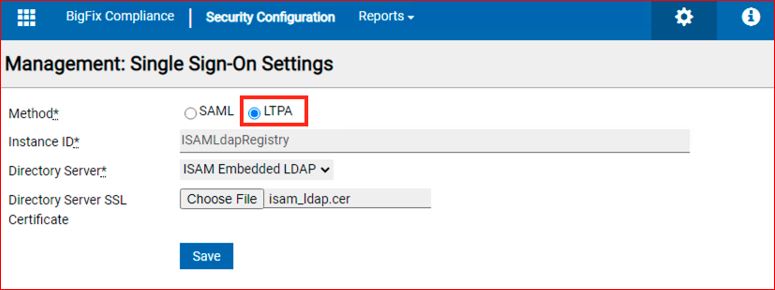
Create an LTPA configuration entry.
- Go to .
- Select LTPA as the Single Sign-On method.
- Select the directory server that was created in Step 2.
- If the directory server is configured with SSL option, click Browse and upload the directory server’s certificate.
- Click Save.
- Restart Compliance service.
-
Download LTPA Keys from Compliance.
- Login back to Single Sign-On Settings page.
- Click Download LPTA Keys link and save ltpa.keys.
- Configure reverse proxy / virtual junction on ISAM with Compliance’s server certificate and LTPA keys (See https://help.hcltechsw.com/bigfix/10.0/inventory/Inventory/security/t_configuring_sso_isam.html for details).
-
Enable Single Sign-On in Compliance.
- Login back to Single Sign-On Settings page.
- Click Enable.
- Restart Compliance service.
- Access Compliance by ISAM’s virtual host/url (such as https://<virtual_host>/sca)