Container Manipulator components
You use Container Manipulator components to add and delete data in Container components.
In the Container Manipulator component, you can map fields from a data source to the fields you defined in the Container.
Firing conditions
Firing conditions are optional. If no firing conditions are set, the Container Manipulator fires a positive event when it completes its processing.
If firing conditions are specified, the Container Manipulator evaluates the data to see whether it meets the firing condition criteria. If the data satisfies the criteria, the Container Manipulator performs its defined operations on a specified Container component and then sends its event. If the data does not satisfy the firing condition criteria, the Container Manipulator does nothing.
A Container Manipulator component can also be configured to send a negative event when the criteria in its firing condition are not met.
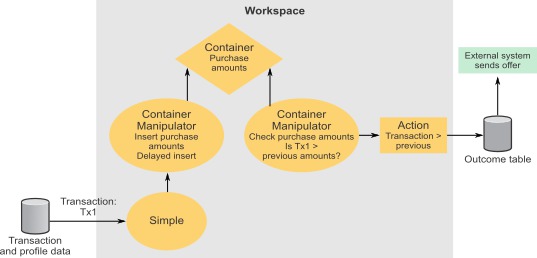
Delayed insert
Delayed insert provides a special way to insert a value into a container. When you choose the Delayed insert option, the system adds the values to the contents of the Container only after all logic in the trigger system has finished processing the transaction.
For example, suppose you have a trigger system like the one shown in the following diagram. It includes a Container that holds purchase amounts. You want to detect any purchase that is larger than the previous purchases made by that customer. If you perform a delayed insert, you can check the incoming purchase against previous purchases before the incoming purchase is inserted into the Container.
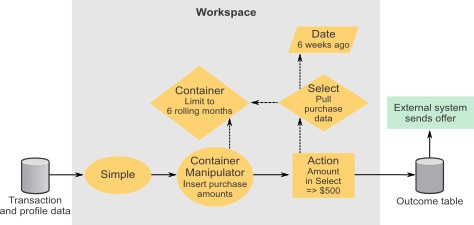
Detailed Container Manipulator example
Suppose your goal is to offer a discount to customers who purchase $500 or more within a 6 week period. You can set up a trigger system as follows.
- Create a Simple Event component that fires an event when a customer makes a purchase.
- Create a Container to store dollar amounts of purchases.
- In the Aging panel, set a rolling six month limit on the amount of time to retain data, to prevent overload.
- Create a Container Manipulator, CM1, that listens for the Simple component event.
- In the Action panel, specify that the purchase amount is inserted into the Container.
Tip: Unlike the simplified example shown in the detailed Container example, this Container holds more data than is needed for the current scenario, so additional components are needed to filter the data. - Create a Date component that returns a date of 6 weeks before the current date.
- Create a Select component.
- In the Select panel, pull the purchase data from the Container.
- In the Where panel, use the date returned by the Date component to limit the data to the last six weeks.
- Create an Action component that listens for the CM1 event.
- In the Firing Condition panel, define a Boolean expression that applies the Sum function to the dollar amount field in the Select and returns True when the amount is equal to or greater than $500.
Each time a customer makes a purchase, the dollar amount is saved and the total purchases for the last six weeks are evaluated for that customer. When the amount is equal to or greater than $500, the Action component fires for that customer.