Creating a new meeting
Because meetings are configurable, user access and capability vary depending on how the meeting is created. Some moderated meetings are configured to restrict guest access. The Sametime Meetings landing page is where you can create a meeting.
Before you begin
Procedure
- From the Meetings homepage, click Get Started.
- Select Create a new meeting.
-
Enter a name for the meeting.
Meeting names must be unique at the server level.
-
Select a meeting mode.
- Select Collaboration if the meeting is open to anyone that is provided with the meeting link.
- Select Confidential if the meeting is restricted
to a designated set of authenticated participants. Use the Manage
members field to add participants that can access the
meeting. Or, leave the list empty and share the meeting name or link to all
intended users. In the latter scenario, the waiting room must be enabled and
you have to manually admit the participants in to the meeting, deciding
whether these users have one-time access or are added to the member list for
future meeting instances.
You must define a password for confidental meetings. All participants are required to enter the password to access the meeting
- Select Lecture if the meeting participants are to
be in listen-only mode. This choice is suited for presentations type
meetings.
Moderated meeting is mandatory for this mode. Although the meeting participants are in listen-only mode, moderators can give them speaker access so they can participate in the discussion. By default, Conference dial-in and Allow guests are enabled and anyone with the meeting details can join.
-
Select meeting settings. Settings vary based on the meeting mode that you have
selected.
- Conference dial-in
- When enabled, anyone with the meeting details can join.
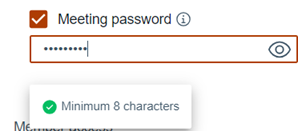
- Meeting password
- When enabled, all participants, including moderators and owners, are
required to enter a password to join the meeting. Enter the meeting
password in the text box. As you type the password, password
requirements are displayed. As a requirement is met, a green circle
with a check mark is displayed.
- Member access
-
- Allow guests
- When enabled, guests or people outside of the organization can join the meeting.
- Manage members
- This setting is enabled when the moderated option is selected. The Manage members feature allows meeting owners to add moderators to the meeting.
- Moderated
- Only moderators or meeting owners can start the meeting. When enabled, moderators can also control the other aspects of the meeting such as who can present. For more information, refer to Editing existing meetings.
- Restricted
- Moderators can define which participants have access to the meeting.
- Waiting room
- When enabled, moderators can control when a participant joins a meeting. The waiting room feature requires participants to remain in a waiting area before they are admitted in to the meeting.
-
Select Advance meeting settings. Settings vary based on
the meeting mode that you have selected. Advance setting must be set before
starting the meeting to be in effect.
- Allow meeting recording
- Turn on to allow recording of the meeting. If enabled, you have the option to share the recording in chat message and allow the recording to be downloaded. You can enable one or both options.
- Allow meeting reports
- Enable so that a meeting report can be generated after the meeting ends. See Generating reports for more information.
- Allow chat outside of meeting
- Enable to allows participants to access the meeting chat after the meeting using the Chat client.
- Select Start to begin the meeting. Selecting Start automatically saves the meeting in the My Meetings list and redirects the owner to an active meeting room. You can also select Save and Copy meeting link to save the meeting in the My Meetings list and then share the meeting link to all intended participants.