Configuring host aliases for Kubernetes deployments
If your Kubernetes environment is unable to consistently resolve the host names of the supporting servers (MongoDB, Sametime Proxy, STUN) using DNS, configure the hosts manually.
About this task
In Kubernetes, you can add host name(s) and their corresponding IP addresses to the host aliases. In a Sametime Meetings on Kubernetes deployment, this setting is defined in the deployment.yaml in the various templates for each Kubernetes pod.
Table 1 lists the pod name and template for each host to be resolved.
Modify each template specified in Table 1 to include the host name and IP address of the required supporting server.
Complete the following steps to modify each template in the table to include the host name and IP address of each supporting server.
- When modifying yaml files, do not use the tab key for indentation, when using indentation use two spaces for each indentation.
- This process should be completed for all templates involved.
- There should be no extra blank lines in the template.
Procedure
| Hostname to resolve | Pod | Template name(s) |
|---|---|---|
| Sametime Proxy | web | helm/charts/web/templates/deployment.yaml |
| Sametime Proxy | auth | helm/charts/auth/templates/deployment.yaml |
| MongoDB server | catalog | helm/charts/catalog/templates/deployment.yaml |
| STUN server | video | helm/charts/video/templates/deployment.yaml |
| Recording repository and Sametime Proxy | recordings | helm/charts/recordings/templates/deployment.yaml |
- Open the template using a text editor and place into edit mode.
Locate the line restartPolicy=Always and insert a new line.
Use the below example text as a template and include the hostnames that need to be resolved:hostAliases: - hostnames: - "sametimeproxy.example.com" - "sametimeproxyalias.example.com" ip: "10.10.10.10" - hostnames: - "mongodb.example.com" ip: "10.10.10.11"Note: In the hostnames field your server may only be known as one hostname, you can add multiple aliases if desired. - Before saving the template, ensure the indentations are correct, using only spaces for
indentation. The
hostAliases:line should line up exactly under therestartPolicyline at the same level of indentation. You may need to correct the other lines as well after copy and pasting them. Visually it should look like this: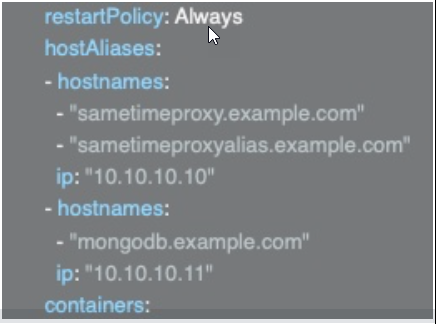
- Save and close the template when changes are complete.
What to do next
Once this process is completed you can continue the steps to install Sametime Meetings. If you have already installed Sametime meetings, follow the procedure in the topic Enabling Meeting Configuration Changes.