Configure a cluster of IBM® Sametime® Gateway Servers
to operate in a NAT (Network Address Translation) environment.
Before you begin
Traversing a NAT environment is a known issue in the SIP
domain. There are several ways to solve this issue, while some of
them have been formed as IETF standard (RPORT, STUN and ICE), others
have been formed as proprietary solutions. So what is the problem?
Some of the SIP communication parameters contain the Fully Qualified
DNS Name (FQDN) or the IP address, and the port, but a SIP device
deployed in a NAT environment does not know how it will be seen from
the internet because the NAT device translates the IP address.
A
static NAT is defined in the NAT or firewall; the public IP address
should be mapped to the SIP proxy server's internal IP address.
About this task
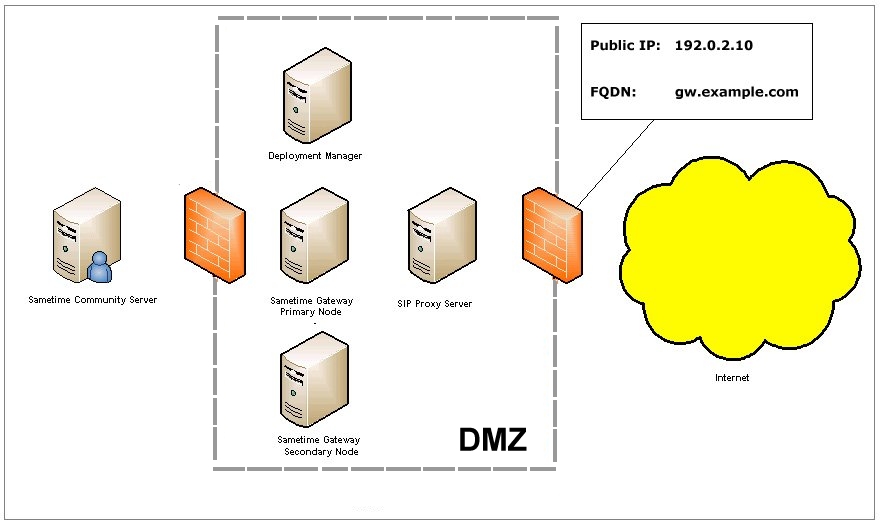
The following diagram illustrates the NAT environment
that this solution was designed for. Only static NAT is supported.
A fully qualified domain name for the cluster is mapped to the public
IP address serving the Sametime Gateway.
Then a custom property maps the cluster FQDN for traversing the NAT.
Procedure
- Map a fully qualified domain name to the public IP address
serving the Sametime Gateway
Server.
- Install the SSL certificate.
- Define a custom property to map the cluster FQDN for traversing
the NAT:
Define a custom property to enable communications
in a NAT (Network Address Translation) environment. Traversing NAT
is known issue for the SIP domain; defining the "FQDN" custom property
for Sametime Gateway
is a workaround for this issue. Before beginning, make sure the following
requirements have been satisfied:
- A static NAT should be defined in the NAT or Firewall (only static
NATs are supported).
- The public IP address should be mapped to the SIP proxy internal
IP address.
- A fully qualified domain name must be mapped to the public IP
address serving the Sametime Gateway
Server.
-
Log in to the WebSphere® Integrated Services Console
as the WebSphere administrator.
- Click .
- Click New and enter information
for the new custom property:
- Type
com.ibm.sametime.gateway.fqdn as the Name
of the new property.
- Type your fully qualified domain name as the Value.
- Type a description of the new property.
- Click Apply, and then click OK.
- Perform a full synchronize with the nodes:
- In the Deployment Manager's Integrated Solutions Console, click .
- Click Full Resynchronize.
- Restart all Sametime Gateway nodes.
For example, If you set the custom property to gw.ibm.com
(and the port is set to 5070), the INVITE SDP would look like this:
v=0
o=- 0 0 IN IP4 gw.ibm.com
s=session
c=IN IP4 gw.ibm.com
t=0 0
m=message 5070 sip null
- Set the
ipForwardingLBEnabled custom property:
- In the Integrated Solutions Console, click .
- In the list of proxy servers, click the link for your
SIP proxy server to open its Configuration page.
- Click .
- Click New, enter information
for the new custom property and then click OK:
- Type ipForwardingLBEnabled as the Name
of the new property.
- Type True for the Value.
- Continuing on the Custom Properties page, enable the SIP
Proxy IP Sprayer as follows:
- Define the TLS IP Sprayer by clicking New,
adding the following settings, and then clicking OK:
- Type
tls.IPSprayer.host as the Name with the
SIP Proxy server's external fully qualified host name as the Value;
for example: stgw.example.com.
- Type
tls.IPSprayer.port as the Name with the
port used by the IP sprayer for TLS encrypted communications; for
example: 5061.
- Optionally define a TCP IP Sprayer by clicking New,
adding the following settings, and then clicking OK:
- Type
tcp.IPSprayer.host as the Name and the SIP
Proxy server's external fully qualified host name as the Value; for
example: stgw.example.com.
- Type
tcp.IPSprayer.port as the Name and the port
used by the IP sprayer for TCP communications as the Value; for example:
5060
- Optionally define a UDP IP Sprayer by clicking New,
adding the following settings, and then clicking OK:
- Type
udp.IPSprayer.host as the Name and the SIP
Proxy server's external fully qualified host name as the Value; for
example: stgw.example.com.
- Type
udp.IPSprayer.port as the Name and the port
used by the IP sprayer for UDP communications; for example: 5060.
- Click Save in the "Messages"
box at the beginning of the page.
- Restart the SIP proxy server.
- Restart the cluster.