Roadmap: Production and delivery environment | HCL Digital Experience
The production environment represents the servers that incoming web traffic accesses to experience your digital experience. It does not have to be a cluster. This environment could multiple clusters, a portal farm, or a stand-alone server, depending on your business needs. However, this roadmap is based on a cluster topology. In a cluster, the portals share a common configuration and the load is distributed evenly across all cluster instances.
The Configuration Wizard prompts you to select the cluster type, static, or dynamic. By default, the cluster type is static. A static cluster is a group of application servers in a IBM® WebSphere® Application Server Network Deployment environment that participates in workload management. A dynamic cluster monitors performance and load information and is able to dynamically create and remove cluster members that are based on the workload. You can add extra nodes to expand the capacity of the dynamic cluster.
Before version 8.5, you were required to install and configure IBM WebSphere Virtual Enterprise to set up a dynamic cluster. Now, the virtual enterprise component is integrated with the application server. Therefore, you do not need to install and configure WebSphere Virtual Enterprise before you set up a dynamic cluster.
Who should use this roadmap
- An organization whose production site requires improved availability and failover
- An organization whose site experiences random high load situations that might benefit from dynamic load balancing
- An organization whose website can benefit from other features such as prioritization, health monitoring, and dynamic operations
- An organization that needs to manage deployments and synchronize various cluster nodes with a single administrative interface, the deployment manager
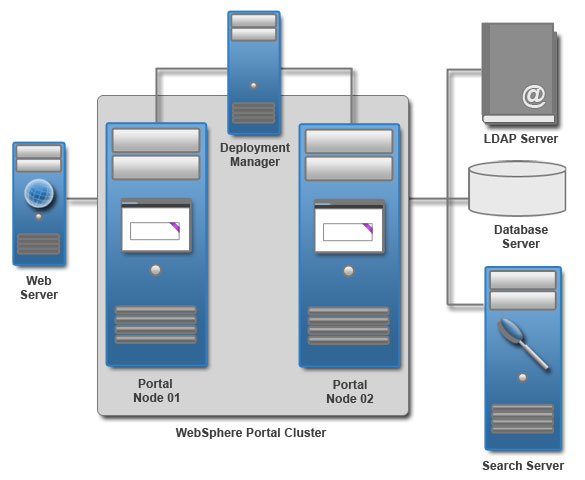
Topology diagram
A cluster topology is versatile. You can use it to set up a production environment, a test environment, and more. The clustered topology diagram includes two horizontal nodes that are managed in the same cell. The nodes in the cluster use a common LDAP and database server. A remote search server is depicted too. In a cluster environment, you must use a remote search server.
Preparing for the installation process
- Check requirements.
- Documentation resource: System requirements
- Get the software.
- Documentation resource: Getting the software
Installing prerequisite
You can use existing prerequisite software installations. Verify that your existing version is supported. If it is not, upgrade to the appropriate version. Otherwise, install a web server, database server, and user registry server. Typically the database and user registry servers are already installed and configured. However, there might be specific configuration steps that are required to integrate them with the portal server.
- Install a web server.
- Documentation resource: Preparing a remote web server
- Prepare a database server.
- Documentation resource: Installing and preparing the database software
- Prepare a user registry.
- Documentation resource: Preparing the user registry software
Installing the HCL Digital Experience
- Documentation resource: Installing the HCL Digital Experience software
Applying the latest cumulative fix
- Documentation resource: Roadmap: Applying maintenance
Setting up a cluster environment
Start the Configuration Wizard to set up your clustered environment. First, transfer your database. Then, create the deployment manager and create a cluster node. Then, enable your federated LDAP user registry. Finally, create your additional horizontal cluster nodes using the Configuration Wizard. These instructions are for a horizontal cluster only. For information on setting up a vertical cluster, see Setting up a Cluster in the Configuring section of the documentation.
http://hostname.example.com:10039/wps/portal,
where hostname.example.com is the fully qualified host name of the server where
Portal is running and 10039 is the default transport port that is created by DX® Application Server. The port number might be different
for your environment.- To get the latest updates for the wizard, apply the most recent Combined
Cumulative Fix. For more information about applying the latest fix pack, see
HCL Digital Experience Combined Cumulative Fix Fix
Strategy.Note: Skip this step, if you have the most recent fix pack applied.
- Access the Configuration Wizard. Go to http://your_server:10200/hcl/wizard.Note: If working with HCL Digital Experience 8.5 or 9 software level prior to CF18, the wizard address will be: http://your_server:10200/ibm/wizard. After installing CF18, the configuration wizard will automatically be adjusted to http://your_server:10200/hcl/wizard.Restriction: There is a known issue with Chrome version 45.x and the Configuration Wizard. If you are experiencing difficulties, use a different browser when you access the wizard.
- Log in to the Configuration Wizard with the administrative ID for
the configuration wizard profile, cw_profile.
Note: The wizard user interface might not be available in all languages. If the language is not currently supported, you might see the English version. For details on the supported languages for all of the HCL Digital Experience user interfaces, see Supported languages.
Complete the following steps below to transfer your database:
- Select .Note: The Database Transfer configuration option in the Configuration Wizard assigns users and permissions, creates databases, obtains support for database collation, and transfers your database.
- Provide information about your environment.
- Save your configuration settings.
- Choose one of the following options:
- Click Download Files to run the steps remotely; or
- Click Run All Steps to run the steps locally.
- Log in to HCL Portal to verify that you have a working portal
server.
Complete the following steps below to create your deployment manager.
- Select .
- Provide information about your environment.
- Save your configuration settings.
- Choose one of the following options:
- lick Download Files to run the steps remotely; or
- Click Run All Steps to run the steps locally.
- Optional: If you changed the context root during the installation or configuration of HCL Digital Experience, then you must complete the optional next step from the Configuration Wizard to update parameters with the new context path after you complete the Create a Deployment Manager configuration option. For more information about this configuration option and completing the next steps, see Create a deployment manager.
- Log in to HCL Portal to verify that you have a working portal
server.
Complete the following steps below to create a cluster node:
- Select .
- Provide information about your environment.
- Save your configuration settings.
- Choose one of the following options below:
- Click Download Files to run the steps remotely; or
- Click Run All Steps to run the steps locally.
- Log in to HCL Portal to verify that you have a working portal
server.
Complete the following steps to enable federated security:
- .Note: If you set Use Administrator IDs stored in your LDAP user registry to yes, the WebSphere® Application Server and HCL Portal user IDs and passwords are changed to the LDAP user ID and password. If you do not want to change both user IDs and passwords to match the LDAP user ID and password, set this value to no. After you configure your LDAP user registry, you can manually change the user IDs and passwords.
- Documentation resource: Updating user ID and passwords
- Provide information about your environment.
- Save your configuration settings.
- Choose one of the following options:
- Click Download Files to run the steps remotely; or
- Click Run All Steps to run the steps locally.
- Log in to HCL Portal to verify that you have a working portal
server.
Complete the following steps to create extra cluster nodes
- Install HCL Digital Experience on the additional node. Install HCL Digital Experience
on the idle standby.
Documentation resource: Installing the HCL Digital Experience software.
Tip: For additional nodes, you only need to install the HCL Digital Experience product binary files. Therefore, on the Features screen of the IBM® Installation Manager, ensure that Portal Server Profile is not selected. - .Note: If you are setting up a vertical cluster, manual instructions are available for dynamic and static cluster configurations. For more information, see Adding vertical cluster members to a static cluster or Adding vertical cluster members to a dynamic cluster.
- Provide information about your environment.
- Save your configuration settings.
- Choose one of the following options:
- Click Download Files to run the steps remotely; or
- Click Run All Steps to run the steps locally.
- Log in to HCL Portal to verify that you have a working portal server.
Configuring the web server
- Documentation resource: Web servers
Tuning the servers in your environment
Tuning the servers is important to the performance of your portal environment.
HCL Digital Experience is not tuned for a production environment after installation and deployment. You can apply tuning now or prior to "production", but under no circumstance should Portal be placed into production without some level tuning.
- Run the performance tuning tool to complete an initial tuning of your servers.
- Documentation resource: HCL Digital Experience Performance Tuning Guide
- Check the tuning guide for more instructions. Use the tuning guide for the previous
product version when the tuning guide for the current release is unavailable.
- Documentation resource: HCL Digital Experience Performance Tuning Guide
- Set the Portal to replicate Dynamic Cache (Dynacache) in your HCL Portal and HCL Web
Content Manager 8.5, 9 or 9.5 environment using the non_WAS ND method.
You need to be on the HCL V8.5, 9 or 9.5 CF18 , or 9.5 Container Update release CF_171 or later to perform this task. Afterwards, configure the following property in the IBM WebSphere Application Server Resource Provider (REP):
use.db.cache.invalidation.table= (Boolean, which controls whether or not Dynacache invalidation table is used)- For Single node HCL Portals, this does not matter.
- Set to
Truefor Kubernetes or Farming of more than one (1) POD instances. - Set to
Falsein a “true” WAS ND cluster (e.g. to let WAS ND control Dynacache invalidation via the DRS manager).
For further HCL 8.5 and 9, or 9.5 deployment guidance, see Replicate Dynacache service for HCL Digital Experience.
Configuring a remote search service
Configure the remote search service to offload and balance system load.
- Use the IBM® Installation Manager to
install the remote search service.
- Documentation resource: Installing remote search service by using IBM Installation Manager
- If you use single-sign on, prepare the security for the remote search service.
- Documentation resource: Creating a single-sign on domain between HCL Portal and the remote search service
- Configure the security between portal and the remote search server.
- Documentation resource: Configuring user repositories on the remote search server
- Set the search user ID.
- Documentation resource: Setting the search user ID
- Configure the remote search service.
- Documentation resource: Configuring a remote search service
- Configure the seedlist servlet.
- Documentation resource: Configuring HTTP for the seedlist servlet
Next steps
Depending on the choices that you made during the installation and set up, there are additional tasks to configure your environment.
The following options are available to continue configuring your environment:
- Configure global settings
- Documentation resource: Configuring portal behavior
- Change the default portal Uniform Resource Identifier (URI)
- If you changed the context root on the Configuration for HCL Digital Experience: Profile configuration details: Advanced panel during installation: Completing the context root change started during installation
- Adapt the attribute configuration to match the LDAP server
- Documentation resource: Adding more attributes to VMM
- Configure syndication
- Documentation resource: Syndication
- Add vertical cluster members
- Documentation resource: Setting up a cluster
- Configure search
- Documentation resource: Configuring search in a cluster
- Update your user registry
- Documentation resource: User registry