Customizing default CAS connectors with Ingest profiles
In this lesson you will learn how to pull an additional column from the database and make it available as an extra field in the search response.
Before you begin
- Ensure that you have downloaded and extracted
HCL_Commerce_Search_Bundle_9.1.x.0.zipfrom the HCL License and Delivery portal. The extracted zip will contain the tutorial data at the following folder location: \dependencies\nifi\Tutorials. - Extract
commerce-custom-search-marketplace-seller.zipinto a temporary directory in your development environment, which needs to be set up in the NiFi toolkit following the procedure described below. This file includes the sample Java code and Junit tests that you use in this tutorial.
Procedure
-
Create a custom NiFi processor by extending the default Ingest processor in the
NiFi Toolkit.
To set up the toolkit environment with the provided sample source code
commerce-custom-search-marketplace-seller.zipin the same workspace ascommerce-custom-search-bundles-9.1.x.0as explained in the pre-requisite follow the steps mentioned below. And for more information oncommerce-custom-search-bundles-9.1.x.0see Tutorial: Customizing default Connectors with Ingest Profile.Note: You can use any eclipse distribution that includes the maven plug-in (Maven version 3.8.4 or later).- Extract
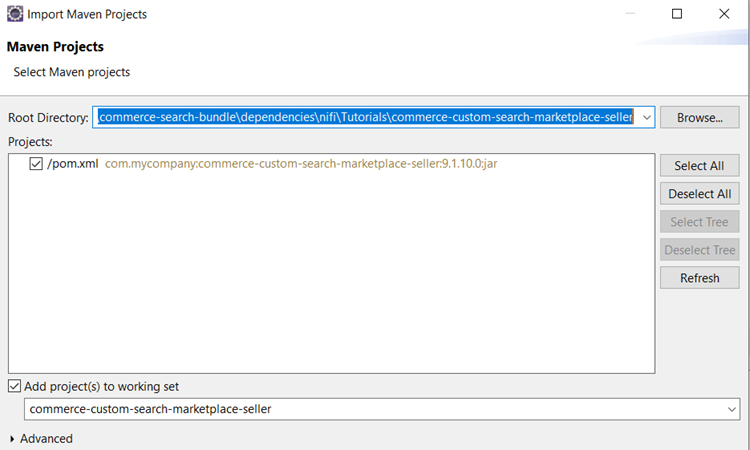
commerce-custom-search-marketplace-seller.zipto a working directory,commerce-custom-search-marketplace-seller, that contains a Maven project with apom.xmlfile inside it. - Update
pom.xmlfile in the root directory of thecommerce-custom-search-marketplace-sellerproject and change the file name references to the JAR file names.Example from V9.1.x.0:<dependency> <groupId>com.hcl.commerce</groupId> <artifactId>dummy-commerce-search-processors</artifactId> <version>9.1.x.0</version> <scope>compile</scope> </dependency> <dependency> <groupId>com.hcl.commerce</groupId> <artifactId>dummy-hcl-cache-core</artifactId> <version>9.1.x.0</version> <scope>compile</scope> </dependency> <dependency> <groupId>com.ibm.commerce.cf</groupId> <artifactId>dummy-cf-base</artifactId> <version>9.1.x.0</version> <scope>compile</scope> </dependency> - Import the extracted project as a Maven project into eclipse () and select the root directory commerce-custom-search-marketplace-seller. Click Finish. Wait for the dependencies to complete downloading.
This project has an example custom expression provider class ChangeSQL which implements the IngestExpressionProvider interface. The ChangeSQL class extends the SQL to include a DESCRIPTION column from the MPSELLERDESC table for DatabaseCASProductStage1a stage. It also includes a PARTNUMBER column from CATENTRY table for the DatabaseCASProductStage1h stage. You can use this sample reference to learn how to modify the SQL used in the default Extract, Transform, and Load (ETL) stages.
ComposeDatabaseSQLTest is the JUnit test that can be used for verifying the code logic of ChangeSQL.
ChangeDocument is an Ingest profile post-processor extension that demonstrates how you can perform further data manipulation following the default transformation, in two of the Product related Ingest stages: DatabaseCASProductStage1a stage and DatabaseCASProductStage1h stage
CreateProductDocumentFromDatabaseTest and FindChildItemsByAssetStoreFromDatabaseTest are the JUnit tests that can be used for verifying the code logic of ChangeDocument.
In this class, if current stage is DatabaseCASProductStage1a, then it adds an additional field seller_description with the value from the DESCRIPTION column of the "MPSELLERDESC" table into the document that is to be indexed in the Elasticsearch.
If current stage is DatabaseCASProductStage1h, then adds an additional field parent_partnumber with the value from the PARTNUMBER column of the CATENTRY table into the document that is to be indexed in Elasticsearch.
Once completed, your workspace contains two projects. The first project is
commerce-custom-search-bundles, from the NiFi Toolkit, and the second one is the importedcommerce-custom-search-marketplace-sellerproject.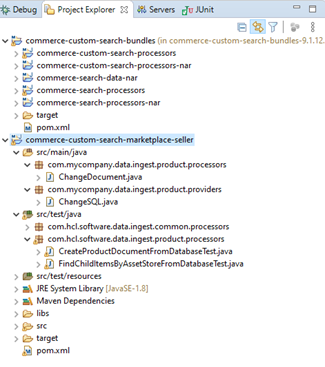
- Extract
-
Test the custom ingest logic in NiFi toolkit and building deployable JAR.
To run the JUnit test, right-click on the chosen JUnit Test class and choose either or .
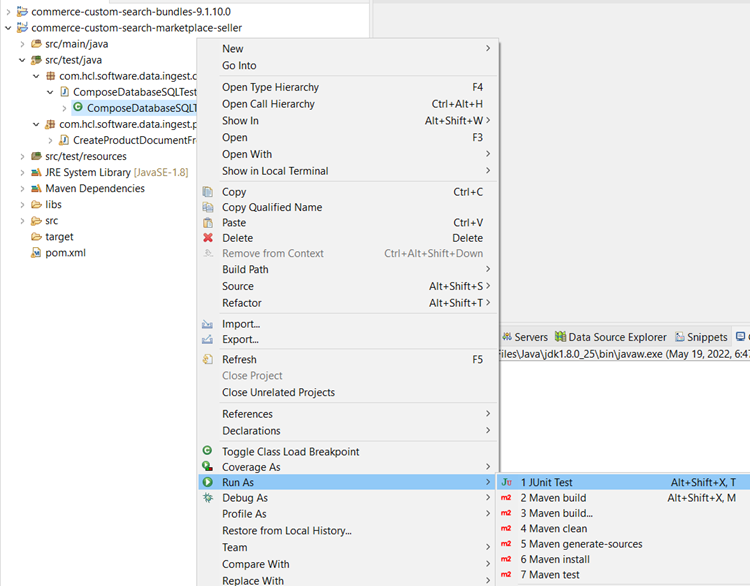
Also run a unit test for FindChildItemsByAssetStoreFromDatabaseTest.
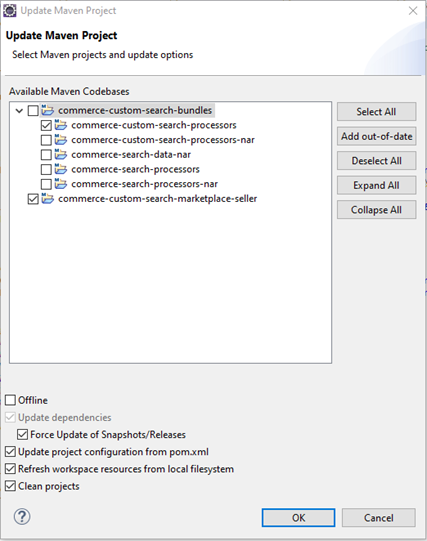
- Update projects by right-clicking on the Project and select .
- Select and click OK button. Rebuild the
binaries for project
commerce-custom-search-bundles-9.1.x.0.
 Note:
Note:- The commerce-custom-search-marketplace-seller customization project does not have any dependencies on the commerce-custom-search-bundles-9.1.x.x project, however it is recommended that you build the commerce-custom-search-bundles-9.1.x.x project before proceeding with any customizations. This can be useful for other customizations that may have dependencies on the commerce-custom-search-bundles-9.1.x.x for other use-cases.
- If you
encounter any missing dependencies for
dummy-commerce-search-processors,dummy-hcl-cache-coreordummy-cf-baseJAR files, see Troubleshooting: Missing custom NiFi processor dependencies.
Build the binaries for the project commerce-custom-search-marketplace-seller:
In the Project explorer, Right-click project (Note that there are two menu items, Maven build and Maven build... select Maven build...) The Edit Configuration window opens.
Enter the command clean install -U -Denforcer.skip=true into the Goals textbox and click the Run button.
Once the build is finished, the jar file will be available in the target directory of this project, for example: commerce-custom-search-marketplace-seller-9.1.x.0.jar. For more information, see Custom NiFi processors.
-
Deploy your custom Ingest logic on the Elasticsearch server in the Commerce
Development environment.
In this step, you extend the default connector by deploying the custom logic in the NiFi container on the data platform, and then create a custom Ingest profile to bind it to the default connector pipe.
Deploy the custom jar file commerce-custom-search-marketplace-seller-9.1.10.0.jar in the NiFi container on the Elasticsearch data platform for the Commerce Development environment.- Copy
commerce-custom-search-marketplace-seller-9.1.x.0.jar
from the target directory under
commerce-custom-search-marketplace-seller
project in NiFi toolkit from
commerce-custom-search-marketplace-seller
project’s libs directory, to the nifi
container’s libs directory on the Elasticsearch
data server.
docker cp "/root/commerce-custom-search-marketplace-seller-9.1.10.0.jar" <NIFI_CONTAINER_ID>:/opt/nifi/nifi-current/libNote: (Optional) This customization tutorial is independent of the commerce-custom-search-processors-nar project. However, if your customization depends on the commerce-custom-search-processors-nar project, transfer the NAR file from the commerce-custom-search-processors-nar project’s target directory to the designated extension directory on the Elasticsearch server and mount this file as a volume in the NiFi Docker container.Ignore the NAR files generated in projects other than commerce-custom-search-processors-nar. For more information, see Building and deploying a custom NAR file
or example, you could use the following command to mount the NAR file that has been added to the/extensions folder, instead of mounting the volume folder:
docker run -it -p 30600:30600 --name elasticsearch_nifi_1
  -v /{docker-compose dir}/volumes/nifi-ext/commerce-custom-search-processors-nar-9.1.x.x:/opt/nifi/nifi-current/extensions/commerce-custom-search-processors-nar-9.1.x.x  search-nifi-app:v9-latest
Where elasticsearch_nifi_1 is the NiFi container from Elasticsearch server and search-nifi-app:v9-latest is the NiFi image.
- Restart the Nifi container.
- Copy
commerce-custom-search-marketplace-seller-9.1.x.0.jar
from the target directory under
commerce-custom-search-marketplace-seller
project in NiFi toolkit from
commerce-custom-search-marketplace-seller
project’s libs directory, to the nifi
container’s libs directory on the Elasticsearch
data server.
-
Deploy Ingest Profile custom extensions on production runtime
environment.
- Create a custom
search-nifi-appdocker image.For runtime deployment of Ingest customization extensions, create a custom docker image forsearch-nifi-appto include the customizations created using the NiFi toolkit.- Create a Dockerfile configuration with the following
content:
FROM search-nifi-app docker image
COPY CusDeploy/ /opt/nifi/nifi-current/lib
Where CusDeploy/ contains the commerce-custom-search-marketplace-seller-9.1.x.0.jar that you built in Step 2.
-
 If the following patch is
applied:
If the following patch is
applied:COPY patches/ /opt/nifi/nifi-current/patches FROM comlnx94.prod.hclpnp.com/9.1.x.0/search-nifi-app:v9-20220322-1524 WORKDIR /opt/nifi/scripts RUN ./patch.sh COPY CusDeploy/ /opt/nifi/nifi-current/libWhere patches/ directory contains the patch (jar) to be applied in V9.1.10.0 and CusDeploy/ to contain commerce-custom-search-marketplace-seller-9.1.x.0.jar built in Step 2.
-

FROM comlnx94.prod.hclpnp.com/9.1.x.0/search-nifi-app:v9-20220322-1524
COPY CusDeploy/ /opt/nifi/nifi-current/lib
Where CusDeploy/ to contain commerce-custom-search-marketplace-seller-9.1.x.0.jar built in Step 2.
- Prepare the custom deployment files.
- Create the CusDeploy subdirectory in the same directory as the Dockerfile created in Step 1.
- Copy the commerce-custom-search-marketplace-seller-9.1.x.x.jar into the CusDeploy directory.
- Build the custom NiFi server
(search-nifi-app) Docker image.
- Open a command prompt and navigate to the directory containing your Dockerfile, and its CusDeploy subdirectory.
- Run the docker build command to
build a custom Docker image for the NiFi server
(search-nifi-app)
docker build -t search-nifi-app:<tag>
                                                  .
For example:docker build -t search-nifi-app:nifi-extension .Note:- Ensure that the period is present at the end of your docker build command.
- The tag, like the deployment package build label, is used to identify the custom Docker image. You can modify this at any time to help identify the generated Docker image.
- Create a Dockerfile configuration with the following
content:
- Deploy the runtime Elasticsearch data Server through CI/CD using custom
docker image created in Step
1.This task covers the minimum requirements for a deployment that is based on Docker Compose.
- Set up an HCL Commerce production environment using the Docker Compose deployment method. For information on setting up this environment, see Deploying HCL Commerce Version 9.1 with Docker Compose (for non-production usage).
- (Optional) For your custom NiFi server Docker image (search-nifi-app), ensure that you have the following deployment parameters correctly defined under the environment section of your docker-compose configuration file.
If your customization depends on the commerce-custom-search-processors-nar project, transfer the NAR file from the commerce-custom-search-processors-nar project’s "target" directory to the designated extension directory on Elasticsearch server and mount this file as a volume in the NiFi Docker container. For detailed instructions, refer to topic Building and deploying a custom NAR file.volumes: - ./volumes/hcl-cache-local-redis/cache_cfg-ext.yaml:/SETUP/hcl-cache/cache_cfg-ext.yaml - ./volumes/hcl-cache-local-redis/redis_cfg.yaml:/SETUP/hcl-cache/redis_cfg.yaml - ./volumes/nifi-ext/commerce-custom-search-processors-nar-9.1.x.0.nar:/opt/nifi/nifi-current/extensions/commerce-custom-search-processors-nar-9.1.x.0.narThe following steps are to be performed in the runtime environment the same way that they were performed the Development environment:- Create an Ingest profile and bind it to a default connector (Step Step 5.
- Override the default search query profile to include the additional seller_description attribute in the query response. (Step Step 6).
- Validate that the search profile response contains additional the attribute seller_description (Step Step 7).
- Create a custom
-
Create a custom Ingest profile and bind it to the Create Stage
(DatabaseCASProductStage1a) and Update Stage
(DatabaseCASProductStage1h).
The Create Stage is the first stage for product, category or attribute, for example auth.reindex.cas - Product Stage 1a (Main Document).
The Update Stage consists of the rest of the stages, for example, auth.reindex.cas - Product Stage 1c (Find SEO URLs), auth.reindex.cas - Product Stage 1h (Find Child Items) and the rest.
The Update Stage and Create Stage use different flow designs, so the method for adding custom ingest profile is slightly different. How to add custom Ingest profile to Update Stage is described after this step.
-
Using a REST client, issue the following POST command to create a MyCustomIngestProfile ingest profile.
POST http://<QUERY_HOST>:<QUERY_PORT>/search/resources/api/v2/documents/profiles/MyCustomIngestProfile?profileType=IngestBelow is the request body. Please note it obtains the fully qualified class names of the custom provider and post processor created earlier in the commerce-custom-search-marketplace-seller-9.1.x.x project.{ "profileName": "MyCustomIngestProfile", "provider": [ "com.mycompany.data.ingest.product.providers.ChangeSQL" ], "preprocessor": [], "postprocessor": [ "com.mycompany.data.ingest.product.processors.ChangeDocument" ] }Following is the expected response:{ "Profile created with name": "MyCustomIngestProfile" } - Restart the query-app container.
- Bind the custom Ingest profile to the connector pipe. Use the following
steps. For instructions on how to use an Ingest endpoint to update the
Ingest profile binding as a variable to a connector pipe, see Updating
NiFi process group, processor, controller service using Ingest
connector descriptor.
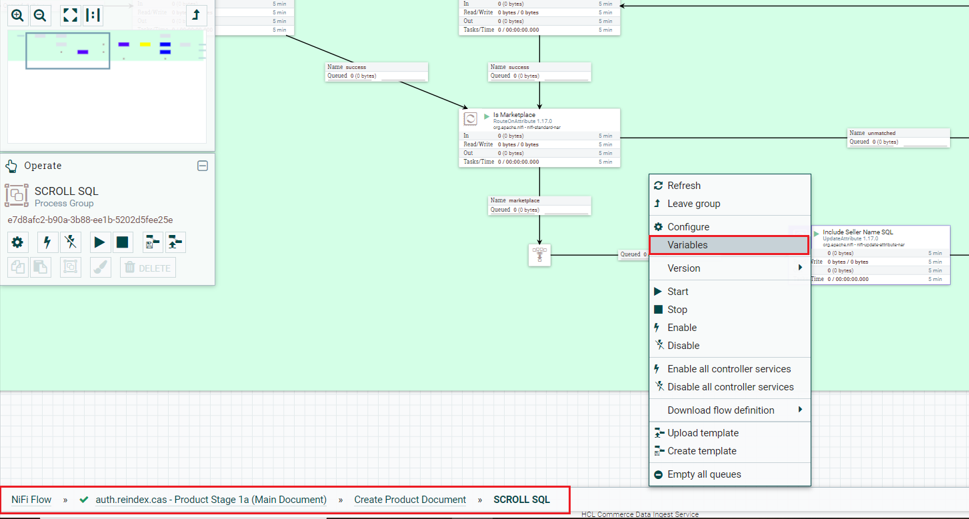
- Open your Nifi user interface and navigate to
- Right click on the empty canvas and click on
Variables.
- Create a new variable with the name
ingest.profile.name and a value
of
MyCustomIngestProfile. Click on Apply button.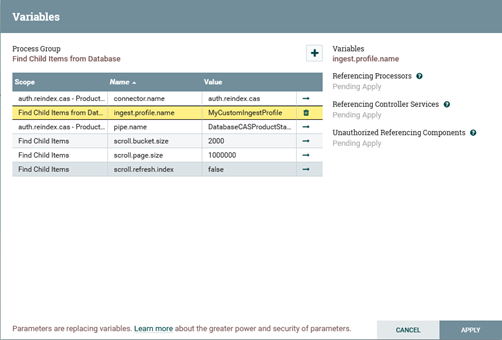
-
-
Add the custom Ingest profile to Update Stage (
DatabaseCASProductStage1h).
-
The
seller_description.rawattribute is also indexed by the build index and can also be validated from the NiFi console.-
Navigate to . Right-click on .
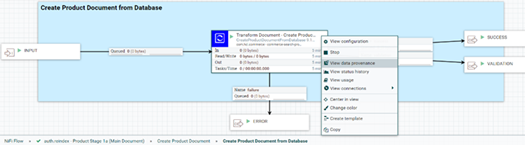
-
Click on View Details icon for CONTENT_MODIFIED under the Type
column.

-
After indexing is done, query the product index (for example, selecting
catentry id 14501) to verify that theseller_description.rawandparent_numberproperties are indexed.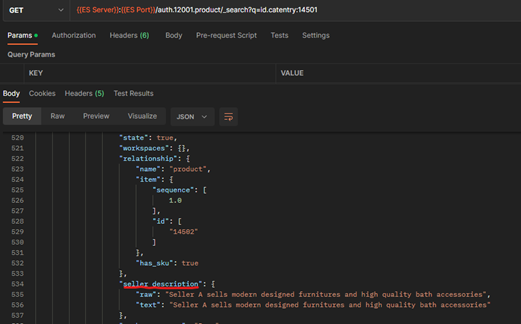

-
Navigate to . Right-click on .
-
Override Query search profiles to modify the response fields.
You can override default search profiles by creating a custom profile using the same name as the default profile. If a custom profile with the same name as a default profile is available, the custom profile is used and the default profile is ignored. For detailed steps on overriding search profiles, see Setting up your custom search profile.
- Override the default search query profile to include the additional
seller_description.rawattribute in the query response. - Extend the fault HCL_findCatalogEntrySKUs search
profile by adding
seller_description.rawinto the responseFields section of the existing search profile.GET http://QUERY_HOST:QUERY_PORT/search/resources/api/v2/documents/profiles/HCL_findCatalogEntrySKUsFor example:GET http://QUERY_HOST:30920/search/resources/api/v2/documents/profiles/HCL_findCatalogEntrySKUsFor findCatalogEntrySKUs search profile by adding
seller_description.rawinto the responseFields section of the existing search profile.The response should be similar to:{ "profileName": "HCL_findCatalogEntrySKUs", "indexName": "product", "query": { "params": [ { "maxRows": "1200" }, { "sortField": "relationship.product.sequence asc" } ], "queryFields": [ "relationship.product.id" ], "provider": [ "com.hcl.commerce.search.internal.expression.provider.SearchInventoryExpressionProvider", "com.hcl.commerce.search.internal.expression.provider.SearchByPublishedEntryOnlyExpressionProvider", "com.hcl.commerce.search.internal.expression.provider.SearchByStorePathExpressionProvider", "com.hcl.commerce.search.internal.expression.provider.SearchBySellerExpressionProvider", "com.hcl.commerce.search.internal.expression.provider.SearchByCatalogExpressionProvider", "com.hcl.commerce.search.internal.expression.provider.SearchByLanguageExpressionProvider", "com.hcl.commerce.search.internal.expression.provider.SearchProductEntitlementExpressionProvider" ], "preprocessor": [], "postprocessor": [ "com.hcl.commerce.search.internal.expression.postprocessor.SearchMainCatalogEntryViewResultQueryPostprocessor", "com.hcl.commerce.search.internal.expression.postprocessor.SearchCatalogEntryViewPriceQueryPostprocessor", "com.hcl.commerce.search.internal.expression.postprocessor.SearchCatalogEntryViewUserDataQueryPostprocessor" ], "responseFields": [ "id.catentry", "id.store", "buyable", "id.catalog", "identifier.sku.raw", "name.raw", "name.override.raw", "description.raw", "description.override.raw", "url.thumbnail", "url.override.thumbnail", "url.image", "url.override.image", "keyword.text", "manufacturer.raw", "id.member", "seller.raw", "seller_description.raw", "type", "prices.*", "path.*", "relationship.product.id", "relationship.item.id", "attribute.source", "url.seo", "url.override.seo", "attachments.*", "images.*", "description.long" ] } }PUT http://QUERY_HOST:30920/search/resources/api/v2/documents/profiles/HCL_findCatalogEntrySKUsThe response should be similar to:{ "Profile created with name": "HCL_findCatalogEntrySKUs" } -
Repeat this step for theHCL_V2_findProductByPartNumber_Details search profile by adding
seller_description.rawinto the responseFields section of the existing search profile.GET http://QUERY_HOST:QUERY_PORT/search/resources/api/v2/documents/profiles/HCL_V2_findProductByPartNumber_Details -
Add
seller_description.rawinto the responseFields section of the existing search profile to use it as a request body for the below PUT call to override the default HCL_V2_findProductByPartNumber_Details search profile.PUT http://QUERY_HOST:30920/search/resources/api/v2/documents/profiles/HCL_V2_findProductByPartNumber_Details{ "profileName": "HCL_V2_findProductByPartNumber_Details", "indexName": "product", "query": { "params": [ { "DynamicKitReturnPrice": "true" }, { "maxRows": "50" } ], "queryFields": [ "identifier.sku.normalized" ], "provider": [ "com.hcl.commerce.search.internal.expression.provider.SearchByCatalogExpressionProvider", "com.hcl.commerce.search.internal.expression.provider.SearchByStorePathExpressionProvider", "com.hcl.commerce.search.internal.expression.provider.SearchBySellerExpressionProvider", "com.hcl.commerce.search.internal.expression.provider.SearchByLanguageExpressionProvider", "com.hcl.commerce.search.internal.expression.provider.SearchInventoryExpressionProvider", "com.hcl.commerce.search.internal.expression.provider.SearchProductEntitlementExpressionProvider" ], "preprocessor": [], "postprocessor": [ "com.hcl.commerce.search.internal.expression.postprocessor.SearchMainCatalogEntryViewResultQueryPostprocessor", "com.hcl.commerce.search.internal.expression.postprocessor.SearchCatalogEntryViewPriceQueryPostprocessor", "com.hcl.commerce.search.internal.expression.postprocessor.SearchCatalogEntryViewSKUQueryPostprocessor", "com.hcl.commerce.search.internal.expression.postprocessor.SearchCatalogEntryViewAttributesQueryPostprocessor", "com.hcl.commerce.search.internal.expression.postprocessor.SearchCatalogEntryViewAttachmentsQueryPostprocessor", "com.hcl.commerce.search.internal.expression.postprocessor.SearchCatalogEntryViewImagesQueryPostProcessor", "com.hcl.commerce.search.internal.expression.postprocessor.SearchCatalogEntryViewComponentsQueryPostprocessor", "com.hcl.commerce.search.internal.expression.postprocessor.SearchCatalogEntryViewMerchandisingAssocQueryPostprocessor", "com.hcl.commerce.search.internal.expression.postprocessor.SearchCatalogEntryViewUserDataQueryPostprocessor" ], "responseFields": [ "id.catentry", "id.store", "id.catalog", "buyable", "identifier.sku.raw", "name.raw", "name.override.raw", "description.raw", "description.override.raw", "url.thumbnail", "url.override.thumbnail", "keyword.text", "manufacturer.raw", "id.member", "seller.raw", "seller_description.raw", "type", "prices.*", "path.*", "relationship.item.*", "relationship.product.id", "relationship.component.*", "subscription.type", "subscription.recurring", "url.image", "url.override.image", "description.long", "attribute.source", "kit.components", "kit.preconfigured", "kit.model", "kit.URL", "kit.default_configuration", "kit.pdks", "kit.parent.model", "kit.configurable", "kit.parent.configurable", "associations.*", "url.seo", "attachments.*", "images.*" ] } }The response should resemble:{ "Profile created with name": "HCL_V2_findProductByPartNumber_Details" } - Restart the Query Service container.
Test the customization to verify that the customization is successful.
- Override the default search query profile to include the additional
-
Test the Ingest profile extensions.
Testing step is same for both developer and runtime environments.
- Build the index for the EmeraldCAS store (storeId = 12001).
- Once the indexing has been finished and the Nifi UI shows 0/0 bytes
queued data perform the following tests to validate that the
response fields contain
seller_description.rawwhen search is performed for both search profiles HCL_findCatalogEntrySKUs and HCL_V2_findProductByPartNumber_Details.Test 1: Validate that the response for the following search query endpoint retrieves
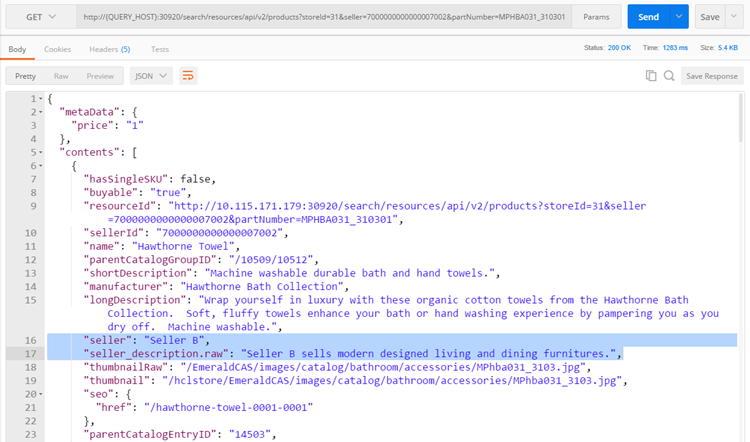
seller_description.rawfor profile HCL_findCatalogEntrySKUs .Execute the following GET command using a REST client.GET http://QUERY_HOST:QUERY_PORT/search/resources/api/v2/products?storeId=31&seller=7000000000000007002&id=14503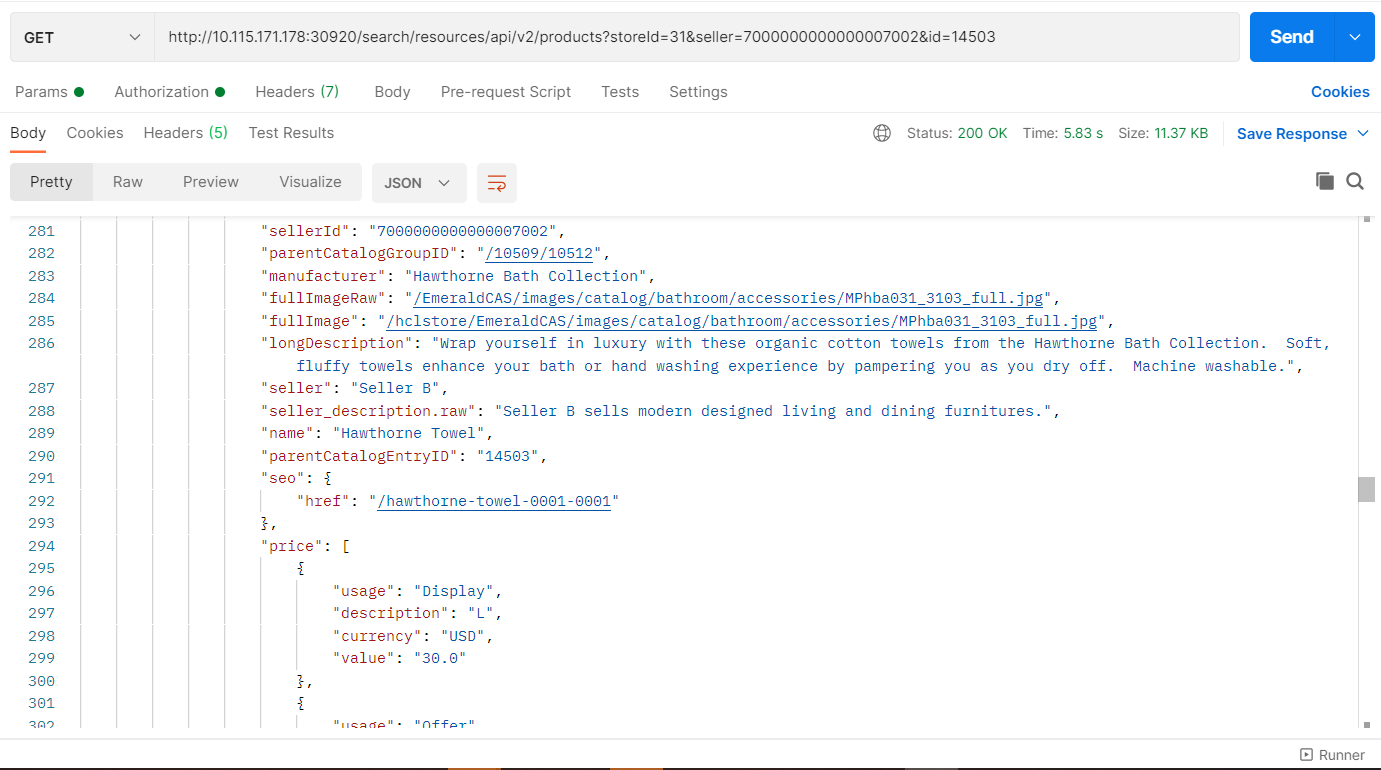
-
Test 2: Validate that the response for the following query endpoint retrieves
seller_description.rawfor profile HCL_V2_findProductByPartNumber_Details.Execute the following GET command using a REST client.GET http://QUERY_HOST:QUERY_PORT/search/resources/api/v2/products?storeId=31&partNumber=MPHBA031_3103&seller=7000000000000007002