(Developer) Installing WebSphere Application Server V8.5.5 with Java 8

Install WebSphere Application Server Version 8.5.5.12 or a later 8.5.5.x fix pack to get IBM SDK, Java Technology Edition, Version 8 working with WebSphere Commerce Developer.

Important: If you need to continue to receive support for WebSphere Application Server, you must upgrade to WebSphere Application Server to version 8.5.5 with Java 8. Earlier versions of WebSphere Application Server are no longer supported. You can only update to use IBM SDK, Java Technology Edition Version 8 if your existing WebSphere Commerce runtime instance is on WebSphere Commerce version 7 Feature Pack 6, 7, or 8, and has Fix Pack 9 installed. For information about updating to Feature Pack 8, see Installing WebSphere Commerce feature packs.

Before you begin

Ensure that your environment meets the minimum requirements before you upgrade to WebSphere Application Server Version 8.5. For more information, see the Before you begin section of Updating a WebSphere Commerce Developer environment to use Java 8.

About this task

Important: Ensure that you install WebSphere Application Server V8.5.5 and fix pack 12 or later, at the same time. By installing at the same time, the default Java version is Java 8. If you install WebSphere Application Server V8.5.5.0 first, and then later upgrade to WebSphere Application Server V8.5.5.12, the default java version is Java 7 and you will need to download and install Java 8 manually.

Procedure

  1. Log in to Passport Advantage and search for part number CRY52ML.

    This part number includes WebSphere Application Server V8.5.5 and the IBM SDK, Java Technology Edition, Version 8. Download the parts for IBM WebSphere Application Server V8.5.5.

  2. Download WebSphere Application Server V8.5.5 Fix Pack 12 or a later V8.5.5 fix pack.
The following steps guide you through a standard WebSphere Application Server installation. To follow official WebSphere Application Server installation documentation, see WebSphere Application Server 8.5.5 Task overview: Installing.
  1. Extract the packages that you downloaded.
  2. Open IBM Installation Manager.
  3. Click File > Preferences, and then select Repositories.
  4. Click Add Repository.
  5. Click Browse and add the repository files from the packages that you extracted. If there are multiple parts to a package, only add the repository file from the "*_part1" file.
    For example,
    • C:\WASND_v8.5.5_1of3\repository.config
    • C:\855-WS-WAS-FP0012-part1\repository.config
  6. Select the Search service repositories during installation and updates option. This option finds newer maintenance packages that you can choose to install at the same time.
  7. Click OK to close the Preferences window.
  8. Click Install.
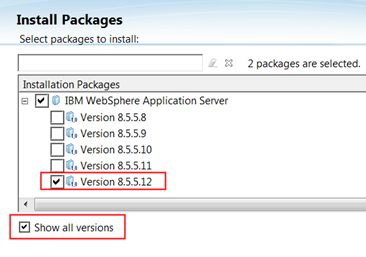
  9. Select IBM WebSphere Application Server Version 8.5.5.12 (or a later fix pack) then click Next.
    Note: If needed, click Show all versions to list the different fix packs.

  10. Accept the license agreement and click Next.
  11. Accept the license agreements on the Licenses panel and click Next.
    The Location panel displays.
  12. Specify an installation directory for WebSphere Application Server. Do not use the default installation directory.
    Note:
    • Do not use a directory that contains periods ("."), spaces, or dollar signs ("$") in the directory names.
    • If you previously installed packages through Installation Manager, the existing Shared resource directory is used and Installation Manager does not let you change the path.
    1. In the Package group name window, select IBM WebSphere Application Server V8.5.
    2. Specify an installation directory, such as C:/IBM/WebSphere8/AppServer.
      This directory is referred to as the WAS8_installdir.
    3. Select the 32-bit or 64-bit architecture based on your operating system and then click Next.
      The Translations panel displays.
  13. Select other languages if needed and then click Next.
    The Features panel displays.
  14. Click Next to accept the default features.
  15. Click Next to skip custom feature configurations.
  16. Review the summary and then click Next.
  17. Click Install to begin the installation.
  18. After installation completes, you are prompted with Which program do you want to start?. Select None and then click Finish.