Creating the access bean
An access bean acts as a wrapper for the enterprise bean that simplifies how other components interact with the enterprise bean. You must create an access bean for your new enterprise bean. The tools in Rational Application Developer are used to generate this access bean, based upon the entity that you have already created (in particular, only methods that have been promoted to the remote interface will be used by the access bean).
Before you begin
About this task
To create the access bean:
Procedure
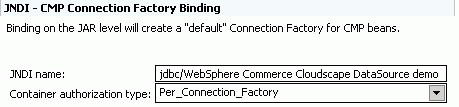
- In the EJB Deployment Descriptor Editor, in
the Overview tab, scroll down to the JNDI
- CMP Connection Factory Binding section and in the JNDI
name field enter the value that matches your database
type. For example, if your instance name is demo,
enter the following values:

jdbc/WebSphere Commerce Cloudscape DataSource demo- jdbc/WebSphere Commerce DB2 DataSource demo
- jdbc/WebSphere Commerce iSeries DataSource demo
- jdbc/WebSphere Commerce Oracle DataSource demoThe following screen capture is an example using a Cloudscape database: