Mapping the database table to the new enterprise bean
After you create the new enterprise bean, you must create a mapping between the CMP fields in the bean and the columns in the database table. When both the enterprise bean and its corresponding database table exist, a "Meet-in-the-middle" type of mapping is used. Rational Application Developer provides tools to simplify this task.
Before you begin
Procedure
- In the Database name field, enter
the name of your development database. There is no default database
name.
 The default database name is mall.
Note: The name you enter in the Database name field is not really used. When you create a database definition, you create XMI files that are later used to generate deployed code. These XMI files are independent of your database name.
The default database name is mall.
Note: The name you enter in the Database name field is not really used. When you create a database definition, you create XMI files that are later used to generate deployed code. These XMI files are independent of your database name. - From the Database vendor type list,
select one of the following types

- DB2 Universal Database V8.2
- DB2 Universal Database Express V8.2
- DB2 Universal Database for iSeries V4R5
- Oracle 9i or Oracle 10g, depending on your target database.
- Add the columns to your table definition:
- In the Column name field, type an appropriate name for the new CMP field. Note that if you want to use the Match by name function later when mapping this field to its corresponding column in the database table, name your field exactly (case insensitive) to the name of the column.
- In the Column type field, type the appropriate data type for the field. Note that you should use the wrapper classes for primitive data types (for example, use the java.lang.Long data type, not the long data type).
- If the field is in the primary key, select the Key column check box.
- Click Add again and repeat steps to add new fields for each column in the database table that requires a CMP field.
- If you want this entity bean to use optimistic locking,
your database table must include a column called
optCounterof type SMALLINT and its corresponding entity bean must have a field calledoptCounterof typeshort.Ensure you mark the optCounter field as the OptimisticPredicate in the Properties view. For example: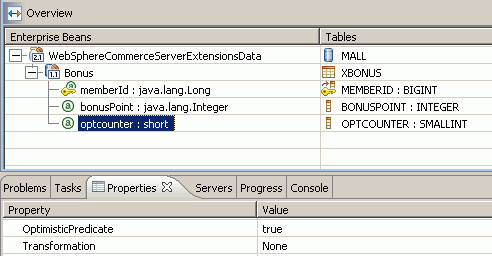
- Click Close to close this window.