Reimaging Linux Systems
You can reimage Linux systems by deploying images that you previously imported from installation media.
When you reimage a Linux target system, you are installing an image file (.LIM) previously created from an ISO image and stored in the Image Library. The images that you can deploy are of type Setup and are identified by the Origin field of the Image Library dashboard.
Depending on the reimaging mode, (Upgrade or Install), you are required to specify parameters that are needed for the target deployment. The parameters that you specify must be saved to a template before starting the reimage task. For more information, see Managing templates.
You can reimage Linux systems in two different modes:
- Upgrade
If you select this mode, the operating system RPM Package Manager files (.rpm) on the target are updated at the required level. Optionally, you can choose to upgrade the Endpoint Manager Client that is installed on the target.
- Install
- If you select this mode, the selected image is installed on the target system. The data on the current system is overwritten by the new installation. The disks on the target are re-partitioned by default. The following existing settings on the target are preserved and copied to the reimaged system:
- Machine identity (language, keyboard, timezone, network settings)
- BigFix client identity
Note: In some cases, the BigFix client identity is not preserved. For more information, see Duplicate client computer entry in the Server database after a Linux reimage.
- Reimaging to targets that are managed by a proxy server is not supported.
- Reimaging to targets that are connected to an authenticating relay is not supported.
- Reimaging of captured images is not supported.
- Reimaging of Ubuntu systems is not supported.
- It is good practice to backup your system before upgrading.
From the Image Library Dashboard, select the Linux source image you want to deploy and click Deploy to Computer.
Linux configuration options
For the reimaging process, a configuration file is used at deployment time for both reimaging modes. The default configuration file is displayed in the corresponding field of the Deploy Image to Computer dialog. This file includes a base system configuration for the installation of the most common packages, and, for the install mode only, a standard partition layout.
The configuration file is updated on the target system during the reimaging task to copy the machine identity on the destination image. The language, keyboard, timezone, and network settings are added at run time for this purpose. To override this behavior, edit the configuration file by providing your values for these settings. The values you provide are used on the target instead of the default ones.
For more information about customizing the configuration files for the supported Linux operating systems, refer to the specific Linux vendor documentation. For example, you can view information about the RedHat Enterprise Linux Kickstart configuration file options for Version 6, at this link: https://access.redhat.com/documentation/en-US/Red_Hat_Enterprise_Linux/6/html/Installation_Guide/ch-kickstart2.html, and information about the SUSE Linux Enterprise Server Control file for Version 11 SP3, at this link: http://doc.opensuse.org/projects/autoyast/index.html.
Valid reimaging combinations
| Architecture (From/To) | Distribution | OS Combinations (From/To) |
|---|---|---|
|
|
|
| Architecture (From/To) | Distribution | OS/SP Combinations (From/To) |
|---|---|---|
|
|
Version 6.x to 6.x+n |
| Version 7.x to 7.x+n | ||
| Version 8.x to 8.x+n | ||
| Version 9.x to 9.x+n | ||
|
|
Version 7.x to 7.x+n |
| Version 8.x to 8.x+n | ||
|
|
Version 11.x to 11.x+1 |
| Version 11.3 or later to 12.x | ||
| Version 12.x to 12.x+n1 | ||
| Version 12.x to 15.x1 | ||
| Version 15.x to 15.x+n1 |
- Select Force upgrade to run the action, if the selected OS combination is not recommended by the manufacturer.
- Upgrading from RHEL 6.x to RHEL 7.x is not supported.
- Upgrading from RHEL 7.x to RHEL 8.x is not supported.
- Upgrading from RHEL 8.x to RHEL 9.x is not supported.
- Upgrading from CentOS 7.x to CentOS 8.x is not supported.
- For 64-bit architectures, both BIOS and UEFI targets are supported.
To upgrade to SLE15, you must edit the configuration file of the reimage template correctly by selecting all the required modules and repositories. On a running SLE15 target, a list of modules can be found in /etc/zypp/repos.d. But this does not include packages installed after OS installation.
As a guideline, the configuration file reports a commented list of all available modules. BaseSystem Module is uncommented, as it is required. You must uncomment the other modules, as required for your system.
Reimaging in Upgrade mode
In the Deploy Image to Computer dialog, select Upgrade.
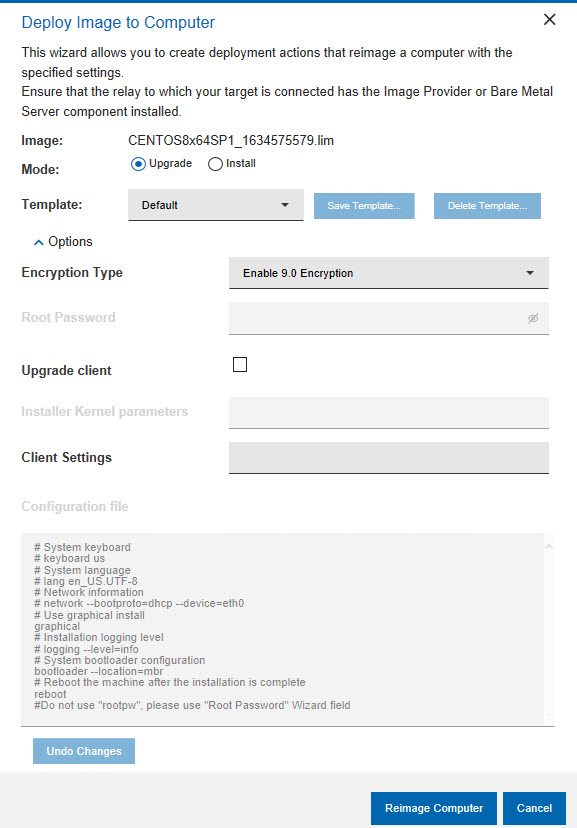
This mode is intended for upgrading to later service packs for the same major release. However, if you check Force upgrade the upgrade to a major release is forced, which could lead to an unsuccessful deployment. If you plan to change major release, you should use the install mode.
There are no required parameters for the Upgrade mode. Optionally, you can select to upgrade the BigFix client, by checking the corresponding option. You are then prompted to select the client package version. All selections that you make must be saved to a template. You can save to the Default template, choose to save your selections to a new template, or populate the dialog with settings from a previously saved template. The default configuration parameters that are stored in the installer response file and used for the upgrade are displayed. You can modify these parameters to suit your reimaging needs. Optionally, you can specify additional kernel parameters that the Linux installer uses during installation, and any client settings for the targets.
Reimaging in Install mode
In the Deploy Image to Computer dialog, select Install .
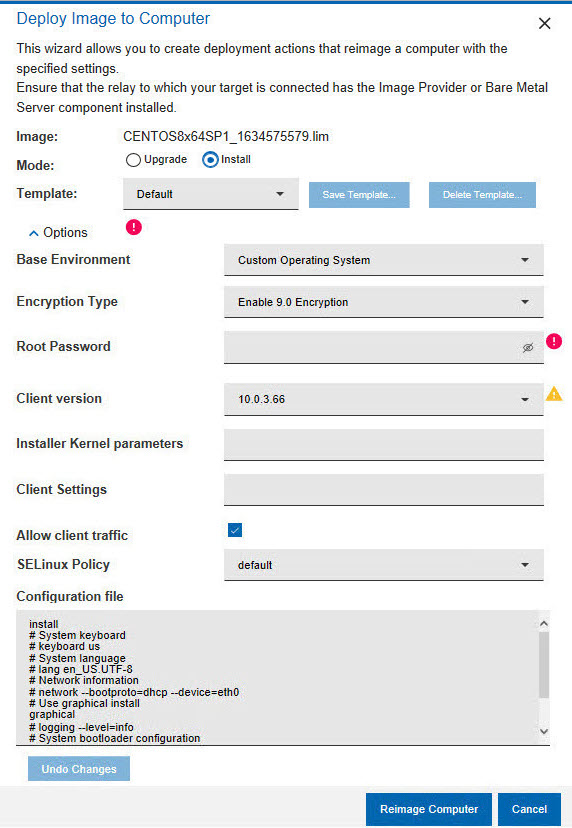
Select a previously saved template, create a new template to save the current settings, or save your selections to the Default template. When you reimage in Install mode, the BigFix client is installed. The default version is the same version as the BigFix server. You can select a different version by expanding Client Version. You must specify the root password of the target, or select a previously saved template that contains the correct root password.
- SELinux Policy
-
This field is available only for RHEL and CentOS. The SELinux Policy option allows to select the selinux policy to apply. The values are:
- default: Lets the operating system apply its default policy by not specifying any policy.
- disabled: Configures selinux policy as disabled.
- permissive: Configures selinux policy as permissive.
-
enforcing: Configures selinux policy as enforcing. If you select this selinux policy, the configured type will be automatically set as "Targeted".Note: With the SELinux support, if policy is not specified, it will be the default of the OS level being deployed. If you want to continue to have the SELinux policy disabled, edit the reimage template and set the value as disabled.
The default deployment configuration parameters stored in the installer response file and used for the installation are displayed. You can modify these parameters to suit your reimaging needs. Optionally, you can specify additional kernel parameters that the Linux installer uses during installation, and any client settings for the targets.
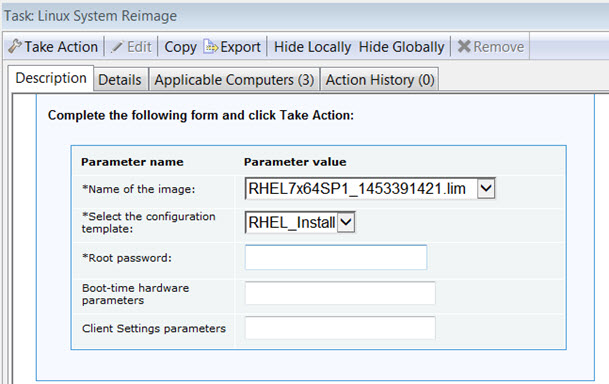
Using the Linux System Reimage task
You can reimage Linux targets using the Linux System Reimage task. Select the image and the associated configuration template containing the settings to be used for the reimaging process that you have previously created and saved in the Image Library. Specify the root password for the target system if you are reimaging in Install mode. The password that you specify can be either in clear text or encrypted. In either case, the password is always encrypted during the deployment process.
You can optionally specify boot-time kernel parameters for the installer, and client settings.
For reimaging to run successfully on the selected targets, the Image Provider component must be running on the relays to which these targets are connected.
During
task execution, the Linux installer boot files are saved in /boot/OSD_XX (if
the target is BIOS) or /boot/efi/OSD_XX (if
the target is UEFI), where XX is a randomly generated number.
During
the final steps of the task, the original boot loader sequence is
modified to start the Linux installer after the target reboots. The
original boot loader configuration file is saved in /tmp/BOOTLOADER.rbobkp,
where BOOTLOADER is either grub.conf or elilo.conf,
depending on the boot loader on the target.
Password encryption
The root password that you supply for reimaging can be either in clear text or encrypted using any of the encryption methods supported by the corresponding Linux installers.
$id$mysalt$mypassword| ID | Method |
|---|---|
| 1 | MD5 |
| 2a | Blowfish algorithm |
| 5 | SHA-256 |
| 6 | SHA-512 |
Example 1:
# openssl passwd -1 -salt my_key
Password: mypassword

$1$my_key$jVY4Txf5wMoEsJX3ieQaR0
Example 2:
# python -c 'import crypt; print crypt.crypt("mypassword", "$6$my_key")'

$6$my_key$2Wz7.0skHT/FQI3yy9TbjPtLjjRq9cmU.TjnPGHWu4WUjemTR/
.TdaK68y2E63cxdxVaD58i64dyQIpnabUjz/
Changing Firewall settings
- RedHat Firewall is Blocking BES Traffic - BES Client (678)
- SuSE Firewall is Blocking BES Traffic - BES Client (682)