Importing images
The Image Library Dashboard allows you to manage images by importing, pre-caching, deleting, and modifying the metadata of your existing images.
- Windows images that have been previously captured with either the Capture dashboard or manually. (.wim), or images uploaded directly from installation media. You cannot import images from installation media (ISO) for Windows 2003 platforms.
- Linux images that you have captured using task 201, or created from installation media (setup).
- VMware ESXi images created from installation media.
For Windows images only, you can copy configuration settings from an existing image to a newly imported image, providing they are compatible. For example, if you have uploaded a new image for an Operating System update, you can associate to it any Bare Metal Profiles, driver bindings, and templates that were defined in an existing image of an earlier service pack of the same Operating System. See Copying configuration settings from a Windows reference image.
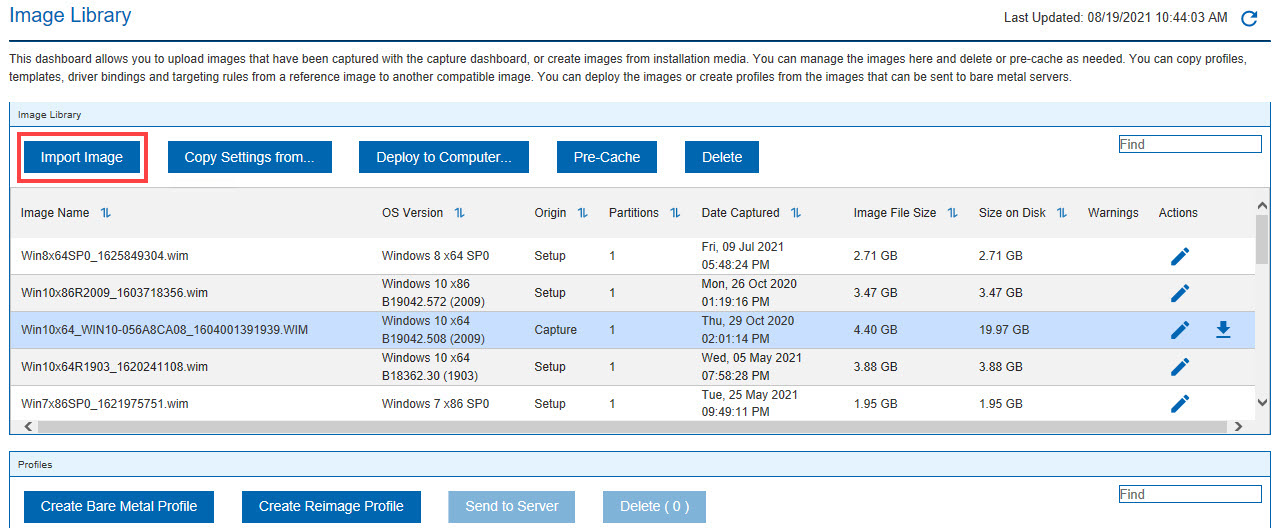
From the Image Library, you can deploy the images to selected targets, or create profiles to send to Bare Metal OS Deployment Servers for deployments on Windows and Linux targets.
The Origin column displays whether the image was captured (Capture) or imported from installation media (Setup).
To import a new image, click Import Image. Use the icons on the right to either download or edit an existing image in the library.
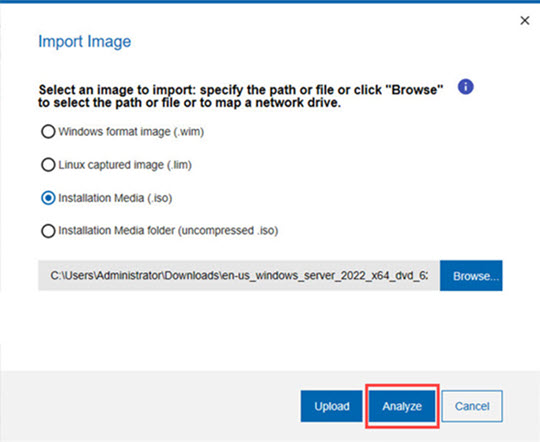
In the import image menu, select the type of image you want to import. You can import images captured from a Windows (.wim) or Linux (.lim) reference machine, or images from installation media (ISO).
Importing images from installation media
ISO images can be imported in archive format (.iso) or from a folder or drive which contains the uncompressed ISO image files. If you are importing Windows images in ISO archive format (.iso), you must have previously downloaded and installed the 7-zip compression/decompression tool on the system where the Console is installed.
If the image you are importing is provided in more than one installation media file, for example
in SLES-DVD1.iso and SLES-DVD2.iso, you must uncompress the files
into a single folder, and specify that folder in the Import image pop-up.
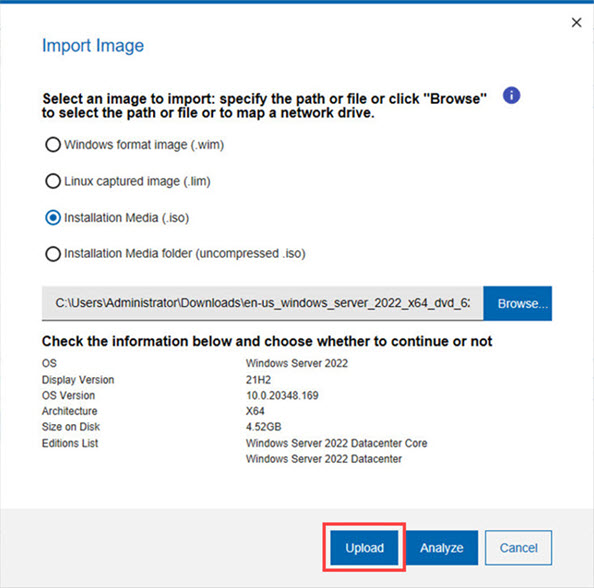
Check the information and click Upload to begin importing the image, or Cancel to quit.
A message will be displayed at the top of the Import Image window stating that "The image is now uploading in the background". Once the image is successfully uploaded the procedure is completed.
- If you are importing a Windows 10 image from installation media in .esd format generated with the Microsoft Media Creation Tool, the image must contain a single architecture (x86 or x64), not both, else the import operation fails.
- Simple bootable Linux iso images that have the behavior of a network installation when deployed
cannot be imported as setup images in the Image Library. For example, the Red Hat
boot.iso
images, such as RHEL-6.8-20160414.0-Server-x86_64-boot ISO, and SUSEmini-iso
images, such as SLE-12-Server-MINI-ISO-x86_64-GM-DVD.iso cannot be used to create Setup images in the Image Library Dashboard.
Requirements for importing Windows 10 and Windows 11 images
.esd file format, if you have the correct level of deployment
tools for the operating system on which the BigFix Console runs. The following
BigFix Console requirements apply:- Console running on a Windows 8.1 or Windows 2012 R2 system or later, with any WADK 10.
- Console running on a Windows system with WADK 10.
- Console running on a Windows 10/11 or Windows 2016/2019 system.
.esd) images, the following BigFix
console requirements apply:- Console running on a system with Windows 7 or later.
- Console running on any Windows system where WADK 10 is installed. If the installed WADK 10 version is 1709 or later, the Console must be on a system with Windows 8.1 or later.
- Console running on a Windows 10/11 or Windows 2016/2019 system.
Importing captured Windows images
You can import images that you have previously captured using the Capture dashboard or that you have captured manually. During the import of a captured .wim image file, the corresponding driver descriptor file (.driverinfo) and image descriptor file (.imageinfo ) that were created during the capture phase, must exist in the same path. If the driver descriptor file is missing, the import process automatically creates it. If the driver descriptor file and/or the image descriptor file is missing, the import process automatically creates it.
Importing captured Linux images
To import a Linux image that you have previously captured using task 201, click Import image, select Linux captured image (.lim) and specify the fully qualified path to the captured image. Click Analyze . When the analysis completes, the import process begins. Click OK.
Copying configuration settings from a Windows reference image
For Windows images, you can copy configuration settings such as Bare Metal Profiles, templates, and driver binding grids, from an existing image to another compatible image. The configuration settings are copied only if the following compatibility conditions are met:
- Both images must:
- be of the same Operating System
- have the same architecture (32-bit or 64-bit)
- have the same origin (both must be either captured images or created from installation media).
- The image that inherits the settings must not already have configuration settings associated to it.
If one or more of the conditions above are not satisfied, an error message is issued.
From the Image Library dashboard, select the target image on which you want to copy the configuration settings and click Copy Settings from....
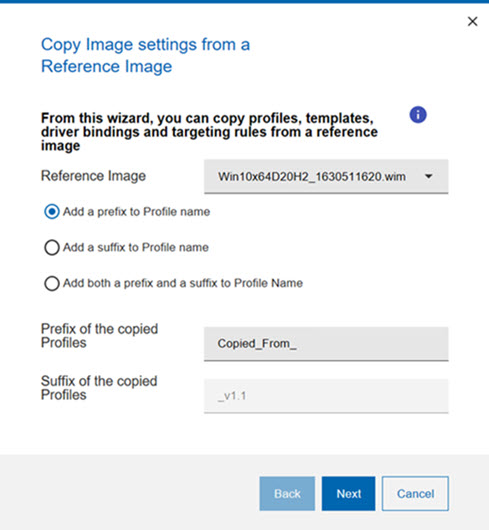
If the reference image has templates and driver bindings associated to it, these are also copied to the new image. You can change profile names in the new image. A summary panel displays all objects that are copied.