Using the Client Deploy Tool
In smaller networks (less than about 5,000 computers) connected to Active Directory or NT Directory domains, you can use the Client Deploy Tool to install Windows clients. For larger networks, you might find it easier to use other deployment methods. The Client Deploy Tool helps you roll out clients in an easy way, but there are some requirements and conditions:
- You must have an Active Directory or NT Directory domain (there is also an option to deploy to a list of computers if you have an administrator account on the computer).
- The IBM BigFix Client Deploy Tool can only target computers running Windows 2000, XP, Server 2003, Vista, Server 2008, 7, or Server 2008 R2.
- The computer running the Client Deploy Tool must be connected to the domain, but must not be the domain controller itself.
- The Service Control Manager (SCM) and the Remote Procedural Call (RPC) services must be running on the target machines.
- There must be no security policy on the computer that would prevent either a remote connection to the SCM or the issuance of a Remote Procedural Call.
- The dnsName property of every target computer in the Active Directory must be correctly defined.
The Client Deploy Tool makes it easier to push the Client to computers, but is not a full-featured enterprise-class software distribution tool. If you already have a software distribution tool, it is recommended that you use the existing software distribution tool instead.
The IBM BigFix Client Deploy Tool starts by getting a list of computers from the Active Directory server and remotely connecting to the computers 'accessing 100 computers at a time' to see if the Client service is already installed on each computer. If it is, it reports Installed along with the status of the Client service such as Running, Stopped, and so on. If it cannot determine the status due to a permissions problem or for any other reason, it reports Status Unknown. Otherwise it reports Not Installed , unless it cannot communicate with the computer at all, in which case it reports Not Responding.
If the Client is not yet installed, the tool provides interfaces that allow you to issue a Remote Procedural Call that accesses the shared installer and, with the proper domain administration credentials, runs it silently, with no user interaction. Use the tool by performing the following steps:
- The IBM BigFix Client Deploy Tool is created by the Installation Generator. You can launch the tool from the Installation Guide. Click the Install IBM BigFix Components > Install IBM BigFix Clients > Install Remotely button or launch it directly from Start > Programs >IBM BigFix > IBM BigFix Client Deploy.
- The resulting dialog offers three ways to deploy the Clients:
- Find computers using Active Directory
- The IBM BigFix Client Deploy tool contacts the Active Directory server to get a list of all the computers in the domain. It checks each of the computers to see if the client is already installed and displays this information in a list.
- Find computers using NT 4.0 Domains
- All the computers in the domain are listed with a status flag indicating whether or not the client is installed.
- Find computers specified in a list
- Based on how your network resolves computer addresses, you must provide a list of computer names, IP address ranges, or hostnames. The list must have one name / IP address range / hostname per line. Using this option, the Client Deploy Tool does not attempt to discover any computers, but instead attempts to install directly to all the listed computers.
- Type in a user name and password that has administrative access to the computers. In most cases, this is a domain administrator account. If you are using the computer list option, you can specify a local account on the remote computers 'such as the local administrator account' that have administrative privileges. The rest of the client deployment process uses this username/password, so if the account does not have the appropriate access on the remote computers, you receive access denied errors.
- When the list of computers is displayed, shift- and control-click to select the computers you want to administer with BigFix. Click Next.
- You see a list of the computers you selected. The default options
are usually sufficient, but you might want to select Advanced
Options to configure the following installation parameters:
- File Transfer
- You can choose to push the files out to
the remote server for installation or to have the files pulled from
the local computer. Unless there are security policies in place to
prevent it, for most cases choose to push the files.Note: The pull option is valid only if the target computer belongs to an Active Directory domain and if you use the domain administrator's credentials.
- Connection Method
- You can connect to the remote computers either using the Service Control Manager (SCM), which is recommended, or the task scheduler if the SCM does not work.
- Installation Path
- Specify a path for the client, or accept the default (recommended).
- Verification
- Check this box to verify that the client service is running after waiting for the installation to finish, to know if the installation completed successfully.
- Custom Setting
- Add a Custom Setting to each client deployed, in the form of a Name / Value pair.
- If the clients to install need to communicate thru
a proxy, configure the proxy connection clicking Proxy Settings.
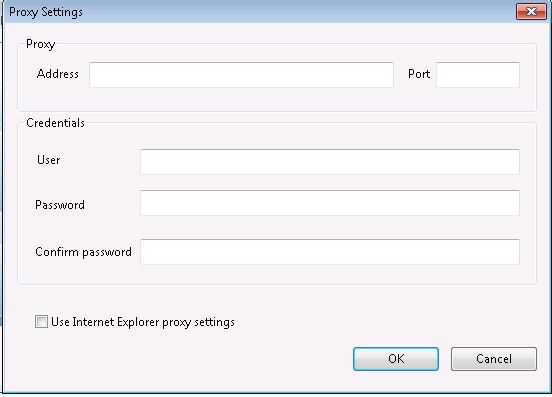
In the Proxy Settings panel specify:- The hostname or IP Address and, optionally, the port number to communicate with the proxy machine.
- The credentials of the user defined on the proxy machine that is to be used when establishing the connection.
For more information about configuring a proxy connection, see Setting up a proxy connection.
Click OK to save the proxy configuration. - To begin the installation, click Start.
When completed, a log of successes and failures is displayed. Simply retrying can resolve some failures; use advanced options if that does not work. For more information about Client deployment, see the article http://www-01.ibm.com/support/docview.wss?uid=swg21505877.