Installing the Web Reports
By default, the Web Reports component is installed together with
the BigFix server.
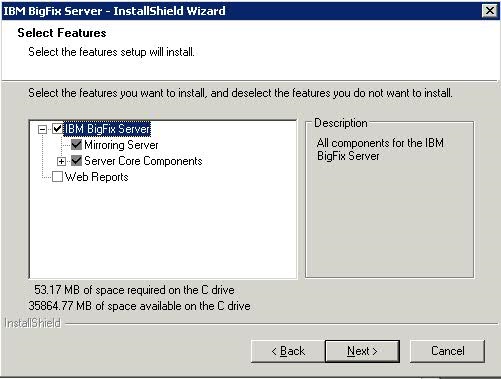
However, you can choose to not install this component by removing
the check in the following installation panel:
You can install it later either on the same system as the BigFix server
or stand-alone on a different system by running the following steps:
- Run the Installation Guide (Start > Programs > IBM Endpoint Manager > IBM Endpoint Manager Installation Guide).
- Select Install Server.
- Choose to use the masthead generated at the BigFix server installation time.
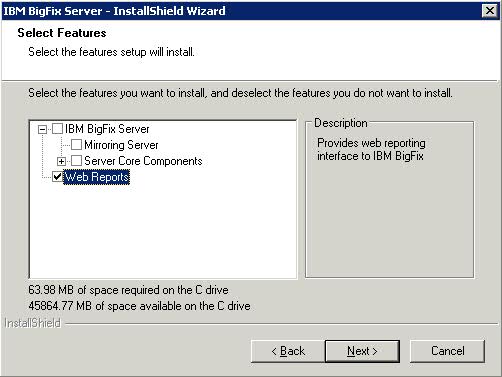
- Select to install only the Web Reports component in this panel:
- Complete by choosing the database options that applies to your
configuration. If you select Use Remote Database,
complete the following configuration steps:
- On the Database Server window select the desired authentication method. If you choose Windows authentication, you need to later change the Web Reports service logon to use a Windows authenticated user logon.
- On the Select Features window unselect the BES Server and BES Server Core Components options from the options. The only option that must be selected is Web Reports.
- Choose the appropriate Destination Location.
- Choose where the Web Reports server will have its root directory and press Next.
- Review the installation parameters and click Next to trigger the installation.
- Specify the database login for the server components and authentication
method and press Next. Make this additional
registry change on the stand-alone machine:
HKEY_LOCAL_MACHINE\SOFTWARE\BigFix\Enterprise
Server\Installer: Hostname={change this value to the Fully Qualified
Domain Name (FQDN) of stand-alone server}