Step 2 - Requesting a license certificate and creating the masthead
Before you perform the steps below, you must have purchased a license
and obtained a BigFix license
authorization file (*.BESLicenseAuthorization) using
your License Key Center account or, in the case of a Proof-of-Concept
evaluation, that was provided to you by your IBM Technical Sales Representative.
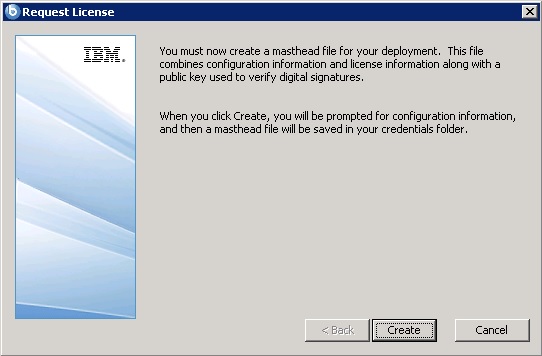
When you have your license authorization file, you are ready to request a license certificate and then create a personalized site masthead that, in turn, allows you to install and use BigFix. The masthead includes URLs for the Server CGI programs and other site information in a signed MIME file. The masthead is central to accessing and authenticating your action site. To create the masthead and activate your site, follow these steps:
- Run the BigFix installer
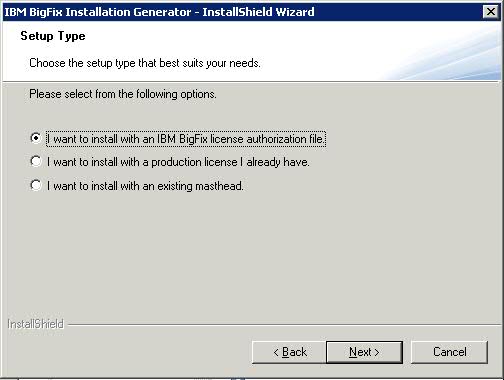
BigFix-BES-9.2.6.xxxx.exe, where9.2.6.xxxxis the version of the installer). When prompted, choose Production installation and accept the Software License Agreement. On the welcome screen, click Next.Note: If you choose the Evaluation installation, consider that this type of installation does not support the enhanced security option. For more information about this feature, see Security Configuration Scenarios. - After reading and accepting the License Agreement, select I
want to install with an IBM Endpoint Manager license authorization
file, to create your Private Key and Masthead.
- Enter the location of your license authorization file, which has
a name like
CompanyName.BESLicenseAuthorization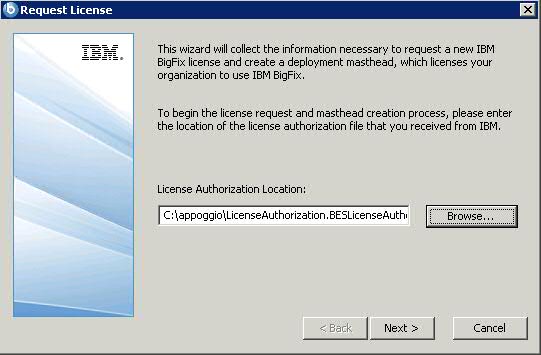
- Specify a DNS name or IP address for
your BigFix server
and click Next. The name that you enter in
this field is recorded in the license and used by clients to identify
the BigFix server.Note: Enter a DNS name, such as
bes.companyname.com, because of its flexibility when changing server computers and doing advanced network configurations. This name is recorded into your license certificate and is used by clients to identify the BigFix server. After your license certificate is created, the DNS name cannot be changed. To change the DNS name, you must request a new license certificate, which requires a completely new installation. - Type a site credential password to
allow you to create a site admin key for your deployment. Type your
password twice (for verification), and specify a key size (from 2K
to 4K bits) for encrypting the private key file. Click Create.
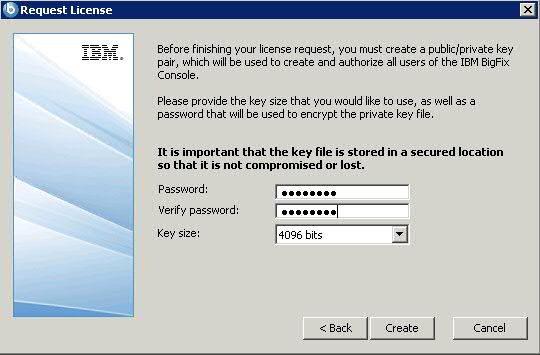
In this way you generate a private/public key pair used to create and authorize all the BigFix users. - Save your private key (
license.pvk) file from the Browse for Folder dialog in a folder with secure permissions or on a removable drive, such as a PGPDisk or a USB drive. Click OK.Important: If you lose the private key file, a new license certificate needs to be created, which requires a completely new installation. In addition, anyone with the private key file and password have full control over all computers with the BigFix clients installed so ensure that you keep the private key file and password secured. - You are requested to send the request file to IBM
for license verification. If you have internet connectivity, choose
the option to submit your request over the internet. In this case,
a request file is sent to IBM for license verification. This request
consists of your original authorization file, your server DNS name
and your public key, all packaged into a single file.
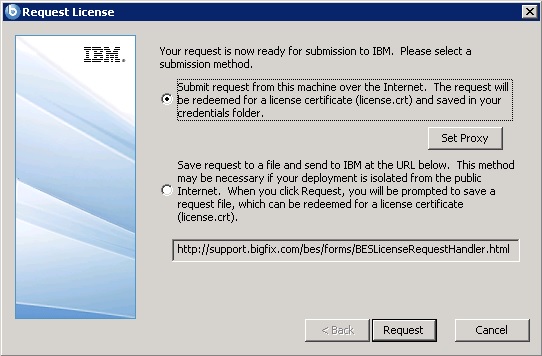
- If you select to submit the request over the Internet and your
enterprise uses a proxy to access the Internet, click Set Proxy.
The Proxy Settings panel opens. In this panel you can configure
the proxy connection.
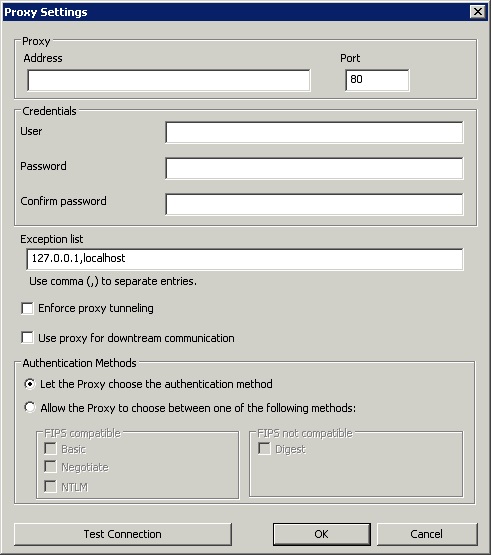
- Specify:
- The hostname or IP Address and, optionally, the port number to communicate with the proxy machine.
- The credentials of the user defined on the proxy machine that must be used when establishing the connection.
- The comma-separated list of hostnames, subdomains, IP addresses
that identify systems in the BigFix topology
that must not be reached thru the proxy. By default, BigFix V9.2
prevents diverting internal communications towards the proxy. If you
set a value in this field, you overwrite the default behavior. To
ensure that internal communications are not directed to the proxy,
add
localhost, 127.0.0.1, yourdomain.com, IP_Addressto the list of exceptions specified in this field. - Whether or not the proxy is enforced to attempt tunneling. By default the proxy does not attempt tunneling.
- The authentication method to use when establishing the communication.
You can either let the proxy choose the authentication method or you
can impose to use specific authentication methods.Note: If you want to enable FIPS mode, select an authentication method other than digest.
Click OK save the settings and return to the Request License panel.
- Click Request. The Wizard retrieves your
license certificate (
license.crt) from the BigFix License server.Alternatively, if you are on an airgap without internet connectivity, choose the option to save the request as a file named
request.BESLicenseRequest. Copy the file to a machine with internet connectivity and submit your request to the URL of the BigFix website shown in the installer. The page provides you with alicense.crtfile. Copy the file back to the installation computer and import it into the installer. - From the Request License dialog,
click Create to create the masthead file
- Enter the parameters of the masthead file that contains configuration
and license information together with a public key that is used to
verify digital signatures. This file is saved in your credential folder.
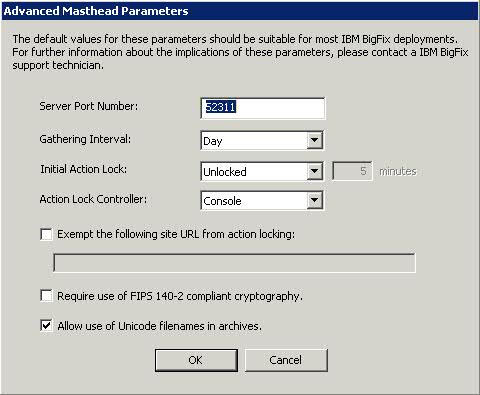 You can set the following options:
- Server Port Number:
- In general, you do not need to change this number. 52311 is the
recommended port number, but you can choose a different port if that
is more convenient for your particular network. Typically, you choose
a port from the IANA range of private ports (49152 through 65535).
You can use a reserved port number (ports 1-1024), but this might
reduce the ability to monitor or restrict traffic correctly and it
prevents you from using port numbers for specific applications. If
you do decide to change this number after deploying the
clients, BigFix will
not work correctly. For additional information, see Modifying port numbers. Note: Do not use port number 52314 for the network communication between the BigFix components because it is reserved for proxy agents.
- Gathering Interval:
- This option determines how long the clients wait without hearing from the server before they check whether new content is available. In general, whenever the server gathers new content, it attempts to notify the clients that the new content is available through a UDP connection, circumventing this delay. However, in situations where UDP is blocked by firewalls or where network address translation (NAT) remaps the IP address of the client from the servers perspective, a smaller interval becomes necessary to get a timely response from the clients. Higher gathering rates only slightly affect the performance of the server, because only the differences are gathered; a client does not gather information that it already has.
- Initial Action Lock:
- You can specify the initial lock state of all clients, if you want to lock a client automatically after installation. Locked clients report which Fixlet messages are relevant for them, but do not apply any actions. The default is to leave them unlocked and to lock specific clients later on. However, you might want to start with the clients locked and then unlock them on an individual basis to give you more control over newly-installed clients. Alternatively, you can set clients to be locked for a certain period of time (in minutes).
- Exempt the following site URL from action locking:
- In rare cases, you might need to exempt a specific URL from any
locking actions. Check this box and enter the exempt URL. Note: You can specify only one site URL and it must begin with
http://. - Require use of FIPS 140-2 compliant cryptography
- Check this box to be compliant with the Federal Information Processing
Standard in your network. This changes the masthead so that every BigFix component
attempts to go into FIPS mode. By default, the client continues in
non-FIPS mode if it fails to correctly enter FIPS, which might be
a problem with certain legacy operating systems. Be aware that checking
this box can add a few seconds to the client startup time.
For more information see FIPS 140-2 cryptography in the BigFix environment.
Note: Enabling FIPS mode might prevent the use of some authentication methods when connecting to a proxy. If you selected to use a proxy to access the Internet or to communicate with BigFix subcomponents, ensure that the proxy configuration is set up to use an authentication method other than digest. - Allow use of Unicode filenames in archives:
- This setting specifies the codepage used to write filenames in
the BigFix archives.
Check this box to write filenames UTF-8 codepage.Do not check this box to write filenames using the local deployment codepage, for example Windows-1252 or Shift JIS. If you run a fresh install of BigFix V9.2, by default, the filenames are written in UTF-8.Note: If you upgraded your BigFix environment to V9.2, by default, the filenames are written in the local deployment codepage.
- Choose the folder in which to install the BigFix component
installers. The BigFix Installation
Guide wizard is launched to lead you through the installation of the BigFix components.Note: This step creates the installers for the BigFix client, BigFix console, and BigFix server, but does not install the components.
license.pvk) authorizes the
creation and rotation of server signing keys, which are trusted by
all agents. This key is not sent to IBM during the license
certificate creation process, and must be carefully protected. To
reinstall the server on your workstation, you must reuse the stored BigFix credentials.
If you did not save them, when you reinstall the server you must regenerate
them.