Editing the default submission and confirmation pages
The Content Library contains the template that provides the framework for the default submission form and confirmation page. HTML snippets that provide the content for the default pages are also available in the Content Library. The default pages contain simple greetings and fields for entering email addresses. You can edit the snippets so that the default email address submission form and the confirmation page reflect your brand.
About this task
The default submission form and confirmation page are stored in the Content Library. They are identified as BUILTIN assets because the system builds them automatically.
The BUILTIN assets become available in the Content Library only after you add a Forward to a Friend link to a communication for the first time. To be able to add the link, Unica must enable Forward to a Friend for your hosted messaging account.
After the BUILTIN assets become available in the Content Library, you can modify the BUILTIN submission form or the BUILTIN confirmation page. For example, the default submission form includes a section in the HTML code to add a logo or image. You can also change the default wording of the form.
You cannot edit Forward to a Friend Template (BUILTIN), which is the template that the system uses to build the pages.
The submission form includes required default HTML elements that you must not change.
The following example illustrates the HTML code for the default submission form and indicates the required HTML elements.
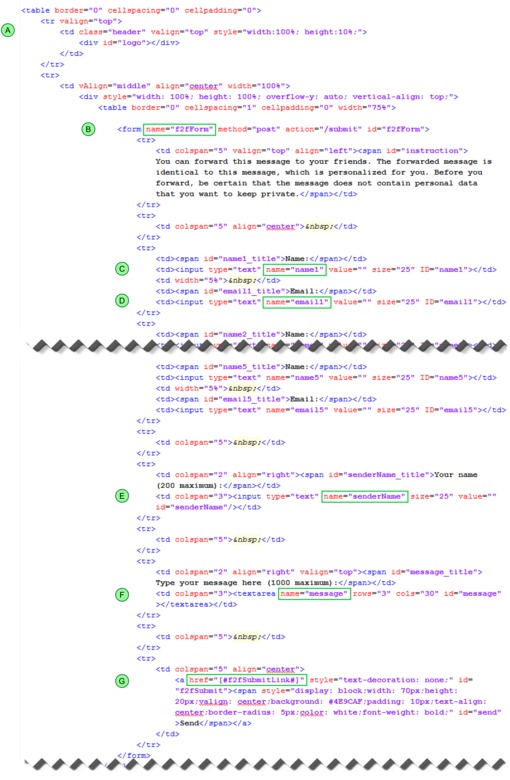
|
|
Header. You can add content, such as a company logo or other image. |
|
|
The submission form must be named |
|
|
By default, the form contains 5 input fields for the name of the recipient of each forwarded
message. The input fields must be named sequentially You can remove input fields, but the form must contain at least one name input field named
|
|
|
The form contains 5 input fields for email address. The input fields must be named sequentially
You can remove input fields, but the form must contain at least one email input field named
|
|
|
The field that is used to enter the name of the person who forwards the message must be named
|
|
|
The field for entering a message to accompany the forwarded message must be named
|
|
|
The link for submitting the form must define the link target as |


The system uses the same submission form and confirmation page for every mailing that includes a Forward to a Friend link. When you change a BUILTIN asset, the change affects every Forward to a Friend link in messages that you publish after you edit the asset.
Procedure
-
In the Content Library, open the Forward to a Friend Contents (BUILTIN) folder.
Note: To make the Forward to a Friend Contents (BUILTIN) folder available, you must add and preview a Forward to a Friend link in at least one communication.
- Open Forward to a Friend Form (BUILTIN) or the Forward to a Friend Confirmation (BUILTIN) page for editing.
-
In the Preview section, click Edit Content
 . Modify the
HTML code as necessary.
. Modify the
HTML code as necessary.
The page supports any valid HTML content. You can use an external text or HTML editor to create the new content and paste the updated HTML content into the Edit Content window.
-
Click Save Changes
 .
.