Splitting an HTTP test during recording
You can insert split points when you record a test. With split points, you can generate multiple tests from a single recording that you can replay in a different order with a schedule. You can also create a schedule that contains all of the tests that are generated from the split points.
About this task
During the recording process, you can select the option
to create a schedule for the tests that are generated from the split
points. The schedule will contain these attributes:
- One user
- One user group for the local computer
- All of the tests from the recording, in serial order
- One stage: Run until finished
- Recorded think times, with the maximum think time set to 2 seconds
- Statistics:
- Statistics log level: All
- Statistics sample interval: 5 Seconds
- Only store All Hosts statistics
- Test Log:
- Show errors and failures: All
- Also show warnings: All
- And also show all other types: All
- Problem Determination log level: Warning
Procedure
To insert split points when you record a test:
- Start recording the test. The Recorder Test Annotations toolbar opens near the top of the screen.
- To insert a split point into the recorded test, click the Split
point icon
 . The Insert
Split Point window is displayed.
. The Insert
Split Point window is displayed.
- Click Test name, and then type a name
for this section of the test.Tip: You are naming the previous section of the test, not the upcoming section of the test.
Repeat this step between recorded user actions as needed to split tests. - Click Test name, and then type a name
for this section of the test.
- Close the client program to stop the recording. The Generate
HTTP Test window is displayed.
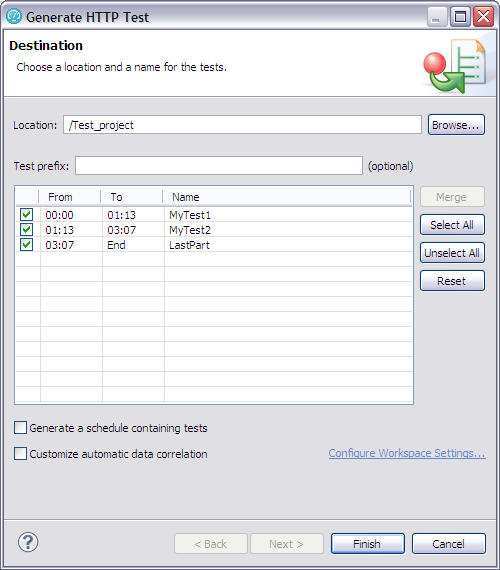
- Type a Test prefix for all the tests in the schedule.
- Select Generate a schedule containing tests to create a schedule for the tests. When you select this option, you can modify the name of the schedule.
- Select Customize automatic data correlation to choose automatic data correlation or rule-based data correlation. If you select this option and choose rule-based data correlation, you can specify which data correlation rule sets to use.
- Click Finish. The Test Generation window displays the status of generating the tests and schedule and the data correlation. You can view the test generation log from this window.
- When test generation is complete, you can select the test to open and then click Open Selected Tests, or you can click Close to finish this process.