Configuring messages to be sent
You fill one or more headers to RabbitMQ messages by setting values in the Header tabs. To publish a simple message and wait for a response to be received, only a few of options under the Producer Settings and Consumer Settings tabs need to be set. You can also add properties to the messages sent.
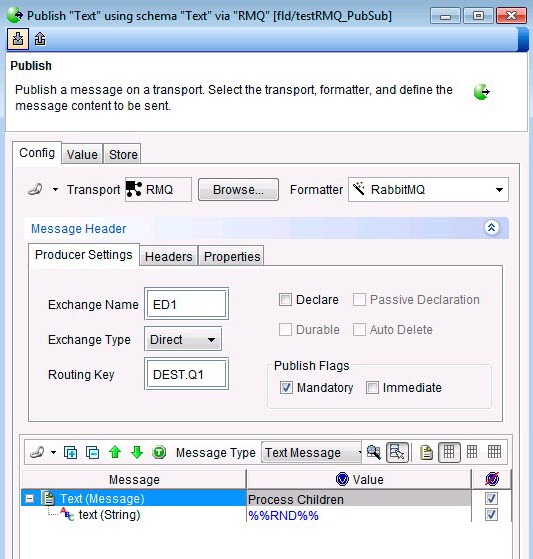
Procedure
-
Configure the Producer Settings section in the
Publish window.
-
Enter the exchange name to be used for the publication in the Exchange
Name field.
This exchange corresponds to the exchange to which queues are supposed to be bound using the following routing key.
-
Select Exchange Type from the list.
Select from the following options:
- Direct
- Fanout
- Topic
- Header
-
Enter the routing key value to be used in the Routing Key field.
When the default direct exchange type is selected, this routing key by convention, would correspond to a queue name.
-
Select any of the following options:
Option Description Declare
This option enables this Exchange to be created dynamically or use the one that already exists.
Passive Declaration
This option enables the API to check if this Exchange object already exists and display an error if the object does not exist.
Durable
This option specifies the Exchange to be a durable Exchange as defined by the RabbitMQspecification.
Auto Delete
This option specifies the Exchange to be an auto-deleted Exchange as defined by the RabbitMQspecification.
-
Select from the following publishing options in the Publish Flags
section:
Option Description Mandatory
This option enables the broker to double-check that the message is routed to queues. When the mandatory field is not selected, the broker silently drops the message if it cannot be routed.
Immediate
This option enables the broker to immediately deliver the message to the consumer which can receive the message.
- Add a header to a message by clicking the Headers tab and entering appropriate values in the fields.
- Add a property to the message by clicking the Properties tab and entering appropriate values in the fields.