Creating a physical File Access resource

You can use a logical File resource with a physical File Access resource to publish or consume remote file contents by using File Transport Protocol (FTP) or SSH File Transport Protocol (SFTP) in HCL OneTest API.

Before you begin

You must have completed the following tasks:

About this task

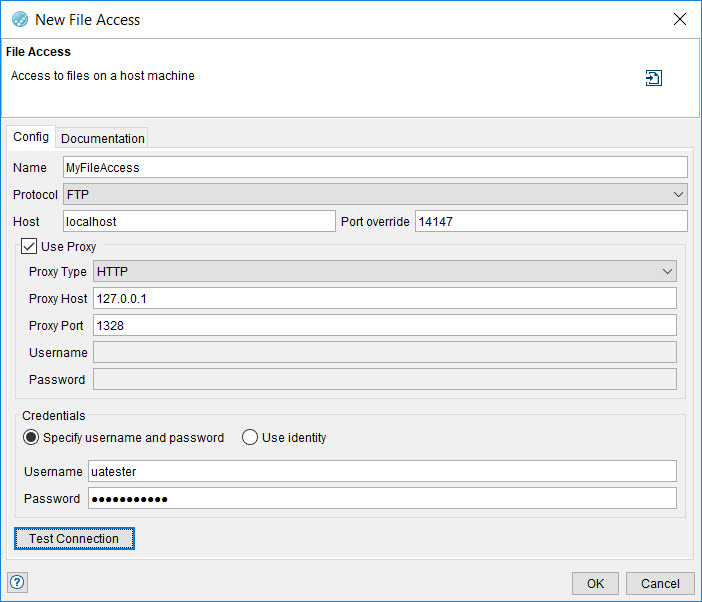
To work with remote files, you must create a physical File Access that configures the remote computer on which you installed the file transfer application that uses either the SFTP or FTP protocol. You can also configure a proxy host and select the protocol that you want HCL OneTest API to use to communicate with the proxy server.

You can either set up an Identity that authenticates HCL OneTest API with the file transfer application that you installed or use the credentials that you set up.

Procedure

  1. Open the Physical View of the Architecture School perspective.
  2. Click General > File Access from the toolbar.
    The File Access window is displayed.
    Image of the File Access configuration window.
  3. Enter a name for the File Access in the File field.
  4. Perform the following steps that specify the details of the file transfer application that you want to use for testing:
    1. Select the protocol as either FTP or SFTP from the list for the Protocol field.

      The FTP protocol helps in transferring files between computers over a network. The SFTP protocol also performs the same task but over a secure shell (SSH) network.

    2. Enter the hostname of the computer on which you installed the file transfer application in the Host field.
    3. Enter the port to connect to the file transfer application in the Port override field.
      Note: If no value is set, an SFTP connection uses the default port 22 and an FTP uses the default port 21.
    4. Specify the sign-in credentials to authenticate the file transfer application by performing any of the following steps:
      • Select Specify username and password, if you have configured the credentials as the authentication method.
        Note: If the fields are left blank, the default value used is anonymous for both fields.
      • Select Use Identity if you created an identity as the authentication method.
        Note: It is necessary to use an identity when you need to authenticate to a third-party application. For example, when you monitor a remote log file over SSH.
    5. Click Test Connection to test the connection to the file transfer application.
  5. Perform the following steps that specify the details of the proxy server, if you want to configure a proxy server:
    1. Select Use Proxy.

      The other fields are enabled.

    2. Select the type of proxy that you want to use in the Proxy Type field.

      You can select the proxy that uses either the HTTP or SOCKS protocols for communication with HCL OneTest API.

    3. Enter the hostname or IP address of the proxy server that you set up.
    4. Enter the port that is enabled to connect to the proxy server.
      Note: The authentication credentials are enabled only if you select the SFTP in the Protocol field.
      Restriction: You cannot configure the user credentials of the proxy server for an FTP connection.
    5. Enter the user name that you configured to authenticate the proxy server.
    6. Enter the password that you configured to authenticate the proxy server.
  6. Click OK to set up the physical File Access resource.

Results

You have set up a File Access as the physical resource.

What to do next

You must create a logical File resource and bind the File Access as its physical resource. See Creating a logical File resource.