Settings on Deployment Manager of Connections Docs and Connections

Specify settings on Connections Docs DM and Connections DM.

Procedure

  • Set the single sign-on domain name
    1. Log in to the WebSphere Application Server Integrated Solutions Console on the Deployment Manager.
    2. Select Security > Global security > Web and SIP security > Single sign-on (SSO).
    3. Enter a value for the SSO Domain name, for example, .ibm.com.
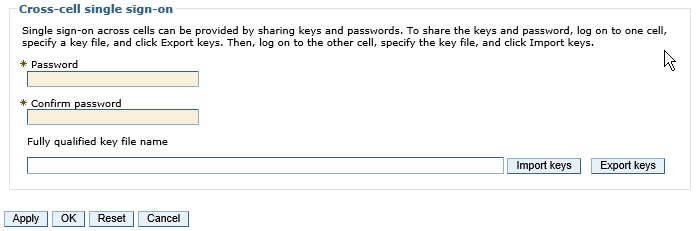
    4. Select Interoperability Mode.
    5. Type LtpaToken in the LTPA V1 cookie name field and type LtpaToken2 in the LTPA V2 cookie name field. The value is case sensitive and should be the same as the one on Connections Deploy management.
    6. Click Apply and then click Save.
    7. Select Security > Global security > Web security > Global settings.
    8. Select Use available authentication data when an unprotected URI is accessed.
    9. Perform a full synchronization of all the nodes.
    10. Do steps 1 to 9 for both Connections and Connections Docs Deployment Managers.
  • Exchange LTPA keys between Connections Docs and HCL Connections
    Note: Snapshot environment before you import sso ltpa key.
    1. On the node where HCL Connections is installed, complete the following steps:
      1. Log into the WebSphere Application Server Integrated Solutions Console as an administrator and click Security > Global security.
      2. Under Authentication, click LTPA.
      3. In the Cross-cell single sign-on section, provide values for the following fields:
        • Password: Type a secure password that you will remember. You will need to provide this password later, when you configure to the keys you are exporting. Confirm the password.
        • Fully qualified key file name: Specify a valid path and a file name for the file that will hold the exported keys. This file is encrypted using the password specified in previous field.
      4. Click Export keys.
    2. On each node where Connections Docs components are installed, complete the following steps:
      1. Log into the WebSphere Application Server Integrated Solutions Console as an administrator, and click Security > Global security.
      2. Under Authentication, click LTPA.
      3. In the Cross-cell single sign-on section, provide values for the following fields:
        • Password: Type the password that you used for the key file that you exported from the node where HCL Connections is installed. Confirm the password.
        • Fully qualified key file name: Specify the file name of the key file that you exported from the node where HCL Connections is installed.
      4. Click Import keys.
    3. Restart all the nodes.

      cross-cell single sign-on settings

  • Go to Connections Docs Deployment Manager console, create connectionsAdmin alias. connectionsAdmin alias is used by SONATA library to perform server to server call. To create connectionsAdmin alias, complete the following steps:
    1. Log in to the WebSphere Application Server Integrated Solutions Console on the Deployment Manager.
    2. Select Security > Global security > JAAS > J2C authentication data.
    3. Click New.
    4. Enter Alias as connectionsAdmin.
    5. Enter administrator User Id and Password.
    6. Click Apply and then click Save.
  • Go to Connections Docs Deployment Manager admin console, Create ViewerAdmin alias.
  • Go to Connections Deployment Manager admin console, Create docsAdmin alias.
  • Copy HCL Connections config files. This task is only needed when Connections and Connections Docs are located within different WebSphere Application Server cell scope.
    1. Copy all HCL Connections configuration files from the cell of Connections to the cell of Connections Docs.
    2. The configuration files is located in WAS configuration folder where runs HCL Connections, like /opt/IBM/WebSphere/AppServer/profiles/AppSrv01/config/cells/<connections_cell_name>LotusConnections-config. The copy target is HCL Docs's WAS configuration folder, like /opt/IBM/WebSphere/AppServer/profiles/AppSrv01/config/cells/<docs_cell_name>/LotusConnections-config.
    3. This task needs restarting WAS to take effect.
      Note: If the Docs environment is a cluster, copy the Connections folder to /opt/IBM/WebSphere/AppServer/profiles/Dmgr01/config/cells/<docs_cell_name>/LotusConnections-config, not under AppSrv01. Otherwise, after synchronizing nodes and restarting cluster, the settings will be overwritten.
  • Import IHS cert on each IHS server
    1. Go to Connections Docs Deployment Manager, open the Key Database Files, select Personal Certificates, then extract certificate.
    2. Go to Connections Deployment Manager, select Signer Certificates, add the extracted certificate files in step 1. Then do step 1 for Connections Deployment Manager.
  • Enter FileNet url for ECM property in Connections Docs concord-config.json file if you need CCM feature on Docs server.
  • If you want to configure snapshot, edit the viewer-config.json file as follows: in docs_integration section, change the docs_enabled value to true, and set the shared_data_root to the location of Docs share data location.
  • Synchronize node and restart server, node and deployment Manager.