In this lesson, you create a definition file that defines the user interface
components that business users use when they create a promotion using the Management Center. These
components include the customized gift reward grid you created in the previous
lesson.
About this task
As you learned in the earlier lesson, the input widgets you need for the Promotion tool
user interface have already been defined for use in the existing promotion types. In Management
Center, each object definition has a different properties view definition that is used to edit the
properties of that specific object type. In the Promotions tool, all promotions are represented by a
single object type. This means that they all share the same properties view definition. Each
promotion then has a property group specific to that promotion type. When a business user is
creating a promotion, only the property groups for that specific promotion type are displayed in the
Promotions tool user interface.
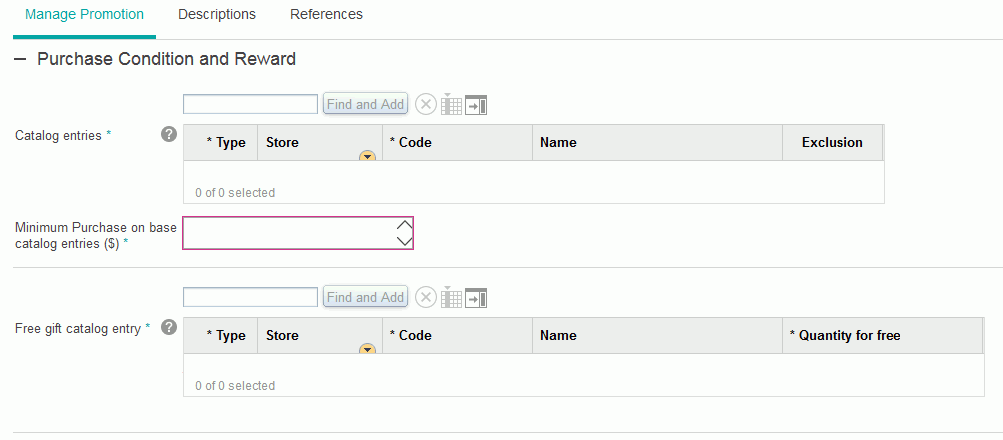
In this lesson, you define a property group that contains the
widgets for the Purchase Condition and Reward section of the user interface
specific to the new promotion type. The resulting properties view looks like this:
Procedure
-
Create a new directory for the properties object:
-
In the Enterprise Explorer view, expand directory.
-
Right-click the promotion folder and click .
-
In the Folder name field, type propertiesViews.
Click Finish.
-
Right-click the propertiesViews folder and click .
-
In the Folder name field, type promotionTypes.
Click Finish.
-
Create a new file to define the property group:
-
Right-click the promotionTypes folder.
-
Click .
-
Name your new file ProductLevelFreeGiftProperties.xml
-
Click Finish to save the file.
The file opens in the default XML editor.
-
Copy and paste the following code into the file.
<Definitions>
  <!--Property group for the ProductLevelFreeGift promotion.-->
  <PropertyGroup collapsable="false" definitionName="cmc/promotion/ExtProductLevelFreeGiftProperties">
    <dependency localName="promotionResources" moduleName="cmc/promotion/PromotionResources"/>
    <dependency localName="ExtPromotionResources" moduleName="cmc/promotion/ExtPromotionResources"/>
    <EnablementCondition conditionId="promotionType" enablementValue="ProductLevelFreeGift" propertyName="promotionType"/>
    <PropertyGroup groupTitle="${promotionResources.promotion_purchaseConditionAndRewardTitle}"
     name="purchaseConditionAndRewardGroup" open="true">
   1<PropertyGroup collapsable="false" displayGrouping="true" name="purchaseConditionGroup">
        <PropertyChildListEditor helpText="${promotionResources.promotion_Product_Promotion_SKU_Search_helpText}"
         listDefinition="cmc/promotion/ProductElementTypeGrid" name="catalogEntry"
         objectPath="ProductLevelFreeGiftPurchaseCondition" objectTypes="Identifier_CatalogEntry,Identifier_InheritedCatalogEntry"
         promptText="${promotionResources.promotion_Select_Catalog_Entry}" required="true"/>
        <PropertyStepper objectPath="ProductLevelFreeGiftPurchaseCondition"
         promptText="${ExtPromotionResources.promotion_Minimum_purchase_TotalPrice}" propertyName="BaseItemTotalPrice" required="true"/>
      </PropertyGroup>
   2<PropertyGroup collapsable="false" displayGrouping="true" name="rewardGroup">
         <PropertyChildListEditor helpText="${promotionResources.promotion_FreeGift_SKU_Search_helpText}"
          listDefinition="cmc/promotion/ExtProGiftRewardGrid" name="giftSKU" objectPath="ProductLevelFreeGiftPurchaseCondition"
          objectTypes="Identifier_GiftCatalogEntry,Identifier_InheritedGiftCatalogEntry"
          promptText="${promotionResources.promotion_Free_gift_sku}" required="true"/>
      </PropertyGroup>
    </PropertyGroup>
  </PropertyGroup>
</Definitions>
In this code sample, the property group is separated into two subgroups:
- 1 purchaseConditionGroup
- The first widget instantiated in this subgroup is a PropertyChildListEditor widget. In the
Management Center, business users use this widget to specify the catalog entry that must be
purchased to qualify for the promotion. The
objectPath specifies where in the model
this input value will be stored. The objectTypes specify the types of objects that
can be displayed in the list. The listDefinitionName specifies the definition for
this view. The second widget is a PropertyStepper. In the Management Center, business users use this
widget to select the total price threshold of catalog entries that must be purchased.
- 2 rewardGroup
- The PropertyChildListEditor widget is instantiated in this subgroup. In the Management Center,
business users use this widget to specify multiple catalog entries as gifts. In this section,
observe the line in boldface text. The value for the
listDefinitionName attribute
is "extProGiftRewardGrid"; this is your customized gift reward grid. To allow business users to add
additional rows to the gift reward grid, the line in boldface text does not include the attribute
singleChild="true"; therefore this grid can have multiple rows.
Take note of the line near the top of the snippet containing the <EnablementCondition>
element. This indicates whether the parent object is enabled. In this customization code, the new
promotion type property group is enabled only when promotionType is ProductLevelFreeGift. Business
users select the promotion type from the Promotion Type Selector window in the Promotions tool.
-
Save and close the file.
-
Add your new property group to the promotions properties view definition. Add the new property
group to the property pane definition, PromotionManageTabPaneContent, which is located in the
PromotionPropertiesView.xml file:
-
Expand
-
Open the PromotionPropertiesView.xml file.
-
Locate the section of the file where the other property groups are instantiated; here are a few
examples.
<PropertyGroup baseDefinition="cmc/promotion/MultipleItemsGetYPercentDiscountProperties"/>
<PropertyGroup baseDefinition="cmc/promotion/MultipleItemsGetYFixedAmountOffDiscountProperties"/>
<PropertyGroup baseDefinition="cmc/promotion/RedemptionLimits"/>
-
Add your promotion property group to the bottom of the list by adding the following code.
<!-- Customization: Properties View for new Promotion Type -->
<PropertyGroup baseDefinition="cmc/promotion/ExtProductLevelFreeGiftProperties"/>
-
Save and close the file.
Results
So far in this tutorial, you have modeled the runtime promotion XML, planned the user
interface, and created new resource bundles for custom text strings. You have also completed the
properties view definition for the new promotion type and added it into the main properties view
list. You have also completed the main user interface element definitions for the new promotion
type, that is, the object definition, the template and the properties view. In the next lesson, you
add your promotion type to the Promotion Type Selector window so that business users can select the
new promotion type as a starting point for a promotion.