Mapping the database table to the new enterprise bean
After you create the new enterprise bean, you must create a mapping between the CMP fields in the bean and the columns in the database table. When both the enterprise bean and its corresponding database table exist, a "Meet-in-the-middle" type of mapping is used. Rational Application Developer provides tools to simplify this task.
Before you begin
- You have implemented the required access control methods
- Ensure that you have RAD 9.5.0.1 installed in your environment
Procedure
-
Create a database connection by following the Connecting to a database topic in the IBM Rational Application Developer for WebSphere, v9.5.0 documentation . Specify filtering options to load only the necessary database
tables.
For example, in the programming tutorials all new database tables begin with the letter X, so you can load only tables with names like X%.
- From the Enterprise Explorer view, navigate to the following directory: .
- Select META-INF and from its pop-up menu, select .
- Search and select Physical Data Model and click Next.
-
In the File name field, enter the name of data model.
 The default database name is mall.
Note: The name that you enter in the file name field is not used. When you create a database definition, you create XMI files that are later used to generate deployed code. These XMI files are independent of your file name.
The default database name is mall.
Note: The name that you enter in the file name field is not used. When you create a database definition, you create XMI files that are later used to generate deployed code. These XMI files are independent of your file name. -
From the Database list, select a database type.
- Click Finish.
- Navigate to the following directory: WebSphereCommerceServerExtensionsData > Data Models > PhysicalDataModel > databaseName where PhysicalDatamodel is the name of the data model you chose in the previous step, and databaseName is the name of your development database.
- Right-click databaseName and from its pop-up menu, select .
-
In the Schema name field under the properties view, enter
NULLID. Use NULLID as the schema name because this name allows flexibility for EJB beans to work against any schema. If the schema name is completed with a specific value other than NULLID, the EJB bean would work for tables created that use a specific schema. - Right-click NULLID and select .
- In the Table name field under the properties view, type your table name.
-
Add columns to your table definition in the Columns tab under the
properties view:
- In the Column name field, type an appropriate name for the new CMP field. If you want to use the Match by name function later when you map this field to its corresponding column in the database table, you must name your field exactly (case insensitive) to the name of the column.
- In the Column type field, type the appropriate data type for the field. Note that you should use the wrapper classes for primitive data types (for example, use the java.lang.Long data type, not the long data type).
- If the field is in the primary key, select the Primary Key check box.
- Click Add again and repeat steps to add new fields for each column in the database table that requires a CMP field.
-
If you want this entity bean to use optimistic locking, your database table must include a
column that is called
optCounterof type SMALLINT. The corresponding entity bean must have a field calledoptCounterof typeshort. Ensure that you mark the optCounter field as the OptimisticPredicate in the Properties view.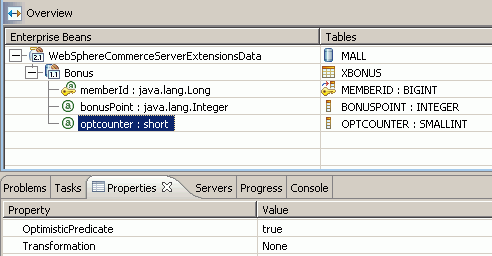
- Click Close to close this window.
-
From the Enterprise Explorer perspective, right-click
WebSphereCommerceServerExtensionsData and from its pop-up menu, select
Java EE > EJB to RDB Mapping > Generate Map. Ensure that the
Use an existing backend folder radio button is preselected. Click
Next.
Note: If you are using Oracle 12c, you might notice that the Oracle 12c backend folder does not exist. Instead, select the Oracle 11 folder. The mapping will still generate properly.
- Select Meet In The Middle and click Next.
- Select Match By Name and click Finish.
- In the Enterprise beans pane, highlight your entity bean. In the Tables pane, highlight your database table.
- Map the fields in your entity bean to the columns in your database table by selecting Match By Name from the bean's pop-up menu.
- Proceed to modifying the schema name.