 In this lesson, you learn how to give customers access to the recipe widget you created
in the last lesson. On the Deprecated featureMadisons store page that displays a
Recipe Collections list, you add a Share link. When a customer clicks the
Share link, the customer can customize your recipe widget and share it to a
social network.
In this lesson, you learn how to give customers access to the recipe widget you created
in the last lesson. On the Deprecated featureMadisons store page that displays a
Recipe Collections list, you add a Share link. When a customer clicks the
Share link, the customer can customize your recipe widget and share it to a
social network.Before you begin
This lesson uses
the Recipe Collections store page developed
during the following tutorial and lesson:If you do not have this page available, you can try adding
the Share link to any store page for the purposes
of this tutorial.
About this task
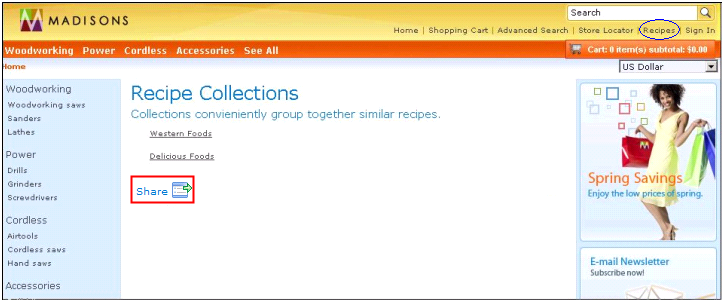
The following screen capture
shows where you might add a Share link
to the Recipe Collections store page:
Procedure
- Open the Recipe Collections store page in an editor.
If
you completed Tutorial: Adding support for a Management Center tool to the Madisons starter store,
the Recipe Collections store page should be located here:
WCDE_installdir/workspace/Stores/WebContent/Madisons/ShoppingArea/RecipeSection/RecipeCollection.jsp
- At the location in the JSP file that you want to
display
a Share link, paste the following lines of
code:
<c:import url="${jspStoreDir}Snippets/Marketing/ESpot/RemoteWidgetButtons.jsp">
   <c:param name="showWidget" value="true" />
   <c:param name="sidebarWidgetId" value="your_widgetID" />
   <c:param name="sidebarColors" value="your_layer_name" />
   <c:param name="feedURL" value="your_feedURL" />
   <c:param name="widgetIconStyle" value="top" />
   <c:param name="feedLayer" value="your_feed_layer_name" />
</c:import>
These lines of code add the Share link to the page. WebSphere Commerce
uses a similar code snippet to display the Share link on Deprecated featureMadisons store pages for e-Marketing Spot and wish list remote widgets.
The snippet imports the RemoteWidgetButtons.jsp file. This file provides the
Share link image, controls its position, and supports the link functions. For
your reference, the RemoteWidgetButtons.jsp file is stored here:
WCDE_installdir/workspace/Stores/WebContent/Madisons/Snippets/Marketing/ESpot/RemoteWidgetButtons.jsp
- Update the parameters in the code snippet for your
widget:
- showWidget
- This parameter
controls whether to display the Share link
on the page. Leave the value set to
true. The value false hides
the link. - sidebarWidgetId
- Specify the ID of the widget you created. In the previous lesson, you wrote down the widget ID
displayed in the embed code for the widget.
- sidebarColors
- Specify
a layer in your widget for which you want to allow customers
to change the color. Typically, this is the background layer. When
the customer clicks the Share link, a "Share
this widget" page displays. This page provides options for changing
the color of a widget layer.
- feedURL
- Specify
the URL for the recipe data displayed the widget you created,
for example:
http://mysite.example.com/wcs/resources/stores/10101/ProjectCollections?responseFormat=atom
- widgetIconStyle
- This parameter positions
the Share link.
Leave the value set to
top. - feedLayer
- Specify the name of the layer in the widget that displays the
feed data. In the example shown in the previous lesson, the feed is
displayed in a layer named Custom List.
Now your code snippet for the
Share link
should look similar to this example:
<c:import url="${jspStoreDir}Snippets/Marketing/ESpot/RemoteWidgetButtons.jsp">
   <c:param name="showWidget" value="true" />
   <c:param name="sidebarWidgetId" value="339145" />
   <c:param name="sidebarColors" value="background" />
   <c:param name="feedURL" value="http://mysite.example.com/wcs/resources/stores/10101/ProjectCollections?responseFormat=atom" />
   <c:param name="widgetIconStyle" value="top" />
   <c:param name="feedLayer" value="Custom List" />
</c:import>
- Save and close
the JSP file.
- To test the Share link:
- Open the Madisons starter store.
- Navigate to the Recipe Collections store page.
- Click the Share link.
The
"Share this widget" page displays, showing a preview of the widget:
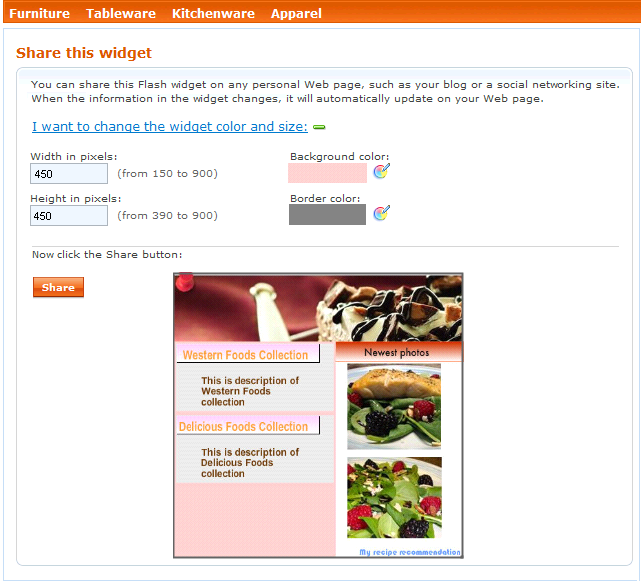
Using
the functions on the page, customers can make changes to the dimensions
and color of the widget.
- Click Share:
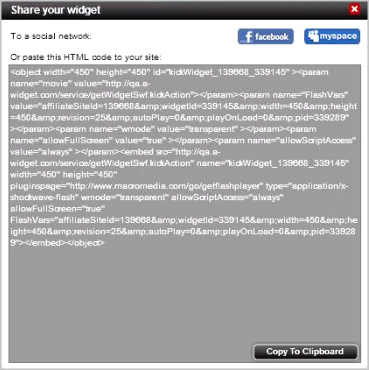
Using
the functions on the page, customers can share the widget directly
to a social network. Alternatively, customers can copy the embed code
and then paste it into a Web page outside of WebSphere Commerce.
Results
In this final lesson,
you have made your recipe widget available
for customers to share from a store page. This concludes the tutorial.