Introduced in Feature Pack 1

Testing the recipe Atom feed

Introduced in Feature Pack 1 In this lesson, you learn how to test the four feed URLs you created in the first tutorial lesson. Now that you have created the Java classes to generate the feeds, and the feed formatting JSP files to format the feeds, the four URLs should display feed data in a client. For this test, you will use a browser as a client to display the feeds.

Procedure

  1. Start a new file in Notepad or another text editor. You will use this file to build the URLs; however, this file is for your reference only and it is not part of the customization code.
  2. Paste the following feed URLs from the first lesson into the empty file:
    http://host_name/wcs/resources/stores/storeId/Projects?responseFormat=atom
    http://host_name/wcs/resources/stores/storeId/Projects/projectIdentifier?responseFormat=atom
    http://host_name/wcs/resources/stores/storeId/ProjectCollections?responseFormat=atom
    http://host_name/wcs/resources/stores/storeId/ProjectCollections/projectCollectionIdentifier?responseFormat=atom
  3. Update the four feed URLs so that they contain real data from your environment:
    1. In all four URLs, replace the variables host_name and storeId with actual values from the development machine and store you are using.
    2. In the Feed 2 URL, replace projectIdentifier with the unique ID of a specific project (a recipe) in your environment.
      This value is stored in the XPROJECT table, in the XPROJECT_ID column.
    3. In the Feed 4 URL, replace projectCollectionIdentifier with the unique ID of a specific project collection (a recipe collection) in your environment.
      This value is stored in the XPRJCOL table, in the XPRJCOL_ID column.

      Here are example URLs containing real data for a development machine with a host_name of mysite.example.com and for a store with the ID 10101:

      • Feed 1:
        http://mysite.example.com/wcs/resources/stores/10101/Projects?responseFormat=atom
      • Feed 2:
        http://mysite.example.com/wcs/resources/stores/10101/Projects/12345?responseFormat=atom
      • Feed 3:
        http://mysite.example.com/wcs/resources/stores/10101/ProjectCollections?responseFormat=atom
      • Feed 4:
        http://mysite.example.com/wcs/resources/stores/10101/ProjectCollections/23456?responseFormat=atom
  4. Open a browser that supports the display of Atom feeds.

    For example, Mozilla Firefox version 3.0.1.9 supports the display of Atom feeds.

  5. One by one, paste the feed URLs into the address field of the browser to verify that recipe data is returned to the browser. If you see recipe data displayed in the browser, your customization is successful.

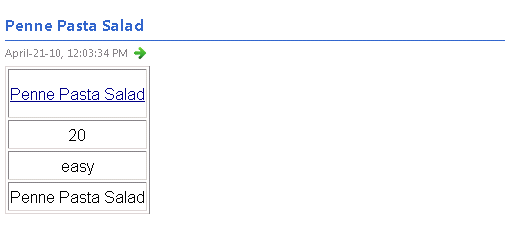
    For example, when you paste the URL for Feed 2 into a browser, the result should return data about a specific recipe similar to this screen capture:


    A recipe feed displayed in a browser

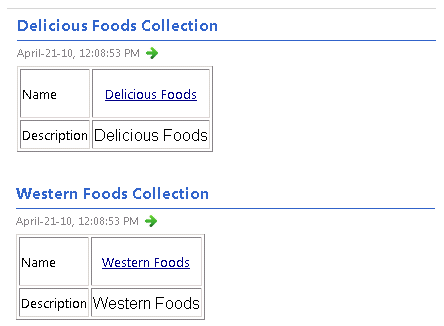
    When you paste the URL for Feed 3 into a browser, the result should return a list of all recipe collections similar to this screen capture:


    A recipe collection feed displayed in a browser
  6. When you have completed your testing, close the browser.

Results

In this lesson, you tested the results of your customization to verify that the feed URLs display recipe data in a client, in this case, a browser. In the next lesson, you will learn how you can use a feed URL to display recipe data in a remote widget that can be shared to a Web site outside of WebSphere Commerce.