Create recipe quick info widget
In this step of the tutorial, you will create a quick info widget. When you click the Recipe tab in the product display page for a recipe, a pop-up window shows the recipe contents.
About this task
When the function is invoked, an event will be published. The event is Dojo event. The refresh controller will receive this event and refresh the refresh area to display the recipe content.
Procedure
- Create Recipepopup.jspf.
In this JSPF file,
dijit.Dialogis a pop-up window widget andwc.widget.RefreshAreais the container to display the recipe content. When you click on a recipe, an event will be published and the corresponding controller will refresh refreshArea to display the recipe content.- In the Project Explorer view, expand Stores > WebContent > Deprecated featureMadisons > ShoppingArea > RecipeSection
- Right-click the RecipeSection folder and select Import. Expand General > File System.
- In the File name field, enter RecipePopup and select the Create as JSP Fragment check box; Click Finish
- Click Next , then click Browse and navigate to TutorialSource\Stores\WebContent\Madisons\ShoppingArea\RecipeSection, where TutorialSource is the location where you unzipped the Tutorial sample source code. Select the RecipePopup.jspf file.
- Open RecipePopup.jspf. Remove parseWidget("recipe_popup_main_div"); code.
Add the following in place of the code that you just deleted:
recipeDisplayJS.setCommonParameters('<c:out
value='${WCParam.langId}'/>','
<c:outvalue+'${WCParam.storeId
/>','<c:outvalue='${WCParam.catalogId}'/>');
parseWidget("recipe_popup_main_div");
- Include the JSPF file in ProductDisplay.jsp
- In the Project Explorer view, expand Stores > WebContent > Madisons > ShoppingArea > CatalogSection > CatalogEntrySubsection
- In the ProductDisplay.jsp, search
for the following code:
<body>
<%@ include file="../../../include/StoreCommonUtilities.jspf"%>
<%@ include file="../../../Snippets/ReusableObjects/CatalogEntryQuickInfoDetails.jspf" %>
Add the following code after the preceding code:<%@ include file="../../../ShoppingArea/RecipeSection/RecipePopup.jspf" %>
- Define refresh controller.
The refresh controller controls a refresh area widget and provides a JavaScript logic that listens to changes in the render context and the model. It refreshes the refresh areas registered to the controller.
- In the Project Explorer view, expand Stores > WebContent > Madisons > javascript
- In the CommonControllersDeclaration.js file,
add the following at the end of the file after }) .
,
wc.render.declareRefreshController({
    id: "RecipePopupController",
    renderContext: null,
    url: "",
    formId: ""
    ,modelChangedHandler: function(message, widget) {
           var controller = this;
           if(message.actionId == "ShowPopup"){
                  var params = [];
             params.project    = message.projectId;
                  widget.refresh(params);
           }
    }
    ,postRefreshHandler: function(widget) {
           var controller = this;
              //The dialog contents has changed..so destroy the old dialog
           destroyDialog();
     }
})
Note: TheRecipePopupControlleris defined to control the refresh area specified in RecipePopup.jspf. This controller listens toShowPopupevent; when the event occurs, the controller creates aparamsobject with theprojectIdthat was retrieved from the event itself and then request the URL to get content from the server side. The controller will then refresh the refresh area.The URL is not set in the refresh controller. If you want to use the controller with different URL to do the refresh, you must set the URL in the JSP page that uses the controller.
- Create RecipePopupContent.jsp.
The controller will call the RecipePopupContent.jsp file to get the corresponding recipe content.
- In the Project Explorer view, expand Stores > WebContent > Madisons > ShoppingArea > RecipeSection
- Right-click the RecipeSection folder and select Import. Expand General > File System.
- Click Next , then click Browse and navigate to TutorialSource\Stores\WebContent\Madisons\ShoppingArea\RecipeSection directory, where TutorialSource is the location where you unzipped the Tutorial sample source code. Select the RecipePopupContent.jsp file.
- Register the new JSP files in the Struts configuration
file.
- In the Project Explorer view, expand Stores > WebContent > WEB-INF
- In the struts-config-ext.xml file,
add the following code in the global forward section.
<forward className="com.ibm.commerce.struts.ECActionForward" name="RecipePopupContentURL/11301"
path="/ShoppingArea/RecipeSection/RecipePopupContent.jsp"/>
Note: 11301 is the store ID. Replace it with your actual store ID - In the struts-config-ext.xml file,
add the following in the action mappings section.
<action path="/RecipePopupContentURL" type="com.ibm.commerce.struts.BaseAction">
</action>
- Create access control policies for the new JSP files.
- Copy the TutorialSource\xml\policies\xml\RecipePoupCommand.xml file into the WCDE_installdir\xml\policies\xml directory.
- Stop the WebSphere Commerce Server.
- At the command prompt, run the following command from
the WCDE_installdir\bin directory:
acpload RecipePopupCommand.xmlNote: Depending on your WebSphere Commerce developer database setup, additionalacploadarguments may be needed. See acpload utility.
- Set controller URL.
In this case, the URL used by the refresh controller is not known when the refresh area is defined because it requires some parameters such as catalogId, and langId. To dynamically set the URL, use the dojo
addonloadfunction. The dojoaddonloadfunction is triggered after the page has finished loading, and the widgets declared in markup have been instantiated.- In the Project Explorer view, expand Stores > WebContent > Madisons > ShoppingArea > CatalogSection > CatalogEntrySubsection
- In the ProductDisplay.jsp file,
search for the following lines:
<%@ include file="../../../include/JSTLEnvironmentSetup.jspf"%>
<%@ include file="../../../include/nocache.jspf"%>
Use the wcf:url tag to build the URL. Add the following code after the preceding lines:<wcf:url var="RecipePopupContentURL2" value="RecipePopupContentURL" type="Ajax"> <wcf:param name="storeId" value="${WCParam.storeId}"/> <wcf:param name="catalogId" value="${WCParam.catalogId}"/> <wcf:param name="langId" value="${langId}"/> </wcf:url> - Find dojo.addOnLoad(function() { and
add the following code after it to set the URL for the
RecipePopupControllerrefresh controller.CommonControllersDeclarationJS.setControllerURL('RecipePopupController','${RecipePopupContentURL2}');
- Add showRecipe function into RecipeDisplay.js.
- In the RecipeDisplay.js. file,
add the following code before the last } character.
     showRecipe :function(projectId)
                  {
                  var message=[];
                  message.projectId=projectId;
                  message.actionId="ShowPopup";
                  dojo.publish("modelChanged", [message]);
                  dijit.byId('recipe_popup').show();
                      dojo.query('.dijitDialogUnderlayWrapper', document).forEach(function(tag) {
                      tag.style.display='none';
                  });,
              }
Note: TheshowRecipefunction will be invoked when the shopper clicks a recipe. This function publishes amodelChangedevent which contains theprojectIdof the recipe and makes the recipe pop-up dialog visible.
- In the RecipeDisplay.js. file,
add the following code before the last } character.
- Update the links to the recipes so they will show the pop-up
instead. Use showRecipe function in RecipeList.jsp. In the RecipeList.jsp file,
set the href value as shown in bold in the following snippet.
<c:forEach var="projectTool" items="${usedAsToolBy}" varStatus="status"> <div id="recipeTool_${status.count}" class="Recipe_link_1"><a href="javascript:recipeDisplayJS.showRecipe('${projectTool.projectIdentifier.uniqueID}')"><u><c:out value="${projectTool.projectIdentifier.externalIdentifier.name}" escapeXml="false" /></u></a></div> </c:forEach> <c:forEach var="projectMaterial" items="${usedAsMaterialBy}" varStatus="status"> <div id="recipeMaterial_${status.count}" class="Recipe_link_1"><a href="javascript:recipeDisplayJS.showRecipe('${projectMaterial.projectIdentifier.uniqueID}')"><u><c:out value="${projectMaterial.projectIdentifier.externalIdentifier.name}" escapeXml="false" /></u> </a></div> </c:forEach> - Include RecipeDisplay.js in ProductDisplay.jsp.
To call the
showRecipe()function, the RecipeDisplay.js need to be included in ProductDisplay.jsp.- In the Project Explorer view, expand Stores > WebContent > Madisons > ShoppingArea > CatalogSection > CatalogEntrySubsection
- In the ProductDisplay.jsp file,
add the following code:
<script type="text/javascript" src="<c:out value="${jspStoreImgDir}javascript/Recipe/RecipeDisplay.js"/>"></script>
- Verify this task.
- Browse one product.
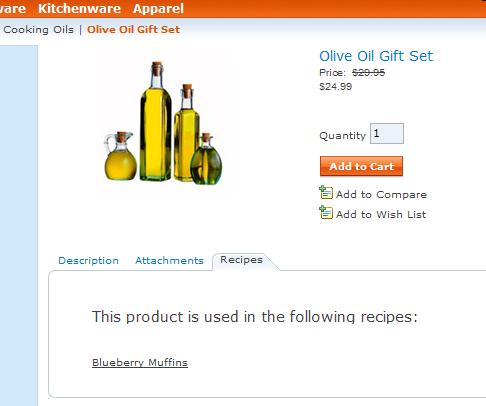
- Click one recipe and confirm a pop-up window displays
recipe content.
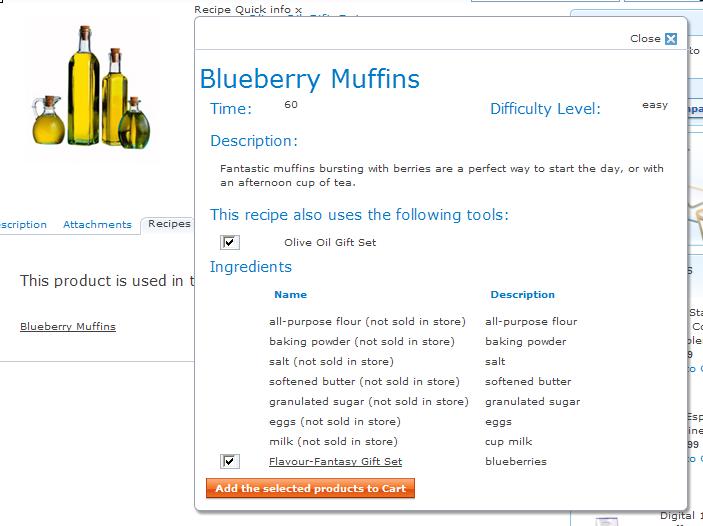
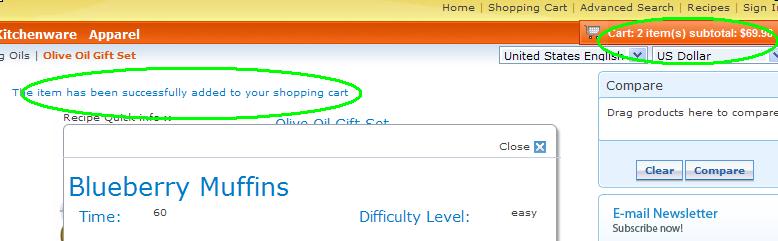
- Click Add the selected products to Cart and
confirm that the product has been added to the cart.
- Browse one product.