Feature Pack 7 or later

Adding custom sort options for product lists and search results

In the Catalog Entry List widget, you can add custom sort options to the SORT BY list for product lists that are displayed on subcategory pages and search results pages. This customization involves defining the new sort options in an extended WebSphere Commerce search configuration file and in the widget JSP files.

When you publish the Aurora starter store, the layouts for subcategory pages and the search results page use the Catalog Entry List widget from the Commerce Composer widget library. This widget displays a product list (see Sort options in the Catalog Entry List widget). In the widget, the SORT BY list has four sort options that are defined, in addition to the default option, Relevance. The options are Brands, Name, Price (Low to High), and Price (High to Low):
Figure 1: Sort options in the Catalog Entry List widget

Sort By list for product listings and search results

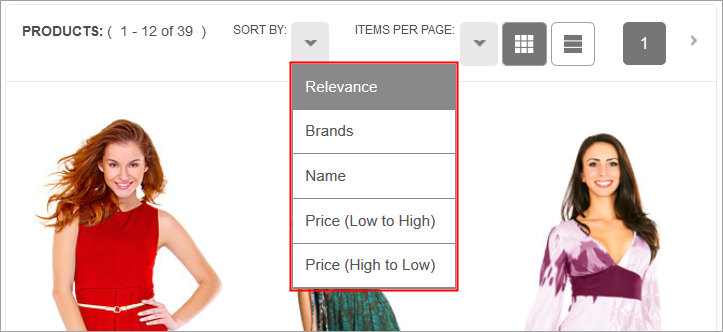
You can add a custom sort option, such as a Part Number option, to help shoppers find a specific product more quickly.

Part 1. Adding the custom sort option to the relevant search profiles

Before you begin

  • Feature Pack 7Apply interim fix JR50972. This interim fix corrects an issue in which the default REST sort profiles are removed when you add new REST sort profiles to a custom search profile.
  • To familiarize yourself with search profiles, read WebSphere Commerce search configuration file (wc-search.xml) (Search EAR). Specifically, review the information for the sort property of a search profile. This part of the customization task requires you to add a sort field to the sort property for multiple search profiles in the extended version of the WebSphere Commerce search configuration file (wc-search.xml).

Procedure

  1. Open the default WebSphere Commerce search configuration file (wc-search.xml) at the following path:

    Search_eardir/xml/config/com.ibm.commerce.catalog/wc-search.xml

  2. Review the existing search profiles that specify the four default sort options that are illustrated in Sort options in the Catalog Entry List widget.
    The following code snippets show two of the default search profiles in the WebSphere Commerce search configuration file:
    • The profile that is labeled 1 finds products by a category when shoppers browse the catalog.
    • The profile that is labeled 2 finds products by a search term when shoppers search the catalog.

    These profiles contain the four default sort property fields that are offered in the Catalog Entry List widget. In each snippet, the fields that are named 1, 2, 3, and 4 define the options Brands, Name, Price (Low to High), and Price (High to Low):

    ...
    1
    <_config:profile name="IBM_findProductsByCategory" indexName="CatalogEntry">
    ...
      <_config:sort>
       <_config:field name="1" value="mfName_ntk_cs asc"/>
       <_config:field name="2" value="name_ntk asc"/>
       <_config:field name="3" value="price_* asc"/>
       <_config:field name="4" value="price_* desc"/>
      </_config:sort>
    ...
    2
    <_config:profile name="IBM_findProductsBySearchTerm" indexName="CatalogEntry">
    ...
     <_config:sort>
       <_config:field name="1" value="mfName_ntk_cs asc"/>
       <_config:field name="2" value="name_ntk asc"/>
       <_config:field name="3" value="price_* asc"/>
       <_config:field name="4" value="price_* desc"/>
     </_config:sort>
    Important: Your store might use different search profiles. Make sure that you know which search profiles your store uses before proceeding.
  3. To add a custom sort option, open the extended version of the WebSphere Commerce search configuration file (wc-search.xml) at the following path:

    Search_eardir/xml/config/com.ibm.commerce.catalog-ext/wc-search.xml

    If you do not already have an extended version of this file, you must create one by using the instructions in Changing properties in the WebSphere Commerce search configuration file (wc-search.xml) (Search EAR)

  4. Within the <config:search element, add code to extend the existing search profiles to add your custom sort option.

    The following snippets show how to extend the two search profiles from step 2 to add a field 5 as a sort option for Part Number. The value partNumber_ntk is the exact name of the search index column, in this case, a non-tokenized (ntk) column. For this example, the part numbers are sorted in ascending (asc) order.

    1
    <_config:profile name="IBM_findProductsByCategory" indexName="CatalogEntry">    	   	        
       <_config:sort>       
          <_config:field name="5" value="partNumber_ntk asc"/>
       </_config:sort>
    </_config:profile>
    
    
    2
    <_config:profile name="IBM_findProductsBySearchTerm" indexName="CatalogEntry">    	   	        
       <_config:sort>       
          <_config:field name="5" value="partNumber_ntk asc"/>
       </_config:sort>
    </_config:profile>
    
  5. Save and close the updated wc-search.xml file.

Part 2: Customizing the JSP files for the Catalog Entry List widget to add the custom sort option

About this task

Procedure

  1. Create a custom version of the Catalog Entry List widget, if you do not already have one. By creating a custom version, you avoid potentially overwriting your customization with future WebSphere Commerce updates.
  2. Open your custom UI provider JSP fragment for the Catalog Entry List widget.
    Tip: For the default Catalog Entry List widget, this JSP fragment is at the following path:
    • WebSphere Commerce DeveloperWCDE_installdir\workspace\Stores\WebContent\widgetdir\com.ibm.commerce.store.widgets.CatalogEntryList\CatalogEntryList_UI.jspf
  3. Find the lines of code that define the existing sort options in the SORT BY list in the widget.

    For the default Catalog Entry List widget, the lines of code are shown here:

    
    <div class="sorting_view_controls_container">
      <div class="sorting_controls">
        <span class="order_by_label"><label for="orderBy${widgetSuffix}">
            <fmt:message key="SN_SORT_BY" bundle="${widgetText}"/></label>:</span>
        <div id="orderByDropdown${widgetSuffix}" class="orderByDropdown selectWrapper">
            <select data-dojo-type="dijit/form/Select" title="<fmt:message key='SN_SORT_BY_USAGE' bundle='${widgetText}'/>" 
                    id="orderBy${widgetSuffix}" baseClass="dijitSelect dijitValidationTextBox orderBySelect" name="orderBy" 
                    onChange="javaScript:setCurrentId('orderBy${widgetSuffix}');SearchBasedNavigationDisplayJS.sortResults(this.value)">
              <option <c:if test="${sortBy == ''}">selected="selected"</c:if> value = "0"><fmt:message key="SN_NO_SORT" bundle="${widgetText}"/></option>
              <option <c:if test="${sortBy == '1'}">selected="selected"</c:if> value = "1"><fmt:message key="SN_SORT_BY_BRANDS" bundle="${widgetText}"/></option>
              <option <c:if test="${sortBy == '2'}">selected="selected"</c:if> value = "2"><fmt:message key="SN_SORT_BY_NAME" bundle="${widgetText}"/></option>
              <c:if test="${globalpricemode == 1}">
                <option <c:if test="${sortBy == '3'}">selected="selected"</c:if> value = "3"><fmt:message key="SN_SORT_LOW_TO_HIGH" bundle="${widgetText}"/></option>
                <option <c:if test="${sortBy == '4'}">selected="selected"</c:if> value = "4"><fmt:message key="SN_SORT_HIGH_TO_LOW" bundle="${widgetText}"/></option>
              </c:if>
            </select>
        </div>
    ... 
  4. As a child element of the <select> element, add the code to define your custom sort option.

    For example, this line of code references a custom sort field that is defined in the extended wc-search.xml file with a name of 5:

    <option <c:if test="${sortBy == '5'}">selected="selected"</c:if> value = "5"><fmt:message key="SN_SORT_BY_PARTNUMBER" bundle="${widgetText}"/></option>

    If you prefer not to use a resource bundle for your widget, you can hardcode the text for the sort option, as shown here:

    <option <c:if test="${sortBy == '5'}">selected="selected"</c:if> value = "5">Part Number</option>
  5. Save and close the UI provider JSP fragment.
  6. If you referenced a resource bundle in step 4, add the message key for the text for your sort option in the storefront to the resource bundle for your widget.
    For example, if you want to display the words Part Number in the SORT BY list, you must add a line similar to the following example to the properties file:
    SN_SORT_BY_PART_NUMBER = Part Number
    
    Tip: For the default Catalog Entry List widget, the English properties file that defines the widget text is at the following path:
    • WebSphere Commerce DeveloperWCDE_installdir\workspace\Stores\WebContent\widgetdir\properties\widgettext_en_US.properties
  7. Open your custom data provider JSP fragment for the Catalog Entry List widget.
    Tip: For the default Catalog Entry List widget, this JSP fragment is at the following path:
    • WebSphere Commerce DeveloperWCDE_installdir\workspace\Stores\WebContent\widgetdir\com.ibm.commerce.store.widgets.CatalogEntryList\CatalogEntryList_Data.jspf
  8. Find the following lines of code:
    <c:choose>
    <%-- param.sortBy is from widget property --%>
    <c:when test="${not empty param.sortBy}" >
      <c:if test="${(globalpricemode == 1 && param.sortBy != '0') || param.sortBy == '1' || param.sortBy == '2' || param.sortBy == '3' || param.sortBy == '4'}">
        <c:set var="sortBy" value="${param.sortBy}" scope="request"/> 1
      </c:if >
    </c:when>
    <c:when test="${not empty param.orderBy}" >
      <c:if test="${(globalpricemode == 1 && param.orderBy != '0') || param.orderBy == '1' || param.orderBy == '2' || param.orderBy == '3' || param.orderBy == '4'}">
        <c:set var="sortBy" value="${param.orderBy}" scope="request"/> 2
      </c:if >
    </c:when>
    </c:choose>

    The line that is labeled 1 sets the sort option on the store page according to the Initial sort order field for the Catalog Entry List widget. Management Center users configure this field when they add the widget to a layout in the Commerce Composer tool.

    The line that is labeled 2 sets the sort option on the store page when the shopper selects from the SORT BY list.

  9. Add the parameter for your custom sort option to the list of parameters.
    In the following code snippet, || param.sortBy == '5' is added to both conditions:
    <c:choose>
    <%-- param.sortBy is from widget property --%>
    <c:when test="${not empty param.sortBy}" >
      <c:if test="${(globalpricemode == 1 && param.sortBy != '0') || param.sortBy == '1' || param.sortBy == '2' || param.sortBy == '3' || param.sortBy == '4' || param.sortBy == '5'}">
        <c:set var="sortBy" value="${param.sortBy}" scope="request"/>
      </c:if >
    </c:when>
    <c:when test="${not empty param.orderBy}" >
      <c:if test="${(globalpricemode == 1 && param.orderBy != '0') || param.orderBy == '1' || param.orderBy == '2' || param.orderBy == '3' || param.orderBy == '4' || param.sortBy == '5'}">
        <c:set var="sortBy" value="${param.orderBy}" scope="request"/>
      </c:if >
    </c:when>
    </c:choose>
  10. Save and close the file.

Part 3: Adding the custom sort option to the widget properties view in Management Center

When Management Center users create a layout that uses the Catalog Entry List widget, they can set certain display properties for the widget. The Initial sort order property controls how products are sorted in the widget on the store page before the shopper chooses a different sort option. You must add your custom sort option to the object definition for the Catalog Entry List widget if you want Management Center users to be able to select the option in the Commerce Composer tool.


Sort By list for product listings and search results

Procedure

  1. Open your custom object definition file for the Catalog Entry List widget.
    Tip: For the default Catalog Entry List widget, the object definition is at the following path:
    • WebSphere Commerce DeveloperWCDE_installdir/LOBTools/WebContent/config/commerce/pagelayout/widgetDefinitions/ProductListingWidget/WidgetObjectDefinition.def
  2. Find the lines of code that define the existing options for the Initial sort order property.

    For the default Catalog Entry List widget, the lines of code are shown here:

    ...
    <PropertyDefinition propertyName="xWidgetProp_sortBy">
       <PropertyValue displayName="${plmPageLayoutResources.productListingWidgetOrderBy_Relevance}" value="0" />
       <PropertyValue displayName="${plmPageLayoutResources.productListingWidgetOrderBy_Brands}" value="1" />
       <PropertyValue displayName="${plmPageLayoutResources.productListingWidgetOrderBy_Name}" value="2" />
       <PropertyValue displayName="${plmPageLayoutResources.productListingWidgetOrderBy_LowToHigh}" value="3" />
       <PropertyValue displayName="${plmPageLayoutResources.productListingWidgetOrderBy_HighToLow}" value="4" />
    </PropertyDefinition>
    ... 
  3. Add a property value for your custom sort option.
    For example, the following line labeled 5 adds a property value to set the initial sort order to Part number:
    ...
    <PropertyDefinition propertyName="xWidgetProp_sortBy">
       <PropertyValue displayName="${plmPageLayoutResources.productListingWidgetOrderBy_Relevance}" value="0" />
       <PropertyValue displayName="${plmPageLayoutResources.productListingWidgetOrderBy_Brands}" value="1" />
       <PropertyValue displayName="${plmPageLayoutResources.productListingWidgetOrderBy_Name}" value="2" />
       <PropertyValue displayName="${plmPageLayoutResources.productListingWidgetOrderBy_LowToHigh}" value="3" />
       <PropertyValue displayName="${plmPageLayoutResources.productListingWidgetOrderBy_HighToLow}" value="4" />
    5 <PropertyValue displayName="${plmPageLayoutResources.productListingWidgetOrderBy_PartNumber}" value="5" />
    </PropertyDefinition>
    ... 
  4. If you referenced a resource bundle in step 3, add the message key for the text to the resource bundle for your widget.
    For example, if you want to display the words Part number in the Initial sort order property, you must add a line similar to the following example to the properties file:
    productListingWidgetOrderBy_PartNumber=Part number
    Tip: For the default Catalog Entry List widget, the English properties file that defines the widget text is at the following path:
    • WebSphere Commerce DeveloperWCDE_installdir\workspace\LOBTools\src\com\ibm\commerce\pagelayout\client\lobtools\properties\PageLayoutLOB_en_US.properties

    If you prefer not to use a resource bundle for your widget, you can hardcode the text for the sort option, as shown here:

    <PropertyValue displayName="Part number" value="5" />
  5. Save and close the file.
  6. Right-click the LOBTools project; then click Build OpenLaszlo Project to produce an updated ManagementCenter.swf file under the workspace_dir\LOBTools\WebContent directory.
  7. Restart the server.

Part 4: Test the results of the customization in the storefront.

Procedure

  1. In a browser, go to the URL for your store.
  2. Do a search by entering a search term. When the search results page is displayed, in the Catalog Entry List widget, confirm that the SORT BY list displays your custom sort option and that the sort works as expected.
  3. Navigate to a subcategory that contains products. In the Catalog Entry List widget, confirm that the SORT BY list displays your custom sort option and that the sort works as expected.

What to do next

Deploy your customized files to the production environment.