Creating and registering the new JSP files to display Recipe information
In this lesson, you create a Recipe
link on the Aurora starter store header which displays recipe collections,
the recipes inside each collection, and then the recipe details.
About this task
In the Aurora starter store, CSS and <div> tags
are used for styling and page layout in the JSP files. In this lesson,
you create the following JSP files:
- RecipeProjectsDisplay.jsp
This JSP file is the page that is displayed when a user clicks the Recipes link from anywhere within the store. It contains the links to all the Recipe Collections, as well as links to the Recipes that do not belong to a Collection. Recipe Collections link to the RecipeCollectionDisplay.jsp file, and Recipes that do not belong to a Collection link to the RecipeDisplay.jsp file.
- RecipeCollectionDisplay.jsp
This JSP file contains the links to the Recipes that are within a Recipe Collection. At most, five Recipes are displayed at a time, with back and forward navigation links to go to the previous or next five recipes. Each link goes to the RecipeDisplay.jsp file.
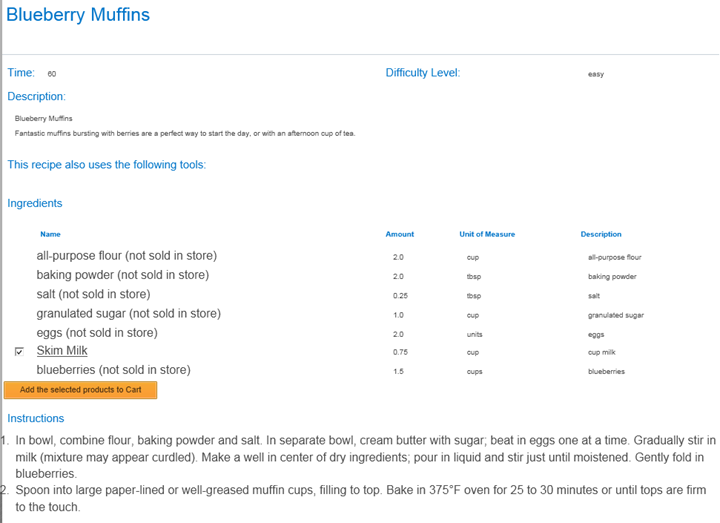
- RecipeDisplay.jsp
This JSP file displays the detail information such as name, description, materials, and instructions for a Recipe.
Procedure
- Create a get-data-config file by following
the Tutorial:
Creating new expression builders to process Recipe service requests.
Note: The Aurora starter store uses the GetData tag to retrieve data objects from a WebSphere Commerce service. For more information, see Overview of the get-data-config.xml file.
- Extend the storefront properties file.
You can isolate the translated text from the JSP source code with a properties file. Each language has a separate properties file that is loaded based on the user's language selection.
- In the Enterprise Explorer view, expand Stores. Right-click the Stores folder and click Refresh.
- In the Enterprise Explorer view, expand Stores > Java Resources: src > Aurora
-
In the storetext_v2.properties file, add the
following code to the end of the file.
#Project Properties
ProjectCollectionsType = Recipe Collections
ProjectCollectionIntro = Collections convieniently group together similar recipes.
ProjectsType = Recipes
UnassignedProjects = The following recipes do not belong to any collection:
EmptyCollection = This Collection contains no recipes.
NextCollections = More...
PreviousCollections = Previous...
ProjectTime = Time:
ProjectDifficulty = Difficulty Level:
ProjectDescription = Description:
ProjectMaterials = Ingredients
MaterialsIdentifier = Name
MaterialsAmount = Amount
MaterialsAmountUnit = Unit of Measure
MaterialsDescription = Description
MaterialsNotSold = (not sold in store)
ProjectToolsIntro = This recipe also uses the following tools:
ProjectInstructions = Instructions
InstructionIsOptional = (Optional step)
ProjectAddtoCart = Add the selected products to Cart
ProjectAddtoCartSucessInfo=These selected products have been successfully added to your shopping cart
ProjectListTitle=This product is used in the following recipes:
ProjectPopupTitle=Recipe Quick info
NO_SELECTED_PRODUCTS=Please select products
Note: The store uses a single properties file storetext.properties to store translated text. Translated text can be used in a JSP file using the JSTL message tag.For example, to display the text for the key "abc", use the following tag in your JSP:<fmt:message key="abc" bundle="${storeText}"/>{storeText}is a variable of store text resource bundle and is defined in the JSTLEnvironmentSetup.jspf file. - Save the file.
- Optional: If you want to support other languages, repeat step 2 for the locale-specific properties file (storetext_locale.properties). You must also translate all the values in the file to the corresponding language.
- Create the Layouts JSP files.
- In the Enterprise Explorer view, expand Stores > WebContent > Aurora > Layouts.
- Right-click the Layouts folder and select Import > File system.
- Click Next, then click Browse and navigate to TutorialSource\Stores\WebContent\Aurora\Layouts, where TutorialSource is the location where you extracted the Tutorial sample source code. Select the following JSP files only: RecipeCollectionDisplay.jsp, RecipeDisplay.jsp, and RecipeProjectsDisplay.jsp. Click Finish to import the files.
- Open the JSP files and examine the contents.
- Edit the CSS file to include style definition.
The style of <div> tags used in the JSP files will be defined in the CSS file.
- In the Enterprise Explorer view, expand Stores > WebContent > Aurora > css
- In the common1_1.css file, add
the following code to the end of the file.
/* -----------------------------------------------------------------------------*/ /* 34.Recipe /* -----------------------------------------------------------------------------*/ .Recipe_area { border-top:solid 1px #c6d0dc; padding-top:10px; margin: 0; } .Recipe_label_1 { height:35px; padding-left:5px; font-size:25px; color: #007bc8; } .Recipe_label_2 { height:30px; padding-left:5px; font-size:15px; color: #007bc8; } .Recipe_label_3 { height:25px; padding-left:5px; font-size:10px; color: #007bc8; font-weight: bold; } .Recipe_content_1 { height:18px; padding-left:15px; font-size:10px; } .Recipe_content_longdescription { height:40px; padding-left:15px; font-size:10px; } .Recipe_content_2 { height:18px; padding-left:25px; font-size:10px; } .Recipe_link_1 { height:30px; padding-left:30px; font-size:15px; } #recipe_popup { width: 498px; position: absolute; display:block; z-index: 9999; background-image: url('../images/colors/color1/transparent.gif'); background-repeat:no-repeat; } #recipe_popup .top_left{ background-image: url('../images/colors/color1/popup_topleft.png'); background-repeat:no-repeat; height:10px; width:8px; float:left; } #recipe_popup .top_right{ background-image: url('../images/colors/color1/popup_topright.png'); background-repeat:no-repeat; background-position:right; height:10px; width: 490px; float:left; } #recipe_popup .header { background-image: url('../images/colors/color1/popup_center_tile.png'); background-repeat:repeat-y; text-align: right; height: 23px; clear:left; } #recipe_popup .close { padding: 5px 15px 2px 0px; color: #666666; } #recipe_popup .close .icon{ padding-top: 2px; padding-left: 4px; float: right; } #recipe_popup .bodycontent { background-image: url('../images/colors/color1/popup_center_tile.png'); background-repeat:repeat-y; margin: 0; padding: 0 0 15px 0; } #recipe_popup .footer { text-align: right; height: 14px; width: 498px; } #recipe_popup .footer .bot_left{ background-image: url('../images/colors/color1/popup_botleft.png'); background-repeat:no-repeat; height:14px; width:8px; float:left; } #recipe_popup .footer .bot_right{ background-image: url('../images/colors/color1/popup_botright.png'); background-repeat:no-repeat; background-position:right; height:14px; width: 490px; float:left; } .Popup_Recipe_area { border-top:solid 1px #c6d0dc; background-image: url('../images/colors/color1/popup_center_tile.png'); padding-top:10px; float:left; margin: 0; width: 498px; } #recipe_popup .dijitDialogTitleBar{ display: none; } - Optional: If you want to support other languages, add the preceding style definition code into the CSS file that is defined for the corresponding language. Example language specific CSS files are common1_1iw_IL.css, common1_1ja_JP.css, common1_1ko_KR.css, common1_1zh_CN.css, common1_1zh_TW.css
- Create the JSP files in the Widgets folder:
- In the Enterprise Explorer view, expand Stores > WebContent > Aurora > Widgets.
- Right-click the Widgets folder and select New > Folder.
- In the Folder name field, enter RecipeCollection and click Finish.
- Right-click the RecipeCollection folder and select Import > File System.
- Click Next, then click Browse and navigate to TutorialSource\Stores\WebContent\Aurora\Widgets\RecipeCollection, where TutorialSource is the location where you extracted the Tutorial sample source code. Select the following JSP files:RecipeCollection.jsp, RecipeCollection_Data.jsp, and RecipeCollect_UI.jsp. Click Finish to import the files.
- Open the JSP files and examine the contents.
- Right-click the Widgets folder and select New > Folder.
- In the Folder name field, enter RecipeDetail and click Finish.
- Right-click the RecipeDetail folder and select Import > File System.
- Click Next, then click Browse and navigate to TutorialSource\Stores\WebContent\Aurora\Widgets\RecipeDetail, where TutorialSource is the location where you extracted the Tutorial sample source code. Select the following JSP files: RecipeDetail.jsp, RecipeDetail_Data.jsp, and RecipeDetail_UI.jsp. Click Finish to import the files.
- Open the JSP files and examine the contents.
- Right-click the Widgets folder and select New > Folder.
- In the Folder name field, enter RecipeProjects and click Finish.
- Right-click the RecipeProjects folder and select Import > File System.
- Click Next, then click Browse and navigate to TutorialSource\Stores\WebContent\Aurora\Widgets\RecipeProjects, where TutorialSource is the location where you extracted the Tutorial sample source code. Select the following JSP files: RecipeProjects.jsp, RecipeProjects_Data.jsp, and RecipeProjects_UI.jsp. Click Finish to import the files.
- Open the JSP files and examine the contents.
- Register the JSP files in the Struts configuration file.
The JSP files must be registered in the Struts configuration file to be recognized by the WebSphere Commerce framework. Modifying the Struts configuration associates the new views with the JSP files.
- In the Enterprise Explorer view, expand Stores > WebContent > WEB-INF
- In the struts-config-ext.xml file,
add the following code to the global forward section, which is found
at the beginning of the file.
<forward className="com.ibm.commerce.struts.ECActionForward" name="RecipeSection/11301" path="/Layouts/RecipeProjectsDisplay.jsp"/>
<forward className="com.ibm.commerce.struts.ECActionForward" name="RecipeCollection/11301" path="/Layouts/RecipeCollectionDisplay.jsp"/>
<forward className="com.ibm.commerce.struts.ECActionForward" name="RecipeDisplay/11301" path="/Layouts/RecipeDisplay.jsp"/>
Note: 11301 is the store ID. Replace it with your actual store ID. To locate your store ID, connect to the development database, http://localhost/webapp/wcs/admin/servlet/db.jsp. Run the sql
Note the value in the column store id for the store that you are working with.select * from storeent; - In the struts-config-ext.xml file,
add following code to the action mappings section, which is found
at the bottom of the file.
<action path="/RecipeSection" type="com.ibm.commerce.struts.BaseAction"/>
<action path="/RecipeCollection" type="com.ibm.commerce.struts.BaseAction"/>
<action path="/RecipeDisplay" type="com.ibm.commerce.struts.BaseAction"/>
- Create access control policies for the JSP files.
By default, only site administrators can access the new views. Create access control policies for each view to allow general access to the JSP files that you created.
- Stop the WebSphere Commerce Server.
- Copy the TutorialSource\xml\policies\xml\RecipeCommands.xml file into the WCDE_installdir\xml\policies\xml directory.
- At the command prompt, run the following command from
the WCDE_installdir\bin directory:
acpload RecipeCommands.xmlNote: Depending on your WebSphere Commerce developer database setup, additionalacploadarguments might be needed. See acpload utility.
- Modify the store header to include a recipe section.
- In the Enterprise Explorer view, expand Stores > WebContent > Aurora > Widgets > Header.
- Open the following file:
 Header_UI.jsp
 Header_UI.jspf
- Search for the following code:
After the code, add the following code:<span class="masthead_links_item"> <a id="StoreLocatorLink" href="${StoreLocatorView}"><fmt:message key="HEADER_STORE_LOCATOR"/> /a> </span> </flow:ifEnabled><fmt:message key="DIVIDING_BAR"/> <span class="masthead_links_item"> <a id="RecipeLink" href="<c:out value='${RecipeProjectsURL}'/>"> <fmt:message key="ProjectsType"/> </a> </span> - Save the file.
- In the Enterprise Explorer view, expand Stores > WebContent > Aurora > Widgets > Header.
- Right-click the Header folder and select New > Folder.
- In the Folder name field, enter ext and click Finish.
- Right-click the ext folder and select Import > File System.
- Click Next > Browse. Navigate to TutorialSource\Stores\WebContent\Aurora\Widgets\Header\ext, where TutorialSource is the location where you extracted the Tutorial sample source code. Select the JSP file, Header_Data.jsp. Click Finish to import the file.
- Rename the Header_Data.jsp file
to Header_Data.jspf
- Open the JSP file and examine the contents.
A recipe header section is added to the header after you complete this step. - Verify customization.
- In the Enterprise Explorer view, right-click Stores, the click Refresh.
- Start the WebSphere Commerce test server
- Right-click the WebSphere Commerce Test Server and click Publish
- Prepare data for verification. To set up associations between Recipe and Catalog entries, run the following SQL statement:
INSERT INTO XPRJMTRCATREL (XPRJMTR_ID,CATENTRY_ID,STOREENT_ID) values(2025,11269,11301);
INSERT INTO XPRJCATREL (XPROJECT_ID,CATENTRY_ID,STOREENT_ID) values (2003,11271,11301);
Tip: You also can create these associations by using the Recipe tool in Management Center.Note: The storeent_id and catentry_id values in the query might be different depending on the store. - Browse the Aurora starter store. Confirm that a recipe
link now exists on the Homepage.

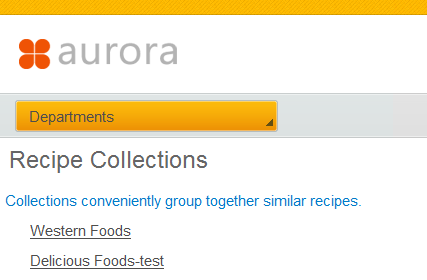
- Click the Recipes link and confirm
that a Recipe Collections list is displayed.
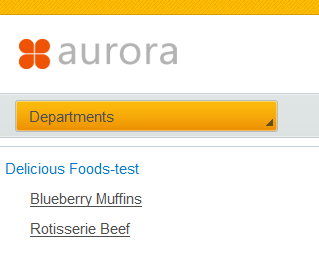
- Select a collection and confirm that a recipes list
is displayed.
- Select a recipe and confirm that recipe detail content
is displayed.