Creating Automatic Computer Groups
To create a group that automatically enlists computers, follow this procedure.
- Click Tools > Create New Automatic Group.
- From the Create New Automatic
Computer Group dialog, enter the name of your group and select
the site and domain you want it to be located in.
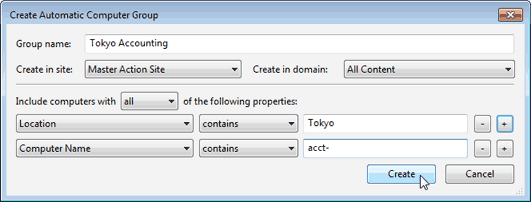
- Enter a property, a relation, and a value into the three boxes at the bottom of the dialog. For example, to create a group that automatically enlists Windows computers, select OS contains Win. Click the + button to add new properties that you can AND (include all properties) or OR (include any properties) together to identify group membership.
- When you are finished, click Create to propagate the group settings.
You now have a new Automatic Computer Group that is listed under the Computer Groups icon in the Domain Panel navigation tree and can be used to subdivide your network into more workable chunks. Unlike Manual Groups, which are statically defined, Automatic Groups change their population depending on the evaluation of the group properties.