Registering the HP-UX download plug-in
Use the Manage Download Plug-ins dashboard to register the download plug-in for HP-UX.
Before you begin
- Subscribe to the Patching Support site to gain access to the Manage Download Plug-ins dashboard.
- Activate the Encryption Analysis for Clients analysis, which is available from the BES Support site.
- Activate the Download Plug-in Versions analysis, which is available from the Patching Support site.
- If you want to encrypt endpoints, deploy the Enable Encryption for Clients Fixlet, which is available from the BES Support site.
When you register the download plug-in on a computer without the plug-in, the plug-in is automatically installed and the configuration file is created.
If the download plug-in is already installed on the computer, the configuration file is overwritten.
Procedure
- From the Patch Management domain, click .
-
From the Servers and Relays table, select the server on which the download plug-in is to be
registered.
Important: You must always register the download plug-in on the BigFix server.
- From the Plug-ins table, select HP-UX Plug-in.
- Click Register.The Register HP-UX Plug-in wizard displays.
Figure 1. Register HP-UX download plug-in wizard 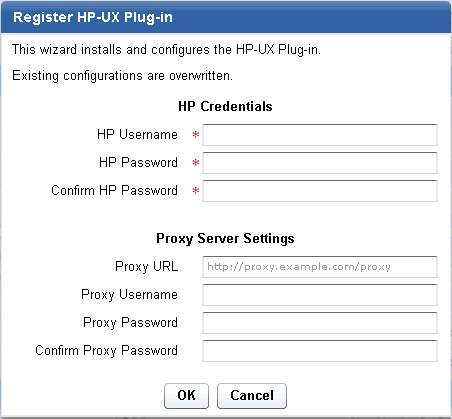
- Enter the HP credentials that you use to log on to the
HP Support site.
- HP Username
- Your HP account user name to the HP Support site. It must have a valid support identifier to download patches.
- HP Password
- Your HP account password to the HP Support site.
- Confirm HP Password
- Your HP account password for confirmation.
- Enter the proxy parameters if the
downloads must go through a proxy server.Note: Only basic authentication is supported.
- Proxy URL
- The URL of your proxy server. It must be a well-formed URL, which
contains a protocol and a host name. The URL is usually the IP address
or DNS name of your proxy server and its port, which is separated
by a colon. For example:
http://192.168.100.10:8080.
- Proxy Username
- Your proxy user name if your proxy server requires authentication.
It is usually in the form of
domain\username.
- Proxy Password
- Your proxy password if your proxy server requires authentication.
- Confirm Proxy Password
- Your proxy password for confirmation.
- Click OK.The Take Action dialog displays.
- Select the target computer.
- Click OK.