Setting and removing the declared metric quantity
![]() Available from 9.2.16. On the All Metrics report, you can
manually declare the metric quantity for selected license types for which BigFix Inventory does not calculate the utilization. You can also use
this option to customize the metric quantity if needed. The declared value takes precedence over the
value that is measured by the application.
Available from 9.2.16. On the All Metrics report, you can
manually declare the metric quantity for selected license types for which BigFix Inventory does not calculate the utilization. You can also use
this option to customize the metric quantity if needed. The declared value takes precedence over the
value that is measured by the application.
Before you begin
 You must have the Manage License Metrics and the Manage Software Bundling permissions to
set the license metric quantity.
You must have the Manage License Metrics and the Manage Software Bundling permissions to
set the license metric quantity.About this task
You can check which of your license metric quantities can be customized. Look at the pencil icon
 in the
Metric Quantity column. If the icon is active, you can declare the custom
metric quantity for the product.
in the
Metric Quantity column. If the icon is active, you can declare the custom
metric quantity for the product.
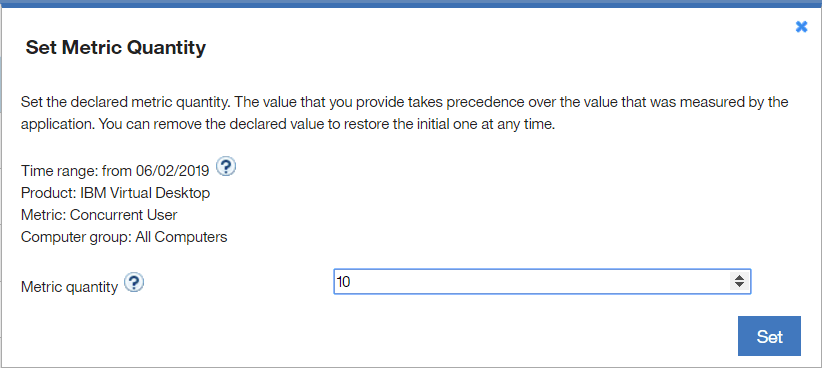
By default, you set the declared value from the reporting start date onwards. However when you explicitly provide also the end date for the report, then the declared metric quantity is set only until this date. Using this mechanism, you can declare metric quantities for any period of time by defining the appropriate time range for the report.
Procedure
- Open the All Metrics report.
- Optional: To change the period for which you want to set the declared metric
quantity, hover over the Manage Report View icon
 , and click Configure View. Then, select the time range. If you
specify a period from a date to a date, the license metric quantity is set only for this particular
period of time.
, and click Configure View. Then, select the time range. If you
specify a period from a date to a date, the license metric quantity is set only for this particular
period of time. - To set the metric quantity, click the pencil icon () in the Metric Quantity
column.
 Note: In case of FlexPoint bundles, you can set the license metric quantities for particular products that contribute to the bundle but not for the bundle itself. Click on the name of the bundle to see the detailed report that lists the products within bundle.
 - Specify the metric quantity and click Set. The value is set only
for the computer group to which you are assigned and is not inherited by its subgroups.
 Note: If you want to set a metric quantity for a subgroup of your computer group, go to and open the subgroup. In the upper left corner, select All Metrics and set the license metric quantity for a particular product.
Results
The metric quantity for the product is set.
The declared metric quantity is independent of your software inventory or bundling and you should make sure that it is kept up-to-date. If you reassign software to another product or FlexPoint bundle, the declared metric quantity remains unchanged. If, as a result of reassignment, a product is left with no components, it is still visible on the All Metrics report with the declared metric quantity.
Removing the declared metric quantity
You can remove the declared value to restore the value that is measured by the application.
Procedure
- Open the report.
- To remove the declared metric quantity, click the pencil icon () in the Metric
Quantity column.
- Clear the text field to remove the declared metric quantity for the specified period of time.
- Click Set.